
Product Overview

2/12/2018 GitHub - PiSupply/PiJuice: Resources for PiJuice HAT for Raspberry Pi - use your Pi Anywhere
https://github.com/PiSupply/PiJuice 2/5
This is particularly indicated for Raspbian Lite or an headless installation.
Please refer to oursoftware sectionto find out more.
Basic functionality
Once the battery is slotted into place (make sure you remove the little plastic battery isolation tab
too!) LED1 will start blinking in green. This doesn't mean your Raspberry Pi is yet receiving power it is
just telling you that the PiJuice MCU is receiving power and is in standby.
Power On and Off the Pi
If you wish to start your Raspberry Pi using the PiJuice SW1 you'll have to connect the micro USB to
the PiJuice directly.
To power on the Raspberry Pi single press SW1 briefly as you would for a click of a mouse. If the micro
USB is directly connected to the Raspberry Pi then it will power up immediately without you needing
to press the SW1. To power off press and keep pressed SW1 for about 10 seconds. A "halt" command
will be received by the OS and the Raspberry Pi will shut down in the proper manner. To remove
power to the Pi press and keep pressed SW1 for at least 20 seconds. This will remove power from the
Raspberry Pi without issuing a "power off" command to the OS. This approach should only be used in
case nothing else works or if the OS is mounted in read only mode otherwise data on SD card may be
corrupted.
Providing power to the board
PiJuice can recharge its on board battery in several ways and via different power sources. The most
common approach is to use the standard Raspberry Pi PSU or a micro USB PSU with similar
characteristics but solar panels, wind mills, and other renewable power sources can be used too. When
the PiJuice is installed over the Raspberry Pi you can power both the Pi and PiJuice via either the Pi's
micro USB or the PiJuice's one. That's because the power lines on the GPIO header are shared by both
boards and this allows to effectively be able to charge the battery independently from which micro
USB connector you use. Other ways of providing power to the PiJuice is directly via the GPIO pin
headers or one of the other connectors on board. See thehardware sectionfor more information.
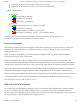
Buttons and LEDs
SW1 and LED1 have predefined default functions associated.
SW1- Power button:
Single brief press to power on.