PiFace Control & Display A Plug and Play Device to control Raspberry Pi Exclusively From Quick Start Guide Version 1.
Table Of Contents Page No 1. Overview 2 2. Fitting the PiFace Control & Display 2 3. Configuring your Raspberry Pi 3 4. Installing PiFace Control and Display Software 3 4.1 PiFace Control and Display Software 4.2 Troubleshooting 5. Setting up your IR remote with PiFace Control & Display 5.1 Setting up your Infrared 5.
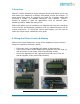
1. Overview PiFace™ Control & Display is a plug and play device that allows you to use and control your Raspberry Pi without a keyboard, mouse and monitor. It saves space and power by removing the need for a monitor whilst still providing a simple, yet capable interactive user interface. PiFace™ Control & Display is ideal for applications such as internet radio, streaming media, XBMC and many more.
3. Configuring your Raspberry Pi To use PiFace Control & Display you need to enable your Raspberry Pi’s SPI port, do this by opening a Terminal window and entering the following command: sudo raspi-config Use your keyboard’s arrow keys to select "Option 8 Advanced Options" to view the list of advanced configuration options. Choose the A5 SPI option, set this to then select then . 4. Installing PiFace Control and Display Software 4.
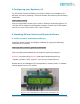
4.2 Troubleshooting If your LCD has nothing appearing on it or its character spaces are all black, try adjusting the contrast screw with a small star head screwdriver. 5. Setting up your IR remote with PiFace Control & Display Want to control your PiFace Control and Display with your remote? Now you can, simply follow below steps: 5.
Add these lines to the end of the file: lirc_dev lirc_rpi gpio_in_pin=23 Save your changes, press Ctrl-x then Y and enter. To set up your pi to receive IR data from PIFace CAD, first backup the previous Linux Infrared Remote Control configuration with: cp /etc/lirc/hardware.conf ~/. Then edit the configuration using sudo nano /etc/lirc/hardware.conf So it looks like the following: # /etc/lirc/hardware.
The highlighted text are the parts that will need changing, though it’s worth checking the rest of the text incase you have a different initial configuration. Save your changes by pressing Ctrl-x then Y Reboot your Pi and then log back in: sudo reboot 5.2 Setting up your Remote The /etc/lirc/lircd.conf file tells LIRC about your remote control. Since every remote control is different, you need to download or generate a config for each remote.
After you have finished, reboot using: sudo reboot Once you have logged in, test your remote using the command: irw Your commands will appear in the console when you press buttons on your remote. Press Ctrl-c to exit this.