Pi Supply The Maker Emporium https://www.pi-supply.
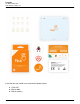
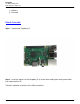
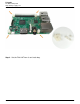
Pi Supply The Maker Emporium https://www.pi-supply.com 3 Stickers 2 Info card Board Assembly Step 1 - Unpack your Raspberry Pi. Step 2 - Install the spacers on the Raspberry Pi as shown here holding them with 4 plastic bolts from underneath the Pi. The bolts should be screwed in with a PH0 screwdriver.
Pi Supply The Maker Emporium https://www.pi-supply.com Step 3 - Get the Flick HAT from its anti-static bag.
Pi Supply The Maker Emporium https://www.pi-supply.com Step 4 - Place the Flick HAT on top of the Raspberry Pi by gently pushing the female header onto the Raspberry Pi male header.
Pi Supply The Maker Emporium https://www.pi-supply.com Step 5 - Screw the last 4 plastic bolts to hold the Flick HAT in place.
Pi Supply The Maker Emporium https://www.pi-supply.com If you have acquired the Flick HAT case please skip to the next Section – Flick HAT Case assembly (Coming soon).