
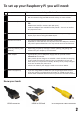
User's Manual


3
WARNINGS
n
This product shall only be connected to an external power supply rated at 5V dc, and a minimum current of 500-700mA for
model A and 700-1200mA for model B. Any external power supply used with the Raspberry-Pi shall comply with relevant regula
-
ons and standards applicable in the country of intended use.
n
This product should not be overclocked as this may make certain components very hot.
n
This product should be operated in a well venlated environment and the case should not be covered.
n
This product should be placed on a stable, at, non-conducve surface in use and should not be contacted by conducve items.
n
The connecon of unapproved devices to the GPIO connector may aect compliance or result in damage to the unit and invali-
date the warranty.
n
All peripherals used with the Raspberry Pi should comply with relevant standards for the country of use and be marked accord-
ingly to ensure that safety and performance requirements are met. These arcles include but are not limited to keyboards,
monitors, and mice used in conjuncon with the Raspberry Pi.
n
Where peripherals are connected that do not include the cable or connector, the cable or connector used must oer adequate
insulaon and operaon in order that the requirements of the relevant performance and safety requirements are met.
INSTRUCTIONS FOR SAFE USE
n
Do not expose it to water, moisture or place on a conducve surface whilst in operaon.
n
Do not expose it to heat from any source; the Raspberry Pi is designed for reliable operaon at normal ambient room tempera-
tures.
n
Take care whilst handling to avoid mechanical or electrical damage to the printed circuit board and connectors.
n
Avoid handling the printed circuit board while it is powered. Only handle by the edges to minimise the risk of electrostac dis-
charge damage.
n
The Raspberry Pi is not designed to be powered from a USB port on other connected equipment, if this is aempted it may
malfuncon.
PREPARING YOUR SD CARD FOR THE RASPBERRY PI
In order to use your Raspberry Pi, you will need to install an Operang System (OS) onto an SD card. An Operang System
is the set of basic programs and ulies that allow your computer to run; examples include Windows on a PC or OSX on a
Mac.
These instrucons will guide you through installing a recovery program on your SD card that will allow you to easily install
dierent OS’s and to recover your card if you break it.
1. Insert an SD card that is 4GB or greater in size into your computer
2. Format the SD card so that the Pi can read it
a. Windows
i. Download the SD Associaon’s Formang Tool from hps://www.sdcard.org/downloads/formaer_4/eula_
windows/
ii. Install and run the Formang Tool on your machine
iii. Set “FORMAT SIZE ADJUSTMENT” opon to “ON” in the “Opons” menu iv. Check that the SD card you inserted
matches the one selected by the Tool v. Click the “Format” buon
b. Mac
i. Download the SD Associaon’s Formang Tool from hps://www.sdcard.org/downloads/formaer_4/eula_
mac/
ii. Install and run the Formang Tool on your machine
iii. Select “Overwrite Format”
iv. Check that the SD card you inserted matches the one selected by the Tool
v. Click the “Format” buon
c. Linux
i. We recommend using gparted (or the command line version parted)
3. Format the enre disk as FAT 3. Download the New Out Of Box Soware (NOOBS) from:
downloads.raspberrypi.org/noobs