
Instructions
Courtesy of the Raspberry Pi Foundation
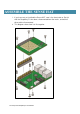
3. First, put the GPIO extension header block onto the Raspberry Pi GPIO pins.
4. Screw the hexagon stand-offs to the Raspberry Pi itself, by threading the
screws through from the bottom and turning the hexagon stand-offs between
finger and thumb.
5. Next, insert the Sense HAT into the GPIO pin extension header. The corner
holes should line up with the hexagon stand-offs.
6. Lastly, put the remaining screws through from the top.
7. Use a small Phillips screwdriver to tighten each corner stand-off individually.
They don't need to be especially tight, just enough to ensure that the HAT
doesn't become loose.