
User's Manual


Chapter 3: Multi-Platform Client and Raritan Remote Client
67
Set Scan Group
a port scanning feature that searches for selected targets and displays
them in a slide show view, allowing you to monitor up to 32 targets at
one time. You can connect to targets or focus on a specific target as
needed. Scans can include standard targets, blade servers, tiered
Dominion devices, and KVM switch ports.
Note: Scanning for tiered devices is not supported by the Multi-Platform
Client (MPC).
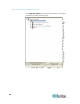
When you start a scan, the Port Scan window opens. As each target is
found, it is displayed as a thumbnail in a slide show. The slide show
scrolls through the target thumbnails based on the default interval of 10
seconds or according to the interval you specify. As the scan scrolls
through the targets, the target that is the focus of the slide show displays
in the center of the page. See Scan Settings (on page 31)
You can change the time between the slide show thumbnail rotation, the
thumbnail focus interval, and the page display settings from the Scan
Settings tab of the Virtual KVM Client (VKC), Active KVM Client (AKC)
and Multi-Platform Client (MPC) Tools > Options dialog. See Scan
Settings (on page 31).
The name of the target is displayed below its thumbnail and in the task
bar at the bottom of the window. If a target is busy, a blank screen is
displayed instead of the target server access page.
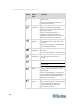
The status of each target is indicated by green, yellow and red lights that
are displayed below the target thumbnail and, as the target is the focus
of the rotation, in the task bar. The status lights indicate the following:
Green - the target is up/idle or up/connected
Yellow - the target is down but connected
Red - the target is down/idle, busy, or otherwise not accessible
Note: This feature is only supported by the KX II.
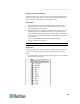
To begin a scan in MPC:
1. Click on Set Scan at the bottom of the Navigator.
2. From the list of targets in the Navigator, use Ctrl + click select each
target you want to include in the scan, or use Shift + click to select a
range of targets.
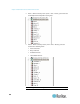
3. Once you've selected all the targets to include in the scan, right click
next to the selected targets and select Start Scan. The targets
detected in the scan are displayed.