
User's Manual

Chapter 2: Virtual KVM Client (VKC) and Active KVM Client (AKC)
35
2. Connect to the target from the Port Access page.
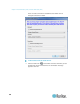
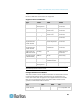
3. Once connected, click the Audio icon in the toolbar. The
Connect Audio Device dialog appears. A list of available audio
device connected to the remote client PC is displayed.
Note: If there are no available audio devices connected to the remote
client PC, the Audio icon is grayed out. .
4. Check Connect Playback Device if you are connecting to a playback
device.
5. Select the device that you wish to connect from the drop-down list.
6. Select the audio format for the playback device from the Format:
drop-down.
Note: Select the format that you wish to use based on the available
network bandwidth. Formats with lower sampling rates consume less
bandwidth and may tolerate more network congestion.
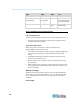
7. Check Connect Recording Device if you are connecting a recording
device.
8. Select the device that you wish to connect from the drop-down list.
9. Select the audio format for the recording device from the Format:
drop-down.
10. Click OK. If the audio connection is established, a confirmation
message appears. Click OK.
If the connection was not established, an error message appears.