
User's Manual


Chapter 2: Virtual KVM Client (VKC) and Active KVM Client (AKC)
18
Adjusting Video Settings
Use the Video Settings command to manually adjust the video settings.
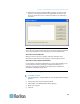
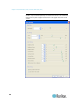
To change the video settings:
1. Choose Video > Video Settings or click the Video Settings button
in the toolbar to open the Video Settings dialog.
2. Adjust the following settings as required. As you adjust the settings
the effects are immediately visible:
a. Noise Filter
The device can filter out the electrical interference of video output
from graphics cards. This feature optimizes picture quality and
reduces bandwidth. Higher settings transmit variant pixels only if
a large color variation exists in comparison to the neighboring
pixels. However, setting the threshold too high can result in the
unintentional filtering of desired screen changes.
Lower settings transmit most pixel changes. Setting this
threshold too low can result in higher bandwidth use.
b. PLL Settings
Clock - Controls how quickly video pixels are displayed across
the video screen. Changes made to clock settings cause the
video image to stretch or shrink horizontally. Odd number
settings are recommended. Under most circumstances this
setting should not be changed because the autodetect is usually
quite accurate.
Phase - Phase values range from 0 to 31 and will wrap around.
Stop at the phase value that produces the best video image for
the active target server.
c. Brightness: Use this setting to adjust the brightness of the target
server display.
d. Brightness Red - Controls the brightness of the target server
display for the red signal.
e. Brightness Green - Controls the brightness of the green signal.
f. Brightness Blue - Controls the brightness of the blue signal.
g. Contrast Red - Controls the red signal contrast.
h. Contrast Green - Controls the green signal.
i. Contrast Blue - Controls the blue signal.
If the video image looks extremely blurry or unfocused, the
settings for clock and phase can be adjusted until a better image
appears on the active target server.