
User's Manual


Chapter 3: Multi-Platform Client and Raritan Remote Client
137
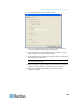
c. Select Pin Menu Toolbar if you want the toolbar to remain visible
on the target when it is in Full Screen mode. By default, while the
target is in Full Screen mode, the menu is only visible when you
hover your mouse along the top of the screen.
3. Click OK.
Scan Settings
The KX II and LX provide a port scanning feature that searches for
selected targets and displays them in a slide show view, allowing you to
monitor up to 32 targets at one time. You can connect to targets or focus
on a specific target as needed. Scans can include standard targets,
blade servers, tiered Dominion devices, and KVM switch ports. See
Scanning Ports. Use the Scan Settings tab to customize the scan interval
and default display options.
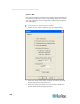
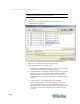
To set scan settings:
1. Click Tools > Options. The Options dialog appears.
2. Select the Scan Settings tab.
3. In the "Display Interval (10-255 sec):" field, specify the number of
seconds you want the target that is in focus to display in the center of
the Port Scan window.
4. In the "Interval Between Ports (10 - 255 sec):" field, specify the
interval at which the device should pause between ports.
5. In the Display section, change the default display options for the
thumbnail size and split orientation of the Port Scan window.
6. Click OK.
Options in MPC for KX II-101 and KX G1
The Options available in the Tools menu allow you to customize scroll
borders, mouse mode settings, Single Cursor mode, auto color
calibration, hot key configuration, keyboard type, broadcast port, and
logging.
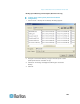
To configure the general options in MPC:
1. Choose Tools > Options. The Options dialog appears and displays
the General tab by default.
General Options
2. Select the "Show scroll borders" checkbox to view the thin scroll
borders designating the autoscroll area.
3. Select the "Auto-Sync mouse in two-cursor mode" checkbox to
enable automatic mouse synchronization.