
User's Manual


Chapter 3: Multi-Platform Client and Raritan Remote Client
136
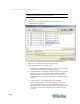
2. Select the Advanced tab to configure advanced options.
3. From the KVM Switch OSUI Hot Key section, select the hot key to
use when switching between target server displays.
4. Enter the HTTPS port and Discovery Port.
5. Select the Enable IPv6 Networking checkbox for IPv6 to enable IPv4
and IPv6 dual-stack operation.
6. Select the Enable Logging checkbox only if directed to by Technical
Support. This option creates a log file in your home directory.
7. Click OK.
Client Launch Settings
Configuring client launch settings allows you to define the screen
settings for a KVM session.
Note: LX devices support this feature in MPC. LX does not support client
launch setting in VKC and AKC.
To configure client launch settings:
1. Click Tools > Options. The Options dialog appears.
2. Click on the Client Launch Settings tab.
To configure the target window settings:
a. Select 'Standard - sized to target Resolution' to open the window
using the target's current resolution. If the target resolution is
greater than the client resolution, the target window covers as
much screen area as possible and scroll bars are added (if
needed).
b. Select Full Screen to open the target window in full screen mode.
To configure the monitor on which the target viewer is launched:
a. Select 'Monitor Client Was Launched from' if you want the target
viewer to be launched using the same display as the application
that is being used on the client (for example, a web browser or
applet).
b. Use Select From Detected Monitors to select from a list of
monitors that are currently detected by the application. If a
previously selected monitor is no longer detected, 'Currently
Selected Monitor Not Detected' is displayed.
To configure additional launch settings:
a. Select Enable Single Cursor Mode to enable single mouse mode
as the default mouse mode when the server is accessed.
b. Select Enable Scale Video to automatically scale the display on
the target server when it is accessed.