
User's Manual


Chapter 3: Multi-Platform Client and Raritan Remote Client
109
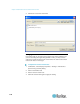
c. Brightness: Use this setting to adjust the brightness of the target
server display.
d. Brightness Red - Controls the brightness of the target server
display for the red signal.
e. Brightness Green - Controls the brightness of the green signal.
f. Brightness Blue - Controls the brightness of the blue signal.
g. Contrast Red - Controls the red signal contrast.
h. Contrast Green - Controls the green signal.
i. Contrast Blue - Controls the blue signal.
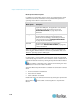
If the video image looks extremely blurry or unfocused, the
settings for clock and phase can be adjusted until a better image
appears on the active target server.
Warning: Exercise caution when changing the Clock and Phase
settings. Doing so may result in lost or distorted video and you may
not be able to return to the previous state. Contact Raritan Technical
Support before making any changes.
j. Horizontal Offset - Controls the horizontal positioning of the
target server display on your monitor.
k. Vertical Offset - Controls the vertical positioning of the target
server display on your monitor.
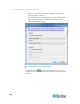
Using Screenshot from Target
You are able to take a screenshot of a target server using the
Screenshot from Target server command. If needed, save this
screenshot to a file location of your choosing as a bitmap, JPEG or PNG
file.
To take a screenshot of the target server:
1. Select Video > Screenshot from Target or click the Screenshot from
Target button on the toolbar.
2. In the Save dialog, choose the location to save the file, name the file,
and select a file format from the 'Files of type' drop-down.