
User's Manual


Chapter 2: Installing and Configuring the EMX Device
26
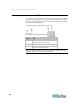
Diagram key
EMX-111
Category 5e/6 cable (Cat5e/6 cable)
12V Feature Port X-Cable (X-cable)
To connect asset sensors to the EMX-111 device:
1. Affix the adhesive end of an asset tag to each IT device through the
tag's tape.
2. Plug the connector on the other end of each asset tag into the
corresponding tag port on the asset sensor.
3. Connect one end of a Cat5e/6 cable to the RJ-45 connector on the
MASTER asset sensor. The EMX-111 supports a maximum of
10-meters of cable connecting each asset sensor assembly.
4. Connect the other end of the Cat5e/6 cable into the in-line Cat5e/6
connector on the X-cable.
5. Connect the ethernet end of the X-cable into the FEATURE port on
the EMX-111 device.
6. Plug the sensor cable of the X-cable into the SENSOR port on the
EMX-111. This supplies power to the asset sensor assembly from
the SENSOR port via the Cat5e/6 cable.
Note: If sensors need to be connected to the EMX via the SENSOR
port, plug them into the SENSOR connector on the X-cable. If no
sensors are connected, this connector can remain empty.
7. Configure the asset sensor. See Configuring the Asset Sensor (on
page 330).
All LEDs on the asset sensor assembly may cycle through different
colors during the power-on process if the asset sensor's firmware is
being upgraded by the EMX device. After the power-on or firmware
upgrade process completes, the LEDs show solid colors. Note that the
LED color of the tag ports with asset tags connected will be different from
the LED color of the tag ports without asset tags connected.