
Install Manual
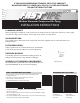

1) CUT PIPE TO LENGTH with tubing cutter (cut must be square)
(DO NOT USE HACKSAW)
•
PIPE SEALANT
which prevents thread galling.
• CHECK
time
• for initial installation, pressurize system slowly to 50psi and check for leaks, then
pressurize slowly to MAX 190psi
• take extra precaution with END CAP INSTALLATION, double check these fittings
are tightened fully
• FASTPIPE can be bent to conform around minor obstacles to a maximum of 15
degrees. DO NOT OVERBEND
• USE JUMPER HOSE at the air compressor to absorb vibration
• ONLY FastPipe outlets are designed for the direct pulling force of air hoses, for other
FastPipe fittings attached to hoses, always secure hose with a STRAIN RELIEF,
attached to the building structure
•
then make sure all the
cone nuts are tight as these may have loosened due to settling of the component
•
e system
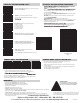
• system must be de-pressurized before installing, wear eye protection
• the drop can be used in any position on the pipe
• avoid putting the hole at the bottom of the pipe to prevent condensate or debris to
enter the drop pipe
• to prevent chips from entering the pipe interior, stop drilling occasionally and blow
out chips, grease the end of the drilling tool
• allen wrench for tightening is 6mm size
1) Position saddle drop opposite the side of the pipe that needs the hole
Tighten securely and mark the pipe by the raised locating mark on the fitting
edge
2) Drill thru one side of pipe with the drill bit, using the hole
3) Insert the saddle drop gasket into the molded cavity
4) Position the saddle drop over the drilled hole with aligning marks, tighten securely
5) Attach the necessary drop pipe or threaded adapter
* Compressed air is DANGEROUS if not used properly
• Always use EYE PROTECTION when using compressed air
• DO NOT POINT compressed air at your body or any person
• Pressurize system SLOWLY
• TURN OFF air compressor when not in use
• CHECK local building codes before installation
• CA PROP 65: This product contains chemicals, including lead, known to the State of California to cause birth defects or
other reproductive harm. Wash hands after handling.
• ALWAYS RELIEVE the system pressure when installing or performing maintenance
• Systems must have a SAFETY RELIEF valve installed at the compressed air source to prevent over pressurization
• When using FastPipe in direct sunlight, cover or paint the poly
covering and can be exposed)
2) DEBURR the end of the pipe outside and inside
(a smooth edge allows easy fitting assembly and no damage to
3) MARK END OF PIPE for the proper insertion depth
3/4” Fitting: 2 inches
1” Fitting: 2-3/4 inches
1-1/2” Fitting: 4 inches
2” Fitting: 4-3/4 inches
3” Fitting: 4-1/2 inches
4) WET END OF PIPE with a very diluted soapy water
DO NOT USE ANY OIL OR GREASE LUBRICANT
5) LOOSEN FITTING CONE NUT PARTIALLY
LOOK INSIDE EACH FITTING FOR INNER PARTS
(inner parts, o-ring, stainless steel bite ring)
6) INSERT PIPE into fitting until pipe bottoms out
HAND TIGHTEN fitting
FULLY TIGHTEN fitting with FASTPIPE spanner wrenches
FASTPIPE INSTALLATION STEPS FASTPIPE INSTALLATION GUIDELINES
SADDLE DROP INSTALLATION TIPS SADDLE DROP INSTALLATION
WARNINGS
Front of block is ported
1/2” NPT Female
(x2)
7-2016 Rev 3
Engineered Specialties, LLC • Auburndale, WI • 800-954-3310
For installation tips and warranty information, please visit www.rapidairproducts.com
STEP 1
STEP 2
STEP 3
STEP 4
STEP 5
STEP 6
STEP 1
STEP 2 STEP 3 STEP 4
Moisture
Drain
TAB MUST ALIGN TO NOTCH
CONTAINS LEAD
MAY BE HARMFUL IF EATEN OR CHEWED.
MAY GENERATE DUST CONTAINING LEAD.
KEEP OUT OF THE REACH OF CHILDREN.
We hope the Rapidair system blesses your life, thanks for the purchase.
We thank Jesus Christ, who made the ultimate purchase, our salvation
thru His death. Read the Bible, you will be amazed at what you find.