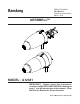
Ransburg SERVICE MANUAL LN-9264-08.2 (Replaces LN-9264-08.1) March - 2013 AEROBELLTM MODEL: A12381 IMPORTANT: Before using this equipment, carefully read SAFETY PRECAUTIONS, starting on page 1, and all instructions in this manual. Keep this Service Manual for future reference. Service Manual Price: $50.00 (U.S.
Ransburg Aerobell NOTE: This manual replaces LN-9264-08.1. LN-9264-08.
Ransburg Aerobell - Contents CONTENTS SAFETY: PAGE 1-5 SAFETY PRECAUTIONS............................................................................................................1 HAZARDS / SAFEGUARDS........................................................................................................ 2-5 INTRODUCTION: 6-23 FEATURES...................................................................................................................................6 GENERAL DESCRIPTION..............
Aerobell - Contents Ransburg CONTENTS (Cont.) PAGE MAINTENANCE: 38-63 O-RINGS...................................................................................................................................... 38-40 PREVENTIVE MAINTENANCE................................................................................................... 40-41 AIR FILTERS / ELEMENT REPLACEMENT............................................................................... 42 BELL CUP CLEANINGS...........................
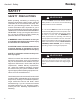
Ransburg Aerobell - Safety SAFETY SAFETY PRECAUTIONS Before operating, maintaining or servicing any Ransburg electrostatic coating system, read and understand all of the technical and safety literature for your Ransburg products. This manual contains information that is important for you to know and understand. This information relates to USER SAFETY and PREVENTING EQUIPMENT PROBLEMS. To help you recognize this information, we use the following symbols. Please pay particular attention to these sections.
Ransburg Aerobell - Safety AREA HAZARD Spray Area Fire Hazard Tells where hazards may occur. Tells what the hazard is. Improper or inadequate operation and maintenance procedures will cause a fire hazard. Protection against inadvertent arcing that is capable of causing fire or explosion is lost if any safety interlocks are disabled during operation. Frequent Power Supply or Controller shutdown indicates a problem in the system requiring correction. SAFEGUARDS Tells how to avoid the hazard.
Ransburg Aerobell - Safety AREA Tells where hazards may occur. Spray Area HAZARD Tells what the hazard is. SAFEGUARDS Tells how to avoid the hazard. Explosion Hazard Improper or inadequate operation and maintenance procedures will cause a fire hazard. Protection against inadvertent arcing that is capable of causing fire or explosion is lost if any safety interlocks are disabled during operation. Frequent Power Supply or Controller shutdown indicates a problem in the system requiring correction.
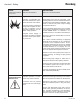
Ransburg AREA Tells where hazards may occur. Spray Area / High Voltage Equipment Aerobell - Safety HAZARD Tells what the hazard is. SAFEGUARDS Tells how to avoid the hazard. Electrical Discharge There is a high voltage device that can induce an electrical charge on ungrounded objects which is capable of igniting coating materials. Inadequate grounding will cause a spark hazard. A spark can ignite many coating materials and cause a fire or explosion.
Ransburg Aerobell - Safety AREA Tells where hazards may occur. Electrical Equipment HAZARD Tells what the hazard is. Tells how to avoid the hazard. Electrical Discharge High voltage equipment is utilized in the process. Arcing in the vicinity of flammable or combustible materials may occur. Personnel are exposed to high voltage during operation and maintenance. Protection against inadvertent arcing that may cause a fire or explosion is lost if safety circuits are disabled during operation.
Ransburg Aerobell - Introduction INTRODUCTION FEATURES GENERAL DESCRIPTION Features which make the Aerobell™ advantageous for use in rotary atomizer electrostatic applications include: • Fast color change due to center feed fluid delivery and integral air brake The Ransburg Aerobell is a high speed bell type atomizer for electrostatic application of conventional and high solids coating materials. It is available in several combinations.
Ransburg Aerobell - Introduction SPECIFICATIONS Mechanical Turbine Speed: 10,000-60,000 rpm max. Turbine Type: Impulse - Front Exhaust Weight: (See outline drawings) Fluid Flow Rate: 500 cc's/max. (paint or solvent) Rotator Atomizer Change Time: (Quick Change Time) Approx. 20 sec. Length & Diameter: (See outline drawings) Bell Change Time: Approx. 40 sec. Turbine Air Consumption: (See "Turbine Speed Charts" in this section.) Bell Cleaning Time: Approx. 2-3 sec.
Ransburg LN-9264-08.
Aerobell - Introduction 9 Ransburg LN-9264-08.
Ransburg LN-9264-08.
Aerobell - Introduction 11 Ransburg LN-9264-08.
Ransburg LN-9264-08.
Aerobell - Introduction 13 Ransburg LN-9264-08.
Ransburg LN-9264-08.
Aerobell - Introduction 15 Ransburg LN-9264-08.
Ransburg LN-9264-08.
Aerobell - Introduction 17 Ransburg LN-9264-08.
Ransburg LN-9264-08.
Aerobell - Introduction 19 Ransburg LN-9264-08.
Ransburg Aerobell - Introduction IMPORTANT NUMBERS NOTES Record these numbers in a log book for future reference. The last digits of the Atomizer serial number are also the Turbine serial numbers. TURBINE SERIAL NUMBER SERIAL NUMBER LN-9264-08.
Ransburg Aerobell - Introduction Figure 1: Aerobell Models Recommended Air Filtration 21 LN-9264-08.
Ransburg 100 100 0 0 100 0 0 100 Aerobell - Introduction Figure 2: Typical Multiple Applicator Configuration MicroPak and RansPak 1000 Cascade LN-9264-08.
Ransburg Aerobell - Introduction Figure 3: Typical Multiple Applicator Configuration Voltage Master 2 and PulseTrack 2 Speed Control 23 LN-9264-08.
Ransburg Aerobell - Installation INSTALLATION ! WARNING > Risk of arcing/fire hazard. The Aerobell must be located a safe distance from the object to be sprayed, as well as all other grounded objects. The safe distance is at least 1-inch per 10kV of electrostatic voltage. Example: If the Aerobell is used with 100kV applied voltage, it must be at least 10-inches from the object to prevent arcing. The Aerobell shipping container includes the basic atomizer assembly with bell and manifold.
Ransburg Aerobell - Installation AIR FILTRATION REQUIREMENTS Ransburg Filter Model No. Description / Specifications Replacement Element Part No. HAF-515 Pre-filter, removes coarse amounts of oil, moisture and dirt. Used upstream of RPM-417 pre-filter (used in systems with poor air quality). HAF-5 Element, One RPM-417 Pre-filter, coalescing type, 136 SCFM, 98.5% efficiency particulate removal .3 to .6 micron, max. aerosol passed 1.0 micron, max. solid passed .
Ransburg AIR HEATER REQUIREMENTS Turbine drive air expands as it moves through the turbine wheel cavity and as it exits the turbine from the exhaust port. This expansion will cause cooling of the exhaust air and the surfaces it contacts. This same expansion cooling can occur across the shaping air exit ports. This cooling effect can cause surface temperatures to fall below the dew point of the booth, which will result in condensation on the interior and exterior of the atomizer, machine, and its components.
Ransburg Aerobell - Installation CCV STYLE TURBINE AIR 12MM TUBING TURBINE AIR 1/2 INCH TUBING BEARING AIR RETURN 1/4 INCH TUBING BEARING AIR RETURN 1/4 INCH TUBING BEARING AIR SUPPLY 1/4 INCH TUBING BEARING AIR SUPPLY 1/4 INCH TUBING FIBER OPTIC CONNECTION FIBER OPTIC CONNECTION SHAPE AIR 3/8 INCH TUBING SHAPE AIR 10MM TUBING BRAKE AIR 10MM TUBING BRAKE AIR 3/8 INCH TUBING METRIC TUBING CONNECTIONS FRACTIONAL TUBING CONNECTIONS MCV STYLE BEARING AIR SUPPLY 1/4 INCH TUBING FIBER OPTIC CONNECTION
LN-9264-08.
Ransburg Aerobell - Installation PAINT INLET REF. PAINT INLET 1/8-27 NPT VALVE PILOT AIR, TYP. ALL VALVES 1/8-27 NPT VALVE FLUID INLET, TYP. ALL VALVES 1/8-27 NPT VALVE PILOT AIR, TYP. ALL VALVES 1/8-27 NPT VALVE FLUID INLET, TYP. ALL VALVES 1/8-27 NPT A12383-01/-02 3-WAY VALVE WITH CCV SOLVENT VALVE PAINT RE-CIRCULATION OUTLET 1/8-27 NPT PAINT INLET REF. A12382-01/-02 3-WAY VALVE Figure 7: 3-Way Valves 29 LN-9264-08.
Ransburg Aerobell - Installation AIR CONNECTIONS ! CAUTION > Provisions should also be made to assure WARNING ! > Arcing/fire hazard exists if ungrounded metal connections (air or fluid) are used in the spray area. Use plastic non-conductive connections, or ensure metal connections are at ground potential. (See Figures 5, 6, and 7 for tubing connections and sizes.) ! CAUTION > Do not use tape or pipe dope on any air fittings beyond the final air filter for BEARING AIR.
Ransburg Aerobell - Installation HIGH VOLTAGE (See Figures 2 and 3 "Typical Multiple Application Configurations" in the "Introduction" section.) INTERLOCKS The following system interlocks are recommended to prevent equipment damage: 1. Bearing air should remain on at all times and should be shut off only by turning off the main air to the pneumatic control cabinet. ! CAUTION > When the turbine air is turned off, the turbine will continue to operate or "coast down" for about two minutes.
Ransburg 6. Any other interlocks required by local code, national code, or international code. 7. High voltage must be interlocked with the booth entry door. HIGH VOLTAGE CABLE ASSEMBLIES General Instructions 1. When routing cable, ensure that no chaffing, binding, or pulling on the cable will occur. Maintain at least a 4-inch bend radius. When possible, sleeve cable with the appropriate sized tubing for external cable protection. Torsion stress should be minimized. 2.
Ransburg Aerobell - Installation Slide the fitting and start threading on to the high voltage cascade tube threads. (Each piece of the fitting may have to be slid into place starting with the sleeve followed by the plastic gripper and then the nut.) Insert the high voltag e cable through the back of the nut all the way through the nut assembly to the banana plug socket in the splitter body. Turn the nut hand tight. Wrench tighten the nut 1/2 turn. Wrench tighten the nut 1/2 turn.
Ransburg Aerobell - Installation High Voltage Cable Assembly Instructions (Instructions for assembling components when using High Voltage Cable SSW-1064) 1. Measure and cut cable to desired length. Make sure ends are cut square. 2. Thread banana plug assembly (EPS-4245) into the cable (SSW-1064) by hand for two turns. Make sure to start on center of cable. 3. Take a 5/16" deep well nut driver and slip it over the banana plug and cable.
Ransburg Aerobell - Operation OPERATION WARNING ! Operators must be fully trained in safe operation of electrostatic equipment. Operators must read all instructions and safety precautions prior to using this equipment (reference NFPA33). > As with any spray finishing system, operation of the Aerobell involves properly setting the operating parameters to obtain the best finish quality for the coating material being sprayed, while maintaining correct operation and reliability of the equipment used.
Ransburg Aerobell - Operation BRAKE AIR Brake air is used to slow the turbine speed. It is advantageous for short color change cycle times, and may be used for stopping the turbine. Use of the brake involves (1) turning off turbine drive air, and then (2) turning the brake air on for a short duration. For example, the air brake will reduce the turbine speed as shown in "Braking Time" chart. Braking Time (at 90 psi Brake Air Pressure) To Brake From (RPM) Seconds (Approx.
Ransburg Aerobell - Operation Fluid Flow Rate Check In the test mode, the flow rate can be measured by removing the bell cup from the atomizer, turning the fluid flow on, and capturing the material in a graduated beaker or measuring cup for a fixed period of time (shaping air, high voltage, and turbine air must be off). ! WARNING > Danger of shock and/or personal injury can occur. Proper grounding procedures must be followed.
Ransburg Aerobell - Maintenance MAINTENANCE WARNING ! > lectrical shock/arcing and fire hazards can exist during maintenance. The high voltage must be turned off before entering the spray area and performing any maintenance procedures. Spray booth exhaust fan(s) should remain on while cleaning the equipment with solvents. > Never touch the atomizer bell while it is spinning. The front edge can easily cut into human skin. Make sure the atomizer bell has stopped spinning before attempting to touch it.
Ransburg Aerobell - Maintenance 3. Flushing should be done with the atomizer bell cup installed. The bell cup will normally be fully cleaned with flushing. However, if there is any remaining paint build up on any areas of the bell after flushing, the bell should be removed for hand cleaning. 4. Clean the bell cup by soaking in an appropriate solvent as long as necessary to loosen paint. Use a soft bristle brush dipped in solvent to remove paint.
Ransburg Vibration Noise If the Aerobell is vibrating or making an unusually loud noise, it usually means there is an imbalance situation. The atomizer bell may have dried paint on it, or the bell may be physically damaged, or there may be paint trapped between the bell and shaft preventing the bell from properly seating. If any of these conditions exist, they must be corrected. Excessive imbalance caused by one of these conditions may result in bearing damage and turbine failure.
Ransburg Aerobell - Maintenance To Clean the Fluid Tube and Bell Cup Using microvalve style manifold, open solvent valve by applying 70-100 psi (482-689 kPa) air pressure to valve pilot line. Fluid will flow through fluid tube into bell cup. Time will be determined by solvent ability to clean sprayed material. Do not spray solvent with voltage on! Atomizer must be spinning at least 10,000 rpm. Using a CCV valve configuration, apply 50-100 psi (345-689 kPa) air pressure to CCV solvent valve pilot.
Ransburg Aerobell - Maintenance AIR FILTERS / ELEMENT REPLACEMENT ! CAUTION > Introducing air which contains oil, mois- ture, and dirt may cause wear and damage to the bearings. It is the user's responsibility to monitor the quality of air and to replace the filter elements as often as necessary. Turbine failure caused by poor air quality will not be covered under warranty. In plants where heavy amounts of oil and moisture vapor are present in the air lines, a refrigerated air dryer may be necessary.
Aerobell - Maintenance Ransburg Bell Cup Soaking 11. It is recommended that extra bell cups be purchased. The cups can then be cleaned off-line in an automated cup cleaner when the second set is in production. Manual Inspection 12. Reinstall cups to proper torque 50-70 lbs•in (5.64-7.91 Nm). Bell cups and splash plates can be soaked in a heated solution for up to 2 hours in an ultrasonic cleaner (120°F (49°C) maximum). 3. Visually inspect the bell cup edge for signs of abrasion.
Ransburg Aerobell - Maintenance AEROBELL PREVENTIVE MAINTENANCE SCHEDULE Frequency Procedure Mid Shift Cleaning • Wipe shroud • Visually inspect cup MidShift Weekly 2 Weeks Monthly 3 Months 6 Months X X X X Bell Cup Removal/ Inspection/Cleaning/ Tightening X X Fluid Tube Inspection/ Cleaning X X Inspect Valve and Seat Assembly for Leaking X Replace Valves and/or Seats in Valve Module or CCV Valve X High Voltage Cable Inspections X X X High Voltage Testing Regreasing of High Voltag
Ransburg Aerobell - Maintenance AEROBELL PREVENTIVE MAINTENANCE SCHEDULE Frequency Procedure MidShift Inspect and Clean Spindle, Bore, and Fluid Tube OD Inspect for Fluid Leaks Low Voltage Cable Inspection 45 End of Shift X Weekly 2 Weeks Monthly 3 Months 6 Months Yearly X Daily X LN-9264-08.
Ransburg Aerobell - Maintenance DISASSEMBLY PROCEDURES NOTE > Mean time to repair entire assembly is 60 minutes. Inspect Bell Cup Daily Inspect the splash plate, screws, and bell cup for wear. Check splash plate teeth for wear. If teeth are missing or severely undercut, replace splash plate and screws (see Figure 10). Pay special attention to the center four holes in the splash plate. Look for erosion between the holes. Replace any part if necessary.
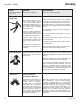
Ransburg Aerobell - Maintenance Shaping Air Cap and Shaping Air Ring Removal, Cleaning, and Reassembly (78297-00 and 78298-00 (70mm)) Remove the shaping air cap and shaping air ring assembly from the atomizer with the RPM-419 wrench. Insert the pin of the wrench into the hole of the shaping air cap. Turn counter-clockwise to remove. Remove the inner shaping air ring by placing the 79005-00 tool into the back of the assembly. Align the pins of the tool with the holes of the shaping air ring.
Ransburg Aerobell - Maintenance RPM-4 and RPM-5 (57mm) Remove the shaping air cap and shaping air ring from the atomizer with the RPM-419 wrench. Insert the pin end of the wrench into the hole of the shaping air ring and remove by turning counter-clockwise. Separate shaping air cap from the shaping air ring by using the RPM-419 wrench. Install the pin end of the wrench into the hole of the shaping air cap and shaping air ring. Remove the shaping air cap by turning counter-clockwise.
Ransburg Aerobell - Maintenance To reassemble, install the shaping air cap on to the shaping air ring with the RMP-419 wrench until the face of the shaping air cap is flush with the shaping air ring. DO NOT OVERTIGHTEN! Inspect parts at the front. The shaping air annulus must be visually even all the way around the entire part. Uneven annulus will cause the spray pattern to be distorted. Reinstall the assembly on to the shaping air manifold.
Ransburg Aerobell - Maintenance 3. Pull quick change rotary atomizer away from the manifold. Do not allow any paint to drip from the manifold into the air ports on the back of the air turbine. ! LRPM-4001-01 Serrated and LRPM-4001-02 Non-Serrated Bell Cup Assembly (70mm) RPM-104-1 BELL CUP 76610-01 SPLASH PLATE 78594-16F SCREW TIGHTEN TO 2-4 LBS/IN (0.23-0.
Ransburg Aerobell - Maintenance CAUTION ! > Disassembly and repair of the turbine during warranty period is not allowed. See “Limited Warranty” in the "Warranty Policy" section of this manual, and also refer to "Aerobell Air Bearing Turbine Assembly" manual for details. Using the seat removal tool (A10766-00), insert the small hex end into the block to engage the seat hex. Using a 3/8" (10mm) socket, end wrench, or adjustable wrench, remove the seat by turning counter-clockwise.
Ransburg Aerobell - Maintenance Seat Replacement FLUID TUBE ASSEMBLY Hand tighten the seat in place. Using a torque wrench with a 3/8" (10mm) socket, torque the valve seats to 15-20 lbs•in (1.7-2.3 Nm). Insert fluid tube into the turbine body bore from the back side. Install and tighten the four (4) SSF-3137 screws to a final torque of 7-10 lbs•in (0.79-1.13 Nm). Install 79001-05 o-ring on to the exposed end of the fluid tube. Make sure this o-ring is not damaged.
Ransburg Aerobell - Maintenance BELL CUP INSTALLATION (ALL) Ensure that shaft taper and threads are clean before installing a bell cup. Also, make sure that the threads and taper on the bell cup are clean. Place one (1) RPM-419 wrench on the flats of the turbine spindle. Use another RPM-419 with a torque wrench fitted into the 3/8" square of the wrench. Hold the shaft while applying pressure to the torque wrench in a clockwise direction.
Ransburg Aerobell - Maintenance SPANNER NUT (1 1/16" ACROSS FLATS) CCV-7 VALVE TOOL TIGHTEN VALVE TO STOP, THEN 1/8-1/4 MORE TURN OR USE A 1 1/16 WRENCH ON THE SPANNER NUT AND TIGHTEN WITH TO A TORQUE OF 132-156 LBS/IN (14.9-17.
Ransburg Aerobell - Maintenance PAINT INLET REF. PAINT INLET 1/8-27 NPT VALVE PILOT AIR, TYP. ALL VALVES 1/8-27 NPT VALVE FLUID INLET, TYP. ALL VALVES 1/8-27 NPT VALVE PILOT AIR, TYP. ALL VALVES 1/8-27 NPT damaged. Align the "black" colored pin on the valve manifold with the groove in the mounting manifold. Press firmly into place. Push down on the front of the clip until it is over the keeper button. Next, push down on the rear of the clip until it snaps into place.
Ransburg Aerobell - Maintenance VALVE MANIFOLD ASSEMBLY/REMOVAL (MCV STYLE) FIBER OPTIC REMOVAL/ REPLACEMENT When removing the quick-disconnect aomizer, the valve manifold assembly may remain in the mounting manifold. To remove, thread two (2) 8532-64C bolts into the threaded holes, 180° apart from each other. Pull valve manifold straight out. (5/16-18 threaded bolts or M8 X 1.25" bolts are sufficient). To remove the fiber optic sensor, grasp the exposed end and turn counter-clockwise.
Ransburg Aerobell - Maintenance MOUNTING RING REMOVAL/REPLACEMENT Remove the three (3) socket head cap screws with a 3/16-inch hex key wrench. Slide ring off back of atomizer. Install mounting ring by lining up the shaping air outlet port approximately with the exposed aluminum area on the back of the turbine body. slide ring onto turbine body. Adjust slightly to line up the screw holes. Install and tighten screws to a final torque of 10-15 lbs•in (1.13-1.70 Nm).
Ransburg Aerobell - Maintenance 57mm and 30mm Styles Remove the front cover of the turbine body by removing the four (4) socket head cap screws with a 2.5mm hex key wrench. Remove white colored seal and blue colored ring. Remove three (3) socket head cap screws from shape air manifold with a 3/16-inch hex key wrench. slide manifold off front of turbine body. NOTE SHROUD REMOVAL/ REPLACEMENT Remove the three (3) screws, spacers, and keeper buttons by using a 1/16-inch hex key wrench.
Ransburg Aerobell - Maintenance TROUBLESHOOTING GUIDE General Problem Bad Spray Pattern Low or No High Voltage Possible Causes Corrective Action 1. Bell cup damaged 1. Replace bell cup. 2. Low voltage 2. See "Low or No High Voltage" below. 3. Bad fluid regulator 3. Repair or replace regulator in system. 4. Paint lodged in shaping air ring 4. Disassemble and clean. 5. Damaged shape air parts 5. Replace parts. 6. Plugged holes in cup 6. Disassemble and clean. 1. High current draw 1.
Ransburg Aerobell - Maintenance TROUBLESHOOTING GUIDE (Cont.) General Problem Low or No High Voltage (Cont.) Low Transfer Efficiency (or light coverage) Possible Causes Corrective Action 7. MicroPak or cascade failure 7. Refer to "MicroPak" manual for detailed "Troubleshooting Guide". 8. Improper color change (i.e., paint or solvent in dump line) 8. Optimize color change. 9. Faulty high voltage connection 9.
Ransburg Aerobell - Maintenance TROUBLESHOOTING GUIDE (Cont.) General Problem No Turbine Air Speed Feedback Fault No Fluid Flow Possible Causes Corrective Action 1. Turbine drive air not present 1. Verify supply air pressure. 2. Bearing air return signal not present 2. a. b. 3. Brake air is activated 3. Remove brake air signal (turbine air and brake air must be interlocked to prevent both from being used simultaneously). 1.
Ransburg Aerobell - Maintenance TROUBLESHOOTING GUIDE (Cont.) General Problem Possible Causes Corrective Action No Fluid Flow (Cont.) 4. Clogged fluid tube 4. Remove and inspect fluid tube. 5. Plugged bell cup 5. disassemble and clean. 6. Worn bell cup splash plate 6. Check splash plate for worn or missing teeth. Replace. 1. Flud valve open 1. a. Remove air pilot signal. b. If still open, replace fluid valve. 2. Fluid valve seat damaged or worn (MCV type) 2. Replace fluid valve seat. 1.
Ransburg Aerobell - Maintenance TROUBLESHOOTING GUIDE (Cont.) 63 General Problem Possible Causes Corrective Action Turbine Cannot Attain Desired Speed 1. Excessive vibration 1. a. b. c. d. Check bell cup for damage. Check bell cup for excessive paint build-up. Bell cup loose - tighten to proper torque. Check cup and shaft tapers for cleanliness. 2. Low or no bearing air 2. a. b. c. e. f. Check bearing air pressure (60 psi minimum) (413.7 kPa). Check filters for contamination.
Ransburg Aerobell - Parts Identification PARTS IDENTIFICATION A12381 AEROBELL MODEL IDENTIFICATION When ordering, use part number as indicated by Tables A, B, C, and D. (Four digits must follow the the basic part number as shown in the example below.
Ransburg 15 6 5 2 REF. 3 PARTS LABELED "H" IN TABLE "A" 17 5 7 16 5 18 8 3X 9 18 4X 3X 11 10 13 3X 14 3X 12 3X Aerobell - Parts Identification Figure 44: A12383 Aerobell Parts 65 LN-9264-08.
Ransburg Aerobell - Parts Identification A12381 AEROBELL - PARTS LIST (Figure 44) Item # Part # 1 2 3 4 5 6 7 8 9 10 11 12 13 14 15 16 17 18 19 Description Table A - "A" RPM-3 Table A - "B" Table A - "C" SSF-317 SSF-3137 RPM-401-1 H-2338 Table B - "D" 79001-05 Table C - "G" SS-7936-NI RPM-14 RPM-21 SSF-4240 Table C - "F" Table A - "H" ---Table C - "E" Qty Bell Cup Shroud Shaping Air Cap Shaping Air Ring Screw, Socket Head Cap, #10-32 X 3/8" Lg. Screw, Socket Head Cap, M3 X .
Ransburg Aerobell - Parts Identification TABLE B - FLUID TUBE ID Dash # Description "D" 00 ---- -- 01 1/16" (1.6mm) Fluid Tube RPM-441 02 3/32" (2.4mm) Fluid Tube RPM-440 03 1/8" (3.
Ransburg Aerobell - Parts Identification SEE TABLE "C" ITEM "E" SEE TABLE "C" ITEMS "E" AND "F" ALL VALVE ASSEMBLIES PLUG INTO THIS PORT AS SHOWN SEE TABLE "D" METRIC OR FRACTIONAL SIZES ITEM "G" SEE TABLE "C" REF. RPM-415 INTERGRATED VALVE MANIFOLD AND MOUNTING MANIFOLD STYLE SEE TABLE "C" REF. RPM-416 SEE TABLE "C" REF. RPM-408 SEE TABLE "C" REF. RPM-409 SEE TABLE "C" REF. A12383 MOUNTING MANIFOLD WITH OPTIONAL VALVE CONFIGURATION STYLES SEE ITEM "F" TABLE "C" SEE TABLE "C" REF.
Ransburg Aerobell - Parts Identification Figure 48: 77602-02 Valve Module Assembly 77602-02 VALVE MODULE ASSEMBLY - PARTS LIST (Figure 48) Item # Part # 1 2 3 4 5 6 7 8 9 10 11 77590-00 78949-00 77367-00 75845-02 79001-07 75845-01 79001-05 75845-01 77591-00 79001-04 79001-14 Description Valve Module Mach.
Ransburg Aerobell - Parts Identification APPLY THIN FILM OF SSL-1001 TO O-RINGS TORQUE FITTINGS TO 8 LBS/IN. (0.90 Nm) TYP. 1 5 6 6 5 7 7 4 4 6 5 7 7 13 12 4 14 7 4 7 7 4 4 4 7 4 11 3 TYP. 3 PLACES 9 TYP. 3 PLACES 2 TYP. 4 PLACES TORQUE TO 60 LBS/IN.
Aerobell - Parts Identification Ransburg Figure 50: RPM-425 Rear Manifold - CCV Style 71 LN-9264-08.
Ransburg Aerobell - Parts Identification Figure 51: RPM-415 1-Valve Assembly Figure 52: RPM-416 2-Valve Assembly - Trigger and Dump LN-9264-08.
Aerobell - Parts Identification Ransburg Figure 53: RPM-408 2-Valve Assembly - Trigger and Solvent Figure 54: RPM-409 3-Valve Assembly - Trigger, Dump, and Solvent 73 LN-9264-08.
Ransburg Aerobell - Parts Identification 1 5 2 5 3 4 VIEW SHOWN AS OPTION A12382-02 Figure 55: 3-Way Valve With CCV Solvent Valve Configuration 3-WAY VALVE WITH CCV SOLVENT VALVE - PARTS LIST (Figure 55) Item # Part # 1 2 3 4 5 "A" A12384-00 79303-00 79304-00 LSFI0033-00 Description Valve Assembly, Fluid, 3-Way Tube, 3/8" ODT X 0.
Ransburg Aerobell - Parts Identification 9 6 8 1 11 2 3 2 4 5 6 7 10 Figure 56: 3-Way Valve Configuration 3-WAY VALVE CONFIGURATION - PARTS LIST - (Figure 56) Item # 1 2 3 4 5 6 7 8 9 10 11 Part # Description "A" LSFI1133-00 A12384-00 79303-00 79304-00 RPM-438 CCV-13 RPM-67 CCV-403-SS CCV-44 SST-8436 Valve Assembly, Fluid, 3-Way Fitting, 3/8" ODT X 9/16" AN, Stainless Steel, Tube Fitting Tube, 3/8" ODT X 0.
Ransburg Aerobell - Parts Identification 2 2 1 1 4 3 1 5 5 3 6 Figure 57: MCV Mounting Manifold Fitting Selection (Metric/Fractional) MCV MOUNTING MANIFOLD FITTING KIT TABLE (METRIC/FRACTIONAL) - (Figure 57) A12388Item 01 Part # # (Fractional) 1 A12389-01 Description Tube Fitting, 5/32" OD Tube X 1/8" Uni. Thread 2 A12389-02 Tube Fitting, 1/4" OD Tube X 1/8" Uni. Thread 3 A12389-04 Tube Fitting, 3/8" OD Tube X 1/4" Uni. Thread 4 A12389-05 Tube Fitting, 1/2" OD Tube X 1/4" Uni.
Ransburg Aerobell - Parts Identification 2 SSP-6079 REF. 1 Figure 58: CCV Mounting Manifold Fitting Selection (Metric/Fractional) CCV MOUNTING MANIFOLD FITTING KIT TABLE (METRIC/FRACTIONAL) - (Figure 58) A12392Item 01 Part # # (Fractional) Description A12392-02 Part # (Metric) Description Qty. Where Used 1 SSP-6071 1/2" OD Tube X 3/8" NPT A12389-11 12mm OD Tube X 3/8" Uni. Thread 1 Turbine Air 2 SSP-6066 3/8" OD Tube X 1/4" NPT A12389-09 10mm OD Tube X 1/4" Uni.
Ransburg Aerobell - Parts Identification AEROBELL RECOMMENDED SPARE PARTS Part # Description RPM-401-1 KK-4458 H-2338 SSF-3137 79001-05 SMC-424-XX A10560-XX Qty. Air Bearing Turbine Draw Latch Repair Kit Tubing, 3/8" OD X 1/4" ID, Polyethylene Screw, M3 X .5" X 8mm Long, Socket Head Cap O-Ring, Solvent Proof Fiber Optic Cable High Voltage Cable Select Option Below - Fluid Tube RPM-439 1/8" ID (3.18mm) RPM-440 3/32" ID (2.36mm) RPM-441 1/16" ID (1.
Aerobell - Parts Identification Ransburg AEROBELL RECOMMENDED SPARE PARTS (Cont.) Part # CCV-403-SS RPM-103 CCV-403-SS SSP-440 RPM-61 CCV-403-SS RPM-61 CCV-403-SS RPM-61 SSP-440 18283-01 18283-02 79304-00 18283-01 18283-02 CCV-403-SS 79304-00 79 Description CCV Valve Configurations Selection - RPM-415 1-Valve Assy.
Ransburg Aerobell - Parts Identification ACCESSORIES Part # Description LSCH0009-00 Dielectrice Grease (.88 oz.
Ransburg Aerobell - Parts Identification SERVICE KITS Part # Description KK-4461 Rebuild Kit, Air Bearing KK-4462 RPM Motor Screw Kit KK-4463 Air Bearing Screw Kit RPM-32 Pre-Filter Replace Element RPM-33 Bearing Air Filter Element A11545-00 O-Ring Lubricant (20. oz. Jar) KK-4913-00 Fiber Optic Maintenance Kit (Repair) A11565-00 White, Stretch, Lint Free Covers Figure 60: 78152 High Voltage Splitter 81 LN-9264-08.
Ransburg Aerobell - Parts Identification AVAILABLE TOOLS LN-9264-08.
Ransburg Aerobell - Warranty Policies WARRANTY POLICIES LIMITED WARRANTY Ransburg will replace or repair without charge any part and/or equipment that falls within the specified time (see below) because of faulty workmanship or material, provided that the equipment has been used and maintained in accordance with Ransburg's written safety and operating instructions, and has been used under normal operating conditions. Normal wear items are excluded.
Ransburg LN-9264-08.
Service Manual Price: $50.00 (U.S.) Manufacturing 1910 North Wayne Street Angola, Indiana 46703-9100 Telephone: 260/665-8800 Fax: 260/665-8516 www.ransburg.com Technical/Service Assistance Telephone: 800/ 626-3565 Fax: 419/470-2040 Telephone: 800/ 233-3366 Fax: 419/ 470-2071 Technical Support Representative will direct you to the appropriate telephone number for ordering Spare Parts. © 2013 Ransburg. All rights reserved. Models and specifications subject to change without notice. Form No.