
Product Manual

23
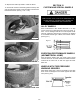
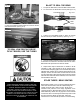
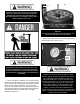
4. Place tire over wheel and move Vertical Arm and Mount/
Demount Head into position as described earlier. Position
tire so that the lower bead is above the left side of the
Mount/ Demount Head and below the right front knob. (See
Fig 13.4)
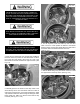
5. Manually push the tire down into the drop center of the
wheel directly across from the Mount/ Demount Head to
reduce the tensional force on the bead. Depress the Table
Top Pedal and rotate the wheel to begin mounting the lower
bead. Rotate the Table Top until the lower bead is fully
mounted. (See Fig 13.5 - 13.6)
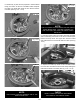
6. For the top bead, rotate the Table Top until the valve
stem is at the 3 o’clock position in relation to the Mount/
Demount Head. Lift the upper bead above the right side of
the Mount/ Demount Head and below the knob.
(See Fig 13.7)
7. With the Bead Lifting Tool, press down on the tire to hold
the upper bead in the drop center. (See Fig. 13.8)
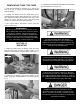
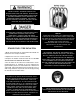
NEVER MOUNT A TIRE AND WHEEL HANDED TO
YOU BY ANYONE WITHOUT CHECKING BOTH TIRE
AND WHEEL FOR DAMAGE AND COMPATIBILITY. BE
EXTRA CAUTIOUS OF PERSONS WITHOUT KNOWL-
EDGE OF TIRE SERVICE. KEEP BYSTANDERS OUT
OF SERVICE AREA.
NEVER MOUNT A DAMAGED TIRE. NEVER MOUNT A
TIRE ON A RUSTY OR DAMAGED WHEEL. DAMAGED
TIRES AND/OR WHEELS MAY EXPLODE.
IF YOU DAMAGE THE TIRE BEAD DURING
MOUNTING, STOP! REMOVE THE TIRE AND MARK IT
AS DAMAGED. DO NOT MOUNT A DAMAGED TIRE.
Fig 13.4
Fig 13.5
Fig 13.6
Fig. 13.8
Fig. 13.7