
Product Manual


19
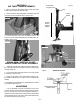
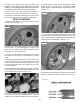
5. Rotate the wheel using the Turntable Pedal until the
valve stem is at the 3 o’clock position in relation to the
Mount/Demount Head.
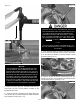
6. Insert the smooth curved end of the Bead Lifting Tool
over the tab side of the Mount/Demount Head and below
the top bead of the tire. (Fig 11.13)
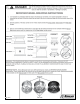
7. Push the Bead Lifting Tool down and away from the
wheel to lower the bead into the Drop Center while lifting
up on the Table Top Pedal to rotate the turnable counter
clockwise. (See Fig 11.14)
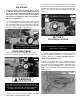
8. Insert the smooth curved end of Bead Lifting Tool over
the right end knob of the mount/demount head and below
the top bead of the tire. (See Fig 11.15)
NOTE:
THIS CLEARANCE WILL BE MAINTAINED AS LONG
AS THE VERTICAL SHAFT REMAINS LOCKED. THE
OPERATOR MAY SWING THE ARM OUT OF THE WAY
AND BACK INTO PLACE AGAIN WITHOUT NEEDING TO
REPOSITION THE HEAD WHEN CHANGING A LIKE SET
OF WHEELS. THE TOOL CLEARANCE MAY CHANGE
WITH MACHINE USE AND SHOULD BE INSPECTED
OFTEN. FAILURE TO MAINTAIN PROPER CLEARANCE
MAY RESULT IN DAMAGE TO THE WHEEL RIM OR TIRE.
SEE PAGE 29 FOR ADJUSTMENT PROCEDURE.
THE BEAD LIFTING TOOL AND DEMOUNT HEAD MAY
ENCOUNTER RESISTANCE OR COME UNDER LOAD
AT TIMES DURING THE MOUNT AND DEMOUNT
PROCEDURES. KEEP ONE HAND FIRMLY ON THE
TOOL TO AVOID POSSIBLE TOOL KICK BACK. USE
THE REVERSING FEATURE (LIFT TABLE TOP PEDAL
UPWARDS) TO BACK OUT OF JAM UPS.
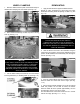
NOTE:
FOR LOW PROFILE TIRES, PERFORM STEP 9 TO
GET THE UPPER BEAD INTO THE DROP CENTER OF
THE WHEEL.
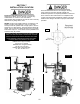
Fig 11.12
Fig 11.11
Fig 11.13
Fig 11.14
Fig 11.15