
Product Manual


18
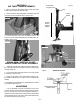
WHEEL CLAMPING
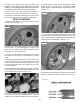
1. Place the Wheel Protector pads on the Wheel Clamps if
desired when clamping from the outside. (See Fig 11.6)
2. Place tire/wheel assembly on Table Top with mounting
side up. (See Fig 11.7)
3. Use the Wheel Clamp Foot Pedal to move the Clamps
inward (pedal down) or outward (pedal up). (See Fig 11.8)
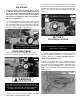
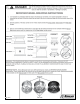
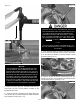
DEMOUNTING
1. Apply tire manufacturer’s approved rubber lubricant
liberally to entire circumference of both upper and lower
beads after loosening bead and placing on table top. (See
Fig 11.9)
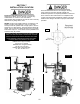
2. After the wheel is secured to the Turntable, swing the
Vertical Arm into position. Use the large adjusting Knob to
position the Mount/Demount Head directly over the edge of
the rim. (See Fig 11.10)
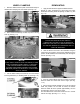
3. Push the Vertical Shaft down and position the Mount/
Demount Head into contact with the rim edge. (See Fig.
11.11)
4. Pull the locking handle towards you to lock the Vertical
Shaft into position. As the slide is locked, the Mount/
Demount Head will move upward approximately 1/8 inch
and backward 1/8 inch from the rim edge.
The Mount/Demount head roller should not be in contact
with the rim edge. (See Fig 11.11 - 11.12)
NOTE:
CLAMP STEEL WHEELS FROM THE INSIDE (CLAMPS
PUSH OUTWARD AGAINST WHEEL). CLAMP MAG
AND CUSTOM WHEELS FROM THE OUTSIDE
(CLAMPS PUSH INWARD AGAINST THE OUTSIDE
RIM EDGE). REFER TO SECTION 12: CUSTOM AND
SPECIAL WHEELS.
Fig 11.7
Fig 11.9
Fig 11.10
THE RIM AND BEAD MUST BE LIBERALLY
LUBRICATED. FAILURE TO USE AN ADEQUATE
LUBRICANT CAN LEAD TO THE BEAD BINDING ON
THE RIM AND DAMAGE TO THE MOTOR AND OR
VOID THE WARRANTY.
Fig 11.6
Fig 11.8