
Product Manual


16
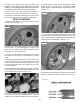
the wheel to be clamped un-level. This may result in the
combination mount/demount head contacting the rim causing
scratches. On alloy wheels, always rotate the wheel one turn
after setting the head to ensure proper wheel chucking.
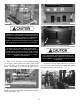
u Always review nicks and scratches with owners of
expensive wheel and tire combinations prior to servicing.
u Review the performance wheel section of this manual
prior to servicing performance tire/wheel combinations.
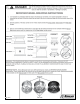
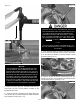
BEAD LOOSENING
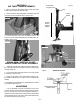
1. Deflate tire completely by removing the valve core from
the valve stem. (See Fig 11.1)
2. The clamps on the table top may extend beyond the
table top itself. To avoid damaging the clamps and/or
wheel, move the clamps to their full inward position before
positioning a tire for bead loosening.
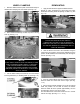
3. Always loosen the bead on the narrow side of the wheels
drop center first. (See Fig. 11.5 for description of the drop
center)
4. Pull the bead breaker blade away from the machine and
roll the wheel into position. If servicing a performance wheel
or any other wheel with Tire Pressure Sensor (see section
12), make sure that the valve stem is either in the 12 o’clock
or 6 o’clock position.
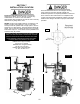
5. The Bead Breaker Arm Adjustment Rod limits or extends
the movement of the arm. Set the Rod as appropriate to the
tire and wheel being serviced. (See Fig. 11.2)
6. Position the bead breaker blade against the tire next
to, but not on, the rim or the sidewall of the tire. Press the
breaker pedal to actuate the blade and loosen the bead. It
may be necessary to loosen the bead in multiple locations
around the tire. Use extra care in positioning the bead
breaker blade on larger wheels/tires, and on alloy wheels.
(See Fig. 11.3)
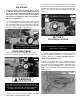
7. Turn wheel around and repeat procedure on the other
side of the wheel. This should be the long side of the drop
center. It will be easier to clamp the wheel to the table top if
the lower bead is loosened last. (See Fig. 11.4)
8. Determine the mounting side of the wheel. The mounting
side is the narrow side of the drop center. (See Fig. 11.5)
Fig 11.1
Fig 11.3
Fig 11.4
Fig 11.2
Fig 11.5