FOLDABLE TABLE TOP GAS GRILL USER GUIDE Now that you have purchased a Range Master product you can rest assured in the knowledge that as well as your 2 year parts and labor warranty you have the added peace of mind of dedicated helplines and web support. AFTER SALES SUPPORT USA 888-892-2075 MODEL: ER-8102P-3 email:rangemaster@1800acs.com ITEM # 45090 -14 1 AFTER SALES SUPPORT 888-892-2075 email: rangemaster@1800acs.
AFTER SALES SUPPORT 888-892-2075 email: rangemaster@1800acs.
FOLDABLE TABLE TOP GAS GRILL Congratulations! You have made an excellent choice with the purchase of this quality Range Master product. By doing so you now have the assurance and peace of mind which comes from purchasing a product that has been manufactured to the highest standards of performance and safety, supported by the high quality standards of ALDI.
Product Name: FOLDABLE TABLE TOP GAS GRILL - ER-8102P-3 WARNING Table of Contents FOR YOUR SAFETY: Limited Warranty . . . . . . . . . . . . . . . . . . . . . . . . . . . . . . . . Page 2 For Outdoor Use Only (Outside any enclosure) Important Safeguards . . . . . . . . . . . . . . . . . . . . . . . . . . . . .. . . . 4 Expanded View & Hardware . . . . . . . . . . . . . . . . . . . . . . . . . . . . 6 WARNING Assembly Instructions . . . . . . . . . . . . . . . . . . . . . . . . . . . . . . . . .
The installation must conform with local codes or, in the absence of local codes, with either the National Fuel Gas Code, ANSI Z223.1/NFPA 54, Natural Gas and Propane Installation Code, CSA B149.1, or Propane Storage and Handling Code, B149.2,or the Standard for Recreational Vehicles, ANSI A 119.2/NFPA 1192, and CSA Z240 RV Series, Recreational Vehicle Code, as applicable. SAFETY FIRST DANGERS AND CAUTIONS 1.
18. Do not use in an explosive atmosphere. Keep grill area clear and free from combustible materials, gasoline and other flammable vapors and liquids. 19. Keep all combustible items and surfaces at least 39 inches away from the grill at all times. Do not use this grill or any gas product under any overhead or near any unprotected combustible constructions. 20. It is essential to keep the grill is valve compartment, burners, and circulating air passages clean. Inspect grill before each use. 21.
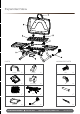
Expanded View 1 2 5 3 6 7 8 4 PARTS HARDWARE PARTS 1 Lid Handle *1 5 Lid Hindge *2 A M5x8 *6 2 Lid *1 6 Bottom Hindge *2 B M5 *8 3 Cooking Grid *1 7 Body *1 C 2 * 4 Grease Tray *1 8 Regulator *1 D 2 * AFTER SALES SUPPORT 7 888-892-2075 email: rangemaster@1800acs.
INSTRUCTIONS FOR YOUR NEW GRILL TOOLS NEEDED FOR ASSEMBLY Phillips Head Screwdriver (not included) BEFORE ASSEMBLY Please read all instructions thoroughly before proceeding. Find a large, clean area in which to assemble your barbecue. Please refer to the parts list and assembly diagram as necessary. Ensure any transit protection or packaging is removed. A.
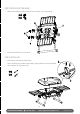
STEP 2 ATTACH BOTTOM HINGE — Attach bottom hinge to the Body using 4 sets of screw(A), and 2 wing nuts (B). A*4 B*4 B 7 A 6 — Insert the Heat shield(7) over the burner. STEP 3 ATTACH LID — Insert the top hinge into the bottom hinge. Note: If top hinge does not fit the bottom hinge, gently squeeze top hinge tab together. D — Secure with pin (C) and cotter pin (D). C*2 D*2 C 9 AFTER SALES SUPPORT 888-892-2075 email: rangemaster@1800acs.
STEP 4 INSERT COOKING GRID — Place cooking grid into barbeque 3 STEP 5 USING THE LOCK — To lock: lift up on lock handle, place lock bracket onto rise on lid, push lock handle down to secure. — To unlock: lift up on lock handle, remove lock bracket from rise on lid, push lock handle down. 10 AFTER SALES SUPPORT 888-892-2075 email: rangemaster@1800acs.
STEP 6 CONNECT THE REGULATOR TO THE BURNER — Screw the front nut in a clockwise motion into the burner. This brass nut should be 1/4 turn past tight. DO NOT OVER TIGHTEN. The regulator assembly will rotate from left to right when the brass nut is tightened, this is normal. 8 STEP 7 INSERT GREASE TRAY — Slide the grease tray(4) into the slots provided in the base of the BBQ housing 4 IF YOU NEED HELP OR HAVE A WARRANTY OR CUSTOMER SERVICE QUERY, PLEASE CALL 888-892-2075.
OPERATING INSTRUCTIONS This grill is designed to operate with a 1 lb. 7.75 in. or 10.6 in. high disposable / 16.4 oz. or 14.1 oz. propane gas tank (DOT 39 Cylinder) (Figure 1). DO NOT ATTEMPT TO REFILL ANY 1 lb. (16.4 oz. or 14.1 oz.) PROPANE GAS TANKS! 1. CONNECTING LP GAS TANK Only cylinders marked “propane” may be used. Note: 1 lb cylinders may form frost when near empty. 1. Make sure the regulator/control knob is in the “OFF ” position. 2.
TANK/GAS LINE CONNECTION Make 2-3 oz. of leak detection solution by mixing one part liquid dishwashing soap with three parts water. Make sure regulator/control knob is in the “OFF ” position. Spoon the detection solution on the connection between the LP Gas tank and the regulator. Turn Gas on. If any bubbles appear, remove the LP gas tank and reconnect, making sure the connection is secure.
LIGHTING INSTRUCTIONS WARNING: KEEP OUTDOOR GAS COOKING APPLIANCE AREA CLEAR AND FREE FROM COMBUSTIBLE MATERIALS, GASOLINE AND OTHER FLAMMABLE VAPORS AND LIQUIDS. WARNING: ATTEMPTING TO LIGHT THE BURNER WITH THE LID CLOSED MAY CAUSE AN EXPLOSION. WARNING: MAKE SURE THERE ARE NO OBSTRUCTIONS OF AIRFLOW TO THE GAS UNIT. SPIDERS, INSECTS CAN NEST WITHIN AND CLOG THE BURNER/ VENTURI TUBE AT THE ORIFICE. A CLOGGED BURNER TUBE CAN LEAD TO A FIRE BENEATH THE APPLIANCE. LIGHTING 1. Open lid. 2.
INITIAL USE Before cooking on this grill for the first time, operate the grill for about 15 minutes with the lid closed and the gas turned on “HIGH.” This will “heat clean” the internal parts and dissipate odor from the manufacturing processes. COOKING 1. Light burner per lighting instructions. 2. Set burner to desired temperature 3. Place food on grid 4. With lid open or closed, cook until desired internal temperatures are achieved TIPS FOR BETTER COOK OUTS AND LONGER PRODUCT LIFE 1.
6. Clean inlet (venturi) of burner with small bottle brush or compressed air. 7. Remove all food residue and dirt on burner surface. 8. Clean any clogged ports with a stiff wire (such as an opened paper clip) 9. Inspect burner for any damage (cracks or holes). If damage is found ,replace with new burner. Reinstall burner, check to insure that gas valve orifices are correctly positioned inside burner inlet (venturi). Also check position of spark electrode.
FOLDABLE TABLE TOP GAS GRILL Your details: Name Address E mail Date of purchase* * We recommend you keep the receipt with this warranty card Location of purchase Description of malfunction: SUPPORT AFTER SALES SUPPORT Return your completed warranty card to: Hark Enterprises USA USA XXX-XXX-XXXX www.xxxxxxx.com 888-892-2075 email:rangemaster@1800acs.
AFTER SALES SUPPORT 888-892-2075 email: rangemaster@1800acs.