RANE SL 3 FOR SERATO SCRATCH LIVE • OPERATOR’S MANUAL 1.
RANE SL 3 FOR SERATO SCRATCH LIVE • OPERATOR’S MANUAL 1.
Important Safety Instructions Copyright Notices Minimum System Requirements For the continued safety of yourself and others © 2009 Rane Corporation. All rights reserved. • A DJ mixer with at least 2 channels. we recommend that you read the following safety Scratch Live and the Scratch Live logo • At least one turntable or CD player. and installation instructions. Keep this document are trademarks of Serato Audio Research. • Computer with available USB 2.0 port.
Scratch Live: Getting started 6 Contents 3 12 6 Virtual Deck 12 Connecting the SL 3 6 Visual Aids 12 Turntable Setup 6 Tempo Matching Display 12 CD Player setup 6 Track Overview Display 12 Installing Scratch Live 7 Main Waveform Display 12 Starting the Software 7 Beat Matching Display 12 Using the Tool Tips 7 Thru Buttons 13 Playing Regular Vinyl and CDs 8 Master Gain 13 Power Supply 8 33 / 45 Speeds 13 Tracking Indicator 13 8 Tap Tempo 13 The Noise Threshold 8
19 Additional Setup 26 Overview 19 Hardware 26 MIDI Controller Setup 19 USB Buffer Size (Latency) 26 Assigning Controls 19 UpdatIng FIrmware 26 MIDI Platters 19 Line / Phono Status 26 Assigning MIDI to Other Controls 19 Ctrl-Click Functionality 19 Track End Warning 26 Presets 19 Playback Keys Use Shift 26 Native Controller Support 19 Lock Playing Deck 26 Technical Information 19 Sort Cues Chronologically 26 Use Auto Gain 26 20 Hi-Fi Resampler 27 Grouping Tracks int
Connecting the SL 3 Scratch Live: Getting started 4. Connect the SL 3 to your computer To integrate an SL 3 unit into a typical DJ setup, connect it to your turntables (or CD players) and mixer, as follows: 1. Inputs * Using the provided USB cable, connect your SL 3 to an available USB 2.0 port on your RIGHT DECK Connecting Your Hardware computer. Make sure you connect it directly to your Connect your CD players or turntables to the DECK INPUTS on the Rane SL 3.
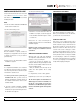
Installing Scratch Live You will see the following screen: Starting the Software 3. Follow the on-screen instructions. Once the Close all other programs on your Mac or PC. Check for the latest download version of Scratch Live software at scratchlive.net. If it is newer than what is on your CD-ROM, we recommend installing it instead. Mac 1. Insert the Software Installation CD-ROM and double-click the installer icon.
Playing Regular Vinyl and CDs How to Calibrate Scratch Live NOTE: the SL 3 must be powered by USB or the supplied external power supply for the DECK THRUs to work. With music playing in the background, put your Calibrating Scratch Live needle on the record with the turntable stopped. If you are using CD players, the same rules apply. Have the CD deck paused or stopped While Scratch Live is not running, and the while calibrating.
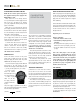
2. Once you have located your music, drag For optimal performance the inner ring should be as close to circular as possible. Use the scope zoom slider (1x to 16x) to zoom in or out as necessary. Use the scope L/R balance and P/A balance controls to adjust the shape of the Importing and playing music inner ring. the folder or files you want to import onto the purple “All...” icon. This is located to the left of your screen at the top of the crates and playlist window.
Playing Music Click on the All… icon to show all the tracks in your library. Use the keyboard shortcut Shift - Left Arrow to load the highlighted track on to Set Auto-BPM Preparing Your Files the left deck, and Shift - Right Arrow to load the highlighted track onto the right deck. TIP: You can also load tracks to decks using If this option is checked while analyzing files, the mouse. Click and drag a track from the Scratch Live will calculate the estimated tempos track list area on to either deck.
Vinyl Scroll File Management Playback Control Vinyl Scroll allows you to select and load tracks using only your turntables (or CD player) – no contact with the computer necessary! To use Vinyl Scroll with turntables, lift the needle off the record and drop it into special “bonus track” section at the end of the record’s A side. The movement of the control disk now controls the selected track within your library.
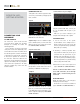
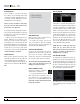
Tempo Matching Display Main Waveform Display This view provides a close-up Main Screen Overview of the track, including color coding to show the frequency The Tempo Matching display area provides a of the sound; red representing helpful tool for beat matching.
Tracking Indicator TIP: F5 and F10 will turn Key Lock on and off After a few seconds, blue peaks appear in the The tracking indicators for the left and right decks respectively. Tempo Matching display. on the main screen show the quality of the signal 1. Start the track playing on the right deck. 2. Adjust the pitch of the right turntable until coming from the control record or CD.
Track Gain Emergency int mode will activate after 1 second. Use the track gain adjustment to balance the volume of the tracks in your library. Any adjustment made to the gain of a Use the keyboard shortcut F1 (left deck) or F6 Scratch Live Modes (right deck) to switch to abs mode.
Internal Mode Bend down - Create a temporary More Controls decrease in the playback speed. Use You can also control playback using the bend down if the two tracks are in time, but this computer keyboard shortcuts — turn Caps Lock track is slightly ahead of the other track. on to enable. See “Playback Keys Use Shift” on page 26. Bend up – Create a temporary increase in the playback speed.
Each cue point can have a different color. To Cue Points change the color of a cue point, click on the colored square and choose a new color from the Looping drop down menu. To remove a cue point, use the x button on the right side of the cue point panel. A cue point can occupy any of the 5 slots. You can drag and drop cue points to change their order in the list. If you wish to have the cue points sorted chronologically, check the sort cues chronologically option in the setup screen.
off, disable the adjust loops with vinyl option The A - Slot Loop Roll with MIDI in the setup screen. There are 9 available loop A special loop slot ‘A’ exists for auto-looping. The You can assign loop roll to MIDI in several ways: slots per track. If a loop is set in a given slot, act of using the auto-loop buttons sets a loop in After pressing the MIDI assign button in Scratch the background (behind the loop number) will be the ‘A’ slot, following the rules above.
Sample Player Play Behavior Pressing the play button on each slot On / Off Mode - When play is pressed, will play the loaded audio. Play will start the audio plays through until the end of from the beginning of the file, unless a the track. Pressing play again stops the audio. cue point or loop is set. Repeat Mode - Each slot has a Tip: Use the shortcut keys The SP-6 Sample Player allows you to play up to 6 sources of audio, in addition to the tracks playing on the virtual decks.
Presets Assigning Controls To enable MIDI assign mode, click MIDI Control the MIDI button. Hovering the mouse pointer over a control will bring up the MIDI assignment box, showing the current assignment status. To assign a MIDI control, click on the control in Scratch Live, then move the MIDI control. The MIDI assignment box should update to show it MIDI presets are accessible in the MIDI panel of has mapped the controls to one- another. the setup screen.
crates. If you do delete a crate by accident, Organizing Your Music Using the Song Browser you can get it back from the recycle bin / trash. Crate files have the extension .crate. Subcrates You can drag and drop crates into other crates to make subcrates. If you drag a crate to the very left of the crate panel, it will stay in the top level of the crate structure.
TIP: Select the contents of the prepare Start Session / End Session - To start or end a window, drag them onto the new crate button session, click the corresponding button. (+) to save the selection. You can choose to show tracks which you have auditioned, but not actually played, by checking the show “unplayed tracks” box. The session will then also list these tracks in grey, along with actual played tracks.
Display Album Art More Info on Corrupt Files Deleting Crates and Tracks If you have a corrupt file in your library, hover To delete tracks from your Scratch Live library, your mouse over the status icon for information select the track and use the keyboard shortcut on what type of corruption was found. SEE ctrl-delete. (Make sure you have the protect “Corrupt File Descriptions and Diagnoses” library option unchecked in the setup menu.) on page 31. • Deleting a track when you are in the All...
Recording Input Record Select Meter Recording Time Save File Elapsed Name Box Level • If the Virtual Deck is set to int mode and is Save File unloaded, the input record level is sent to the Virtual Deck’s higher resolution stereo meters. E.g., if you’re recording from the right deck, set the right Virtual Deck to int, eject the track if there is one loaded, and the Virtual Deck’s meters will show the signal coming into the right deck’s input.
LiveFeed LiveFeed allows you to stream any of the standard record sources (left deck, right deck or aux in) to a virtual deck. You can then instantly play the recording back just like a normal audio file - you can scratch it, speed it up, slow it down, set loops and set cue points. There are two recording options, normal and Using LiveFeed gated. The normal option means recording will First locate the LiveFeed files in your library. Type begin as soon as the deck starts playing.
KEY ctrl - L Keyboard Shortcuts These actions can be accessed directly from the computer keyboard. NOTE: Playback, cue and speed controls use Shift or Caps Lock. You can turn this off in the setup screen. See “Playback Keys Use Shift” on page 26.
Additional Setup Line / Phono Status Use Auto Gain The input level currently set on the SL 3 is Auto gain enables you to set a uniform volume displayed for each input. To change the input level for the tracks in your library. When a track is level setting, use the dip switches on the SL 3. in auto gain mode, the track gain knob appears Choose up for Phono and down for Line. depressed.
Hi-Fi Resampler Vinyl Control Drop To Cue Points This significantly reduces digital distortion at very This option triggers the corresponding cue point slow or very fast record speeds, increasing the when the needle is repositioned into one of the CPU load slightly. This option is off by default, first 5 one-minute sections on the control vinyl. the old resampler is used when switched off.
Library Display Protect library Uncheck this setting to remove files and crates from your library. Enable to lock your library and prevent accidental file or crate deletion while using Scratch Live. Enabling this setting will also lock all file tags and crate names, so that no text can be changed. Read iTunes Library Check the “read iTunes library” option to show your iTunes library and playlists in Scratch Live. You can collapse your iTunes playlists by clicking on the blue folder icon.
Mixing With One Turntable Or CD Player This single turntable technique allows you to mix as if you had two turntables, using just one. If one of your turntables is not performing properly, or if you only have one available, you will be able to continue to mix the way you are used to. The following is a step-by-step description of how to perform a mix using only your right turntable or CDJ with the instant doubles feature. Menu Settings Go to the setup menu, click on the playback tab.
I can’t get the Scope View to show nice clean circles Troubleshooting and Frequently Asked Questions Select phono as the audio input level in the setup screen if you are using vinyl. Check your needles and make sure they are clean. If the circles look fuzzy, try cleaning your control record. If the Scope View shows a line instead of a circle, Scratch Live is only receiving a signal from one channel — check all your cables, and the connection between your cartridges and the tone arm.
Corrupt File Descriptions and Diagnoses Corrupt file: This MP3 contains invalid frames. This MP3 contains frames which do not conform strictly to the official MP3 specification. Scratch Live can not be certain that this file will play back 100% accurately. Corrupt file: This file contains corrupt frames that may result in audible glitches. This file contains two or more contiguous corrupt frames. Since corrupt frames are replaced with silence, this could result in what might sound like an audio glitch.
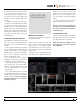
Scope Reading and Fixes Most of the problems that occur with Scratch Live can be attributed to it not getting a good reading of the control signal from your records or CDs. These examples show what the scopes on the setup screen can look like to help solve possible problems. Some problems cause similar looking scopes, e.g., if your scopes look like the Dusty Needle one, the cause could be a damaged needle. GOOD SIGNAL - Clean signal with 100% tracking.
RECORD BURN - This section of the control vinyl has LEFT CHANNEL MISSING - The signal from the needle RIGHT CHANNEL MISSING - The signal from the been worn. Swap sides or use the track start offset. is not reaching the SL 3. Check the cable and cartridge needle is not reaching the SL 3. Check the cable and connections. cartridge connections.
SL 3 Specifications SL 3 Specifications 34 (all specs typical) Computer interface USB 2.0 High Speed USB Power Requirement 400 mA, 5.0 Volts USB Audio Channels Six Record and Six Playback External Power Supply 1060 mA, 7.5 Volts Converters 24-bit / 44.1 kHz or 48 kHz sample rate DAC Dynamic Range 104 dB, A-weighted Line Thru Dynamic Range 101 dB, A-weighted Phono Thru Dynamic Range 98 dB, A-weighted THD+N 0.
Declaration of Conformity Standard(s) to which conformity is declared: Application of Council directive: EN60065:Ed. 7.
Factory Authorized Service Your unit may someday need to be serviced by the Rane Factory if you live in the USA. International customers should contact your dealer or distributor for service. You must call the Rane factory before shipping. Please do not return your unit to Rane without prior authorization.
Warranty Procedure - Valid in USA only NOTICE! You must complete and return the warranty card or register your product online to extend the Warranty from 2 years to 3 years! TO VALIDATE YOUR EXTENDED WARRANTY: Use the postcard that came in the box with your unit, or go to www.rane.com and click on New Product Registration. Fill out the warranty completely, being sure to include the model and serial number of the unit since this is how warranties are tracked. If your Rane product was purchased in the U.S.A.
RANE SL 3 FOR SERATO SCRATCH LIVE • OPERATOR’S MANUAL 1.