
Product Overview

evolution
EasyProg
Ver. 03
PROGRAMMING KEY
EasyProg
PC
Controller
1. DESCRIPTION
The EasyProg is an accessory that has as main function store the parameters of the controllers,
load them and unload them quickly and easily. EasyProg can help programming a production line,
for instance, by copying the information from a standard controller (creating a standard preset) and then
downloading it to the other controllers without the need for connecting it to a PC.
Through a USB port, the EasyProg can connect to your PC and modify the parameters for the editor
revenue Sitrad. For communication with the instrument contains an RS-485 and TTL Serial.
Note: See the controller's manual to check if it is compatible with Easyprog ver. 2 or higher, before
connecting them.
2. TECHNICAL SPECIFICATIONS
- Power supply: Through the mini USB port or serial TTL
- Operating temperature: 0 to 50ºC (32 to 122ºF)
- Operating humidity: 10 to 90% RH (no condensation)
- Indication: Led display (seven segments) and two multicolor leds.
- Size: 45 X 24 X 87 mm (WxHxD)
SET
EASYPROGV04-01T-16699
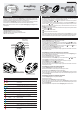
3. CONNECTIONS, KEYS AND SIGNALING
Key START
LED receipt
Display indicator
of chosen recipe
LED sending
Key MODE
Serial TTL connection
RS 485
USB connection to PC
4. FUNCTIONS
The EasyProg has a led display (seven segments) that shows the number of selected recipe and
two multicolors leds, through which are signaled the following functionality: PC connection, receiving
the parameters, selection of recipes and communication with success or error .
By connecting the leds EasyPro are lit (magenta when connected to the PC by USB or
cyan if connected by Serial TTL).
To select recipes that are sent or received through the serial TTL, you should press the MODE key for 15
seconds. The leds will pass to yellow indicating it is in menu selection of recipes. To select
the recipe, use the START key, pressing briefly until you reach the desired amount of revenue. The
EasyPro supports store up 9 recipes.
The MODE key to be pressed for 10 seconds switches between sending and receiving states, identified
through the leds .
and
Send parameters to the controller;
Receive parameters from the controller;
and
and
To execute both the sending and receiving commands require pressing the START key for 1 second.
When the key is released, the communication starts and the corresponding led flashes. When finished,
the same led will indicate if the parameter transmission or reception ended successfully or with errors.
5. LOADING AND UNLOADING RECIPES
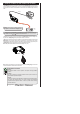
5.1. Copying a recipe from a controller to EasyProg
1) Connect EasyProg to the Controller via Serial TTLor RS-485.
2) If the recipe chosen is the number 1, skip to step 3.
To select the desired recipe, press MODE key for 15 seconds then release it ( lit - yellow).
Press the START key and select the desired recipe number. Press the MODE key for 15 seconds then
release it to exit the menu selection of recipes.
3) When connecting to EasyProg on the controller, the LEDs sending and receive are lit , to
move to the mode receive press the MODE button for 10 seconds.
4) To start the receipt of recipe press START for 1 second.
5) The same LED will flash and, upon completion, will light up green if the communication is successful,
or red if any errors occurred.
5.2. Sending a recipe from a EasyProg to a controller
1) To send the parameters to a controller, a preset must be previously recorded on EasyProg (from
other controller or using Sitrad 's Preset Editor).
2) Connect EasyProg to the controller via Serial TTL or RS-485.
3) If the recipe chosen is the number 1, skip to step 4.
To select the desired recipe, press the MODE key for 15 seconds then release it ( lit - yellow).
Press the START key and select the number of the desired recipe.
Press the MODE key for 15 seconds then release it to exit the menu selection of recipes.
4) Press the MODE key until the LED is on (sending).
5) To start sending the recipe, press the START key for 1 second.
6) The same LED will flash and, upon completion, will light up green if the communication is successful,
or red if any errors occurred.
5.3. Sending a recipe from a PC for EasyProg
1) Connect EasyProg to the PC using the mini USB cable.
2) Use Sitrad 's Preset Editor to create or edit a preset for the required controller.
3) Click the file menu, then EasyProg, and a new window will open.
4) In this new window, click on the menu recipes stored in EasyProg and choose the desired
position. This position corresponds to the number of recipe. After, click the corresponding arrow to send
the recipe to EasyProg.
5.4. Upload a recipe from a EasyProgto the PC
1) Connect EasyProg to the PC using the mini USB cable.
2) Use Sitrad 's Preset editor.
3) Click the file menu, then EasyProg, and a new window will open.
4) In this new window, click on the menu recipes stored in EasyProg and choose the desired
position. This position corresponds to the number of recipe. After, click the corresponding arrow to send
the recipe to EasyProg.
5) Upon closing this window, the parameters saved on EasyProg will remain on the screen.
and
and
LED
STATE
COLOR
Connected to PC
Selection of recipes (press START to select)
Error during initialization of memory. Disconnect the cable
and reconnect
On power up when fed by Serial TTL or other source with
USB connection
Sending of parameters (waiting press START)
Sending of parameters during data transmission
Sending of parameters successfully completed
Sending of parameters with error (controller model is
incorrect or the version is not compatible)
Sending of parameters with error (without communication
with the controller)
Receiving of parameters (waiting press START)
Receiving of parameters during data transmission
Receiving of parameters successfully completed
Receipt of parameters error (controller model is incorrect
or the version is not compatible)
Receipt of parameters error (without communication with
the controller)
magenta
red
yellow
cyan
cyan
cyan
green
red
red
cyan
cyan
green
red
red
ON
flashing
ON
ON
ON
flashing
ON
ON
flashing
ON
flashing
ON
ON
flashing
and
and
and
and
DESCRIPTION