
Technical data

55
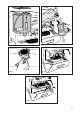
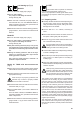
7.3. Starting up (Fig.6)
Model S1
L7XUQRQWKHZDWHUVXSSO\WDS)LJ
L Turn on main switch 1.
7KHSXPSIRUERLOHU¿OOLQJZLOODFWLYDWH .
Orange LED (8) ON
L When the level is reached, the pump stops, the
LED switches OFF, turn the HVLVWDQFHVZLWFK
ZDWHULVKHDWHGLQWKHERLOHUWKHQRSHUDWHWKHXQLW
until the water is dispensed.
L Wait for the machine to reach its working pressure,
gauge needle 7, and to reach the correct thermal
balance.
Model E1
L7XUQRQWKHZDWHUVXSSO\WDS)LJ
L Turn on main switch 1 and resistance switch 2.
7KHSXPSIRUERLOHU¿OOLQJZLOODFWLYDWH
Orange LED (8) ON
L2QO\DIWHUUHDFKLQJWKHOHYHOorange LED (8) ON)
the resistances for water heating in the boiler are
powered,then activate the group until water comes
out.
L'XULQJ WKH KHDWLQJ SKDVH WKH OHGV RI WKH NH\V
switch on in sequence from left to right until the
working pressure is reached.
2QO\ ZKHQ WKH UDWHG SUHVVXUH LV UHDFKHG LW LV
possible to adjust the dosesl.
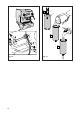
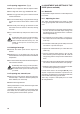
Model S1 TANK with autonomous tan
(Fig.7)
L Open the lid on the water-tank and check that the
softener A has been inserted in the dip pipe B
L Ensure that the air trap C has been inserted in the
DSSURSULDWHKRXVLQJ
If the air trap is not properly positioned, the
machine may not heat or properly indicate
the lack of water in the tank.
L)LOOWKHWDQNZLWKOLWUHVRIZDWHUDQGFORVHWKHOLG
Check the LED (9 - Fig.6)
L Turn on main switch 1WKHERLOHULV¿OOHGDQGLV
activated.
2QFHWKHERLOHULV¿OOHGWXUQUHVLVWDQFHVZLWFK
WKHZDWHULVKHDWHGWKHQRSHUDWHWKHXQLWXQWLOWKH
water is dispensed.
L Wait for the machine to reach its working pressure,
gauge needle 7 - Fig.6, and to reach the correct
thermal balance.
8. USE
The machine has a top shelf on which the
FXSVDUHNHSWDQGKHDWHGUHDG\IRUXVH
7KLVLVYHU\LPSRUWDQWWRREWDLQJRRGFRIIHHDVWKH
pre-warmed cup stops the coffee from growing cold
WRRTXLFNO\
8.1. Preparing coffee
L8QFODPSWKH¿OWHUKROGHUIURPWKHGLVSHQVLQJXQLW
DQGNQRFNDQ\JURXWVRXWLQWRWKHGUDZHUHVSH-
FLDOO\SURYLGHGIRUWKLVSXUSRVHWDNLQJFDUHQRWWR
GDPDJHWKHULPRIWKH¿OWHU
L8VH WKH ¿OWHU IRU RU FRIIHHV DFFRUGLQJ WR
need.
L)LOOWKH¿OWHUZLWKWKHPHDVXUHRIFRIIHHOHYHOLWRII
DQGSUHVVLWGRZQJHQWO\ZLWKWKHSUHVVHU
L5HPRYHDQ\JURXQGFRIIHHWKDWKDVVWXFNWRWKH
ULPRIWKH¿OWHUZKLOHSUHVVLQJ
,IJURXQGFRIIHHLVOHIWRQWKHULPRIWKH¿OWHUD
leaktight seal is not ensured, with consequent
leaking of water and coffee grounds.
L/RFNWKH¿OWHUKROGHULQWRWKHGLVSHQVLQJXQLW¿UPO\
to obtain a leaktight seal.
L Place the cups under the spouts and start pouring
using control 3 or button panel 4 according to
model (Fig.6).
L:KHQWKHFRIIHHKDVEHHQSRXUHGOHDYHWKH¿OWHU
holder attached to the dispensing unit until the next
coffee is required.
When pouring, beware of the hot parts of the
machine, especially the coffee dispensing
units, the steam and hot water spouts. Do not
put your hands for any reason under the units
and the spouts when they are operating.
The grinding of the coffee beans is of fundamental
importance to the making of good coffee, and the
granular texture of the resulting grounds should
be such that it takes 25-30 seconds to produce the
beverage. If the coffee is ground too coardsely the
FRIIHHZLOOEHSDOHLQFRORXUDQGZHDNLQÀDYRXUZLWK
only a very small amount of white cream, and if the
JURXQGVDUHWRR¿QHWKHFRIIHHZLOOEHGDUNZLWKQR
cream. Good coffee can only be made if the beans
are freshly and uniformly ground (only possible when
the blades of the coffee grinder are sharp) and are
then measured out into the correct quantities (roughly
6 grams per measure).
The importance of freshly ground coffee beans is
due to the fact that once ground, they rapidly lose
their aromatic qualities, and fats present in the beans
go rancid.