
Technical data


58
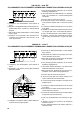
8.7.3 Timer-cut-out (Fig.13)
,IWKHPDFKLQHLVWXUQHGRIIE\WKHSURJUDPE\SUHV-
VLQJNH\RINH\ERUGDWOHDVWIRUVHFRQGVLWZLOO
turn on again and remain on until the following pro-
JUDPPHGVWRSRUE\SUHVVLQJWKHVDPHNH\DJDLQ
,IWKHPDFKLQHLVVZLWFKHGRQE\WKHSURJUDPPHE\
SUHVVLQJNH\RIWKH¿UVWSXVKEXWWRQSDQHOIRUDW
least 3-4 seconds it will switch off and remain off until
VZLWFKRQLVSURJUDPPHGDJDLQRUWKHVDPHNH\LV
pressed again.
9.1.2. Adjusting the quantity of hot water
Proceed as follows:
1 Press the continuous EEXWWRQRQDQ\EXWWRQSDQHO
and hold down for 8-10 seconds until water stops
ÀRZLQJIURPWKHGLVSHQVLQJXQLWDQGWKHOHGRIWKH
(EXWWRQRQWKH¿UVWEXWWRQSDQHORQWKHOHIWVWDUWV
ÀLVKLQJ7KHPDFKLQHLVUHDG\WRDFFHSWTXDQWLW\
variations.
2 Put a cup or a jug to receive the water under the
water spout 15 (Fig.3).
3XVKWKHGHOLYHU\EXWWRQ%)LJ
4 Once the required amount is reached, press the
button 5b again. Water will stop pouring and the
microprocessor will store the dose.
5 Once adjusted, press the stop-continuous button
ERQDQ\EXWWRQSDQHOWKHOHGZLOOJRRXWDQGWKH
PDFKLQHZLOOVWRUHWKHQHZTXDQWLW\
6 Pour out doses of hot water to check that program
-
ming is correct.
WARNING!
The amount of hot water dispensed can be controlled
E\SURFHHGLQJDVIROORZV
L press the hot water control button 5B and hold
GRZQIRUDWOHDVWVHFRQGVZKHQWKHEXWWRQLVUHOHD-
VHGWKHPDFKLQHZLOOGLVSHQVHZDWHUFRQWLQXRXVO\
LWRPDQXDOO\VWRSGLVSHQVLQJSUHVVWKHZDWHUFRQ-
trol button 5B again when the required amount has
been dispensed.
To stop dispensing the measured amounts of hot
water, press the water control button 5B.
9. ADJUSTMENT AND SETTING OF THE
DOSE
9.1. Models DE
It is possible to adjust the dose of coffee and hot water
GLVSHQVHGE\HOHFWURQLFDOO\FRQWUROOHGPRGHOV,IWKH
function is enabled)
9.1.1. Adjusting the dose
7KHTXDQWLW\RIFRIIHHDQGKRWZDWHUGLVSHQVHGFDQ
be adjusted using the button panel or the hot water
controls.
1 Press the button ERQDQ\EXWWRQSDQHODQGKROG
LWGRZQIRUVHFRQGVXQWLOZDWHUVWRSVÀRZLQJ
from the dispensing unit and the led of the conti-
QXRQVEXWWRQRQWKH¿UVWEXWWRQSDQHORQWKHOHIW
EHJLQVÀDVKLQJ
,WLVQHFHVVDU\WRDFWDVWRPDNHRUFXSVLQRU-
der to reach the correct coffee amount adjustment
in the cup.
3XWWKH¿OWHUKROGHUZLWKJURXQGFRIIHHRQWKHOHIW
unit and the cup under the spout.
4 Operate the selected button (i.e. button A for one
small cup).
5 One the required coffee amount in the cup has
been reached, press the stop button A. Coffe will
stop pouring and the microprocessor will store the
dose.
6 Press the continuous button EDJDLQWKHOHGZLOOJR
RXWDQGWKHPDFKLQHZLOOVWRUHWKHQHZTXDQWLW\
7 Make the coffee and check the cup amount in order
to check that programming is correct.
If some doses have to be changed (A-B-C-D), once
at point 5 repeat the instructions in points 3-4-5 for
HDFKGRVHUHPHPEHULQJWRXVHWKH¿OWHUKROGHUZLWK
UHOHYDQW¿OWHUDQGIUHVKO\JURXQGFRIIHH
7KHQFDUU\RXWSRLQWDQGUHSHDWSRLQWWRFKHFN
all changed doses.
If all units are to be programmed with the same doses,
WKHVHOHFWLRQRIFRIIHHGRVHVLV¿QLVKHG,IWKHGRVDJH
of another unit is to be changed (1-2-3-4 doses), pro-
ceed as indicated in the above-mentioned point 1-7,
XVLQJRQO\WKHEXWWRQSDQHORIWKHVHOHFWHGXQLW
9.2. Tray case assembly (Optional) (Fig.14)
The machine is provided with two lateral housing to
EHDSSOLHGWRWKHWUD\JURXSLIWKHDYDLODEOHVSDFH
does not allow, during installation, to install the ma-
chine in standard version.
To replace the cases installed on the machine, loo-
sen the 3 screws (Fig.21), take off and remove the
right case and replace with the one having smaller
dimensions.
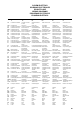
9.3. List of failures
E00 CPU diagnosis
E01 Water lacking
E02 Pressure lacking
E03 Boiler temperature sensor in short circuit
E04 Boiler temperature sensor cut off
E05 Level board lacking
E06 IDS connection lacking