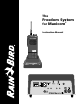
The Freedom System 2 for Maxicom Instruction Manual
Contents List of figures . . . . . . . . . . . . . . . . . . . . . . . . . . . . . . . . . . . . . . . . . . . . . . . . . . . . . . . . . . . . . . . . .v Chapter 1: Introduction . . . . . . . . . . . . . . . . . . . . . . . . . . . . . . . . . . . . . . . . . . . . . . . . . . . . . . . . . .1 Welcome to the Freedom System . . . . . . . . . . . . . . . . . . . . . . . . . . . . . . . . . . . . . . . . . . . . . . . . . . . . . . . . . . . . . . . . . . 1 System overview . . . . . . . . . . . . . . . . . .
Optional equipment . . . . . . . . . . . . . . . . . . . . . . . . . . . . . . . . . . . . . . . . . . . . . . . . . . . . . . . . . . . . . . . . . . . . . . . . . . . 34 Battery life and charging time . . . . . . . . . . . . . . . . . . . . . . . . . . . . . . . . . . . . . . . . . . . . . . . . . . . . . . . . . . . . . . . . . . . 35 FCC regulations . . . . . . . . . . . . . . . . . . . . . . . . . . . . . . . . . . . . . . . . . . . . . . . . . . . . . . . . . . . . . . . . . . . . . . . . . . . . . .
List of figures Figure 1 Configuration of connections between the Freedom System and a serial port . . . . . . . . . . . . . . . . . . . . . . . . . . . . . . . .4 Figure 2 Freedom System base unit . . . . . . . . . . . . . . . . . . . . . . . . . . . . . . . . . . . . . . . . . . . . . . . . . . . . . . . . . . . . . . . . . . . . . . . . .7 Figure 3 Central base antenna (installation detail) . . . . . . . . . . . . . . . . . . . . . . . . . . . . . . . . . . . . . . . . . . . . . . . . . . . . . . . . .
1 Introduction Welcome to Rain Bird Freedom System The Maxicom2 Freedom System is a radio-operated system that gives you control of the Maxicom2 computer and provides voice communication from the field or remote locations. The system consists of a multi-function telephone and radio terminal located at the Maxicom2 central location. With the central terminal, you can use a Freedom handheld radio for two-way radio communication with the Maxicom2 computer.
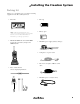
;@À 2 Installing the Freedom System Packing list Check to be certain that you received the following equipment in the Freedom System box: • Base unit Note: A Freedom handheld radio unit (voice only) without a keypad is also available. Contact your local Rain Bird Maxicom Distributor for ordering information.
Configuration You can configure the Freedom System by connecting the base unit to a serial port on your Maxicom2 computer (see fig. 1). This configuration requires additional equipment that is not included with the Freedom System. Be certain to obtain the additional equipment that is required for the installation. (See page 5, “Additional Equipment.
2 Installing the Freedom System Additional required equipment • Heavy-duty antenna mast for mounting the central antenna (Radio Shack model #15-843). The antenna mast must be five-feet long, 16-gauge steel, enamel finished, and 1 1/4-inch diameter. • Steel brackets for mounting the antenna mast.
Installing the base unit Select a suitable location for the base unit, either on a desktop or mounted on a wall (see below). To avoid possible interference with the Maxicom2 computer monitor, position the base unit at least six feet away from the monitor, but within 25 feet (the length of the communication cable) of the Maxicom2 computer. Make sure that you select a location that will allow you to route a 25-feet coaxial cable from the base unit to the central base antenna.
;@À;@À 2 Installing the Freedom System 5. Connect the the communication cable’s male connector (a phone jack-type connector) to the socket on the Freedom System base unit marked “Remote Control Phone.” Figure 2: Freedom System base unit 6. Post a copy of the FCC license near the base unit.
Installing the central base antenna and surge arrestor Select a suitable site for installing the antenna that will be both safe and give it the best performance. Most antennas are supported by a pipe mast that is attached to the side wall, roof, chimney, or eaves of a building with brackets, straps, or a tripodtype mount. Antennas can also be attached to self-supporting towers or masts and may require guying for stability.
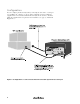
2 Installing the Freedom System Figure 4: Weatherproofing the coaxial cable connections 5. Attach the antenna to the top of the mast using the U-bolts, nuts, and lock washers provided with the antenna. 6. Attach a #10 GA (or larger) bare copper grounding terminal lug to one side of the U-bolt. Figure 5: Ground wire terminal lug and ground wire installation detail of central base antenna 7.
You can also mount the surge arrestor on the inside of the wall (see fig. 6). Securely attach the surge arrestor by using the surface mounting bracket attached to it. Place the surge arrestor as close as possible to where the grounding rod will be grounded. 11. Form a rain drip loop in the coaxial cable at the point before it enters the building (see figs. 3 and 6). Notes: • All exterior connections must be waterproof. • Keep interior wire run to a minimum with coaxial cable because it is not fire rated.
3 Using the Freedom System System setup Setting passwords and changing them periodically protects your system from unauthorized use. You always have complete access to the Maxicom2 system from the computer keyboard. You only need the password to gain access to the Maxicom2 system when you are using the Freedom handheld radio unit or remote telephone. You can use one password with the Freedom System. The Freedom password allows access to all levels of the Freedom System.
If you do not enter start and end times, both times will default to 12:00 a.m., meaning the window is always open. To set the Freedom Time Window: 1. Select Open from the Site menu. The Open An Existing Site dialog box opens. If you have not set up any sites yet in Maxicom2, see the Maxicom2 manual for instructions on setting up sites. 2. Highlight a site for which you would like to set the Freedom Time Window, and then select Open. The site opens. 3. Select Properties from the Site menu.
3 Using the Freedom System 4. Click on the Contact tab. The Contact Sheet comes to the front. Note that at the bottom of the sheet, you are able to set the Freedom Time Window. 5. Enter the time to start the Freedom Time Window. Use a 12-hour time format. Or, use the scroll buttons on the right side of the field to enter the time without typing. You can enter only one start time. 6. Enter the time to end the Freedom Time Window. Use a 12-hour time format.
System operation Understanding the handheld radio The Freedom handheld radio allows you direct access to the Maxicom2 computer from the field. By entering commands with the radio keypad, you have field control for individual stations as well as total system control. The radio can also be used to contact other radios at your site or to receive and make telephone calls from the field. While using the radio, you must keep in mind three important rules: • Monitor the frequency before you talk.
3 Using the Freedom System Sending commands To use the radio to send commands: 1. Turn the volume control knob to the ON position. The radio runs a quick self-test when you turn it on. If the radio works properly, you will hear a short confirmation tone to indicate the radio is ready for use. If the radio does not work properly, consult Chapter 4, Troubleshooting the Freedom System on pg. 25. If you still have difficulty with the radio, contact your Rain Bird Maxicom distributor. 2.
If the local user is manually on-line with a site, and a Freedom user attempts to initiate contact, a message will appear on the Maxicom2 screen, informing the local user that Freedom contact is being attempted. The message will ask if the local user wants to terminate contact. The default answer is “no.” If the local user wishes to monitor the Freedom user’s activities: 1. Open the site to be monitored. 2. From the Site menu, select Manual Contact, Monitor Site. 3. Open the Communications window.
3 Using the Freedom System To turn off access for a specific time period: Press ##4321#2#(1 – 9)## You have closed access to the system for a specific period (1 – 9 hours, depending upon your selection). Contacting the Freedom System by telephone 1. Dial the Freedom System telephone number. 2. Wait until you hear the Freedom System answer. 3. Enter ##XXXX#1#tt## (XXXX = password) Enter a time (tt) only if you desire an access time other than the eight-hour default access time. 4.
3. Specify the site number you would like to contact. For example, to contact site number 5, enter ##5##. It takes Maxicom2 approximately 30 seconds to contact a site. You will hear wait beeps, which are short beeps occurring once every second. • If you entered a valid site number, you will hear the OK beep. • If you entered an invalid site number, you will hear the error beep. If you hear the error beep, enter a valid site number. 4. Verify that you are on-line with the site by entering ##.
3 Using the Freedom System Summary of Freedom System commands There are two sets of commands for the Maxicom2 Freedom System: • The first set of commands are used while on-line with a CCU. These commands are the most commonly used commands and are available to all of the passwords. See “Commands used while on-line with a CCU,” below. • The second set of commands controls the features within Maxicom2. These commands are available only after entering the master password.
Command name Format Description Examples ##1#cc#ss {#ss#ss}#tt## Turns on stations(s) ss on channel cc for tt ##1#3#5#11#13## Turns on stations 5 and 11 on channel 3 for 13 minutes. If you enter more than one station, then the time must be entered. Command 1 Turn on station(s) ##1#5#12## Turns on station 12 on channel 5 for two minutes. If you enter only one station and do not specify any time, then the default time is two minutes.
3 Using the Freedom System Command name Format Description Examples ##52## Turns off the station previously turned on by command 51. ##52## The station turned on by command 51 turns off. You do not have to specify the channel and station because Maxicom2 maintains that information. If you use this command without first turning on a station with command 51, you hear an error beep.
Command name Description Examples Command 76 Resume a paused schedule ##76#SSSS## Resumes an interrupted schedule. ##76#15## Resumes schedule 15. If you omit SSSS, all paused schedules resume, therefore ##76## resumes all paused schedules. Command 8 Hang up on the current site and begin the command sequence with another site. ##8## Hangs up on the site currently on-line. Enables user to enter a new site without re-entering a password.
3 Using the Freedom System 2 Commands used to control Maxicom features For the following commands listed in the table below: • t = hour(s) SSS = site(s) • SSS can be 1, 2, or 3 digits. • Anything in brackets { } is optional and unlimited in length. Command name Format Description Examples Command 1 Set site(s) to auto-on ##1{#SSS...}## Sets site(s) SSS to auto-on. ##1#3#5#11#15## Sets sites 3, 5, 11, and 15 to auto-on. If no sites are entered, then all sites are set to auto-on.
4 Troubleshooting The following pages contain possible problems you may encounter and solutions. Before calling Rain Bird, check this list. If you cannot solve the problem yourself, a simple program called “Clemar 2” is available to confirm that the Freedom System’s repeater, FR-200, radios, PC, cable, and telephone interface are properly functioning. It is available by calling Rain Bird Golf Technical Services at 1.800.984.2255 and pressing 4, or faxing a request to 626.912.3616.
Problem: A short warning tone sounds every 15 seconds while the handheld radio is on. Solution: Recharge the battery pack. (A final longer tone means that the battery is discharged and the radio has turned itself off.) Problem: The handheld radio does not work at all. Solution: • Make sure the battery is installed correctly. • Change or replace the battery. • Try the battery from a working radio. If the radio works with that battery, the original battery may be bad. • Try a different battery charger.
4 Troubleshooting Problem: You hear a busy signal when you try to contact Maxicom2. Solution: If you contact Maxicom2 when it is already on-line with a site, you will hear a busy signal, which consists of many long tones, after you have entered a site number other than 0. If you hear a busy signal, enter #* and hang up.
a Appendix Telephone interface with the Freedom System You can contact the Freedom System and operate the Maxicom2 system from a remote location via telephone. You may also use the handheld radio to receive and send calls from the field through the Freedom System base unit. In order to use the Freedom System’s full capabilities, you will need to connect a dedicated phone line to the Freedom System base unit. Any modem, desk telephone, answering machine, etc.
Using the handheld unit for telephone operations Answering a phone call 1. Press and hold the PTT button and press *. 2. Answer the call as you would with a normal telephone, speaking into the microphone. Press and hold the PTT at all times when you are talking. 3. Release the PTT button in order to listen to the person on the other end of the line. The radio will emit a “cutover” beep when you release the PTT button.
a Appendix Setting up the base unit (6xx* commands) Once you have set up the Maxicom2 computer to interact with the Freedom System, you are ready to set up the Freedom System base unit. All the commands that are entered into the radio that control base unit operation are know as 6xx* commands. The base unit beeps four times when it receives a 6xx* command. If you do not hear any beeps, re-enter the command. If you still do not hear any beeps: • Make sure the base unit is plugged into a 120 VAC power outlet.
Command name Command Function Additional comments Set the base unit to answer incoming telephone calls 672* • Allows the radio to transmit commands to the base unit. • Sets the base unit to answer remote telephone calls which allows the user to operate the Maxicom2 system by remote telephone. • Allows outgoing calls from the radio. The handheld unit will not ring when the base unit receives an incoming telephone call.
a Appendix Caring for the Freedom System equipment • The radio is not waterproof. Do not immerse it in water or expose it to excessive moisture. • Do not expose the radio to extreme heat such as direct sunlight in a closed vehicle. • Detergents, alcohol, aerosol sprays, and petroleum products can damage the case. Clean the case using a soft cloth moistened with water. • Fully charge the battery pack before you use the radio for the first time. Do not fast charge a new battery; this can shorten battery life.
Optional equipment The following optional equipment is available from your Rain Bird Distributor: Product model No. Description FTX-450-01 FTX-450 5 Watt/UHF handheld radio w/DTMF pad, 11 channel 5 Watt/UHF handheld radio w/o DTMF pad, 11 channel 5 Watt/UHF handheld w/DTMF pad and w/high cap. NiCad 5 Watt/UHF handheld w/o pad and high cap. NiCad Watt/UHF handheld w/o pad and w/extra high cap.
a Appendix Battery life and charging time Battery life (90-5-5 duty cycle) Model BPX-8N Capacity Type BPX-8N-HC 650 mAh NiCad BPX-8N-MH 800 mAh NiCad 1100 mAh NiMH Five watts Battery saver enabled Battery saver disabled 90% duty cycle 5% duty cycle 8 hrs. 4.7 hrs. 7.2 hrs. 24 mins. 9.8 hrs. 5.8 hrs. 8.8 hrs. 29 mins. 15.8 hrs. 8.7 hrs. 14.2 hrs. 47 mins. Two watts Battery saver enabled Battery saver disabled 90% duty cycle 5% duty cycle 13.3 hrs. 6.2 hrs. 12 hrs. 40 mins. 16.4 hrs. 7.6 hrs. 14.
FCC regulations Telephone interface information Specifications Ringer equivalence: 0.7B Universal service order code: RJ11C DOC number: 1084 3399 A Prohibited connections The FP-200 autopatch unit may not be connected to a. party telephone line b. telephone line providing phone service Installation requirements All subscriber connections to the telephone system are to be made with standard plugs and telephone company supplied jacks (or their equivalent).
a Appendix If problems occur If a problem occurs that causes interference or difficulty within the telephone network, disconnect the Freedom System (FP-200 autopatch unit) from the telephone network by removing the modular plug from the telephone jack (Phone Line Input) on the Freedom System base unit. Neither you nor your distributor should attempt to repair the Freedom System base unit, the FP-200 autopatch PC board, or the RR-454 PC board.
Safety standards The FCC (with its action in General Docket 79-144, March 13, 1986) has adopted a safety standard for human exposure to radio frequency electromagnetic energy emitted by FCC regulated equipment. We strongly recommend that you observe these standards, especially the guidelines below: • Do not position the radio antenna near the face, eyes, or other exposed parts of the body while transmitting. Keep the radio vertical, two-to-three inches away, while talking into the front panel grill.
PN 633888