Your Data Security Guardian SafeTANK GR5630-WSB3+ User Manual v.1.0 (Oct, 2012) www.RAIDON.com.
Your Data Security Guardian Introduction Thank you for purchasing RAIDON products. This manual will introduce the GR5630-WSB3+. Before using your GR5630-WSB3+, please read this manual thoroughly. Although all information contained in this user manual has been carefully verified before publishing, however, the actual product specification will be based on the time of delivery from RAIDON. Any updates to the product specifications or relevant information may be found on www.RAIDON.com.tw.
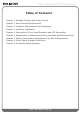
Your Data Security Guardian Table of Contents Chapter 1. Package Contents and Product Views Chapter 2. Environmental Requirements Chapter 3. Hardware Requirements and Precautions Chapter 4. Hardware Installation Chapter 5. Description of Front Panel Operation and LCD Information Chapter 6. Replacement of Malfunctioning Drive and Data Rebuild Instructions Chapter 7. System Temperature Overheat and Fan Failure Management Chapter 8. Visual Status Indicator Definitions Chapter 9.
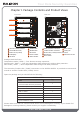
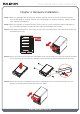
Your Data Security Guardian Chapter 1 Package Contents and Product Views Front view Rear view Drive position(1) Alarm Mute Drive position(2) USB3.0 Drive position(3) Drive position(4) Enter Hard drive status Indicator Removable drive tray Button for Tray Clamp LCM display UP button Esc DOWN button ENTER button ESC button Power indicator Alarm indicator Power socket USB3.
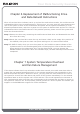
Your Data Security Guardian Chapter 2 Operating Information Operating Temperature : 0 ∼40 ℃ (32 ~ 104 ℉) Storage Temperature : -10 ∼70 ℃ (14 ~ 158 ℉) Line Voltage : 100 ∼ 240V AC Chapter 3 Hardware Requirements and Precautions 1. Only one interface connection may be used at once per computer system. 2.
Your Data Security Guardian Chapter 4 Hardware Installation Step 1 Open the package and take out the product making sure that all the enclosed contents are not damaged or missing. Should you find damages or missing contents, please contact your supplier immediately. Step 2 Place the system on a stable surface. Ensure that it is well ventilated without blockage to the vent and kept away from areas near water and damage prone areas.
Your Data Security Guardian Step 6 Connect the AC power cable to the GR5630-WSB3+, and then plug the AC power to the wall socket. Boot-up the unit. Step 7 Set the storage mode using the LCD and buttons on the front (please refer to section 5 for front panel and LCD information). Step 8 Connect the cable to the PC and the GR5630-WSB3+ port. Step 9 After boot-up, your operating system will automatically detect the storage capacity of your hard drives.
Your Data Security Guardian Chapter 6 Replacement of Malfunctioning Drive and Data Rebuild Instructions When a front hard drive indicator has lit up red and the audio alarm sounds, this could mean the indicated hard drive may be malfunctioning.
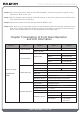
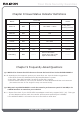
Your Data Security Guardian Chapter 8 Visual Status Indicator Definitions Front LED States buzzer Power LED Alarm LED HDD LED Power on Blue -------- Blue flash => Blue 1 long when booting finished No disk Blue -------- -------- -------- Disk Fail Blue -------- Red -------- RAID Fail Blue -------- Red 4 short Disk Idle Blue -------- Blue -------- Format Blue -------- Blue flash -------- Access Blue -------- Blue flash -------- Fan Fail Blue Red Blue 4 short Over