
User Manual
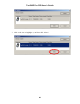
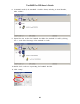


Table Of Contents
- Read Before Operating
- 1. General Information
- 2. Specifications
- Radio Specifications
- 3. Overview
- 4. User Interface
- 5. Charging The ToxiRAE Pro PID
- 6. Turning The ToxiRAE Pro PID On
- 7. Turning The ToxiRAE Pro PID Off
- 8. Testing The Alarms (Manually)
- 9. Low Battery Warnings
- 10. Dead Battery Warning & Shutoff
- 11. Operating The ToxiRAE Pro PID
- 11.1. Overview
- 11.2. Navigation In Normal Mode
- Step through the screens in Normal Mode by pressing [MODE]. Some screens allow actions on your part, such as clearing the data. In these instances, pressing [Y/+] performs the action.
- 11.2.1. TWA, STEL, Peak
- The first screen includes a readout for TWA, STEL, and Peak readings.
- TWA The TWA (time-weighted average) reading is the average reading of the gas concentration times that the monitor has been on, prorated to an 8-hour period.
- Peak The Peak value tells you the highest reading for the sensor since the ToxiRAE Pro PID was turned on. Press [Y/+] twice to clear the Peak value.
- 11.2.2. Date, Time, And Temperature
- The current Date is expressed as Month/Day/Year, with two digits for month and day, and four digits for the year. Below the date is the time, which is expressed as Hours/Minutes/Seconds, with two digits for each. The time is in 24-hour (military) form...
- The current wireless settings are shown here. These include the Roaming, PAN ID, Channel, and Unit ID, which are helpful when creating or troubleshooting networks. Parent ID data does not apply.
- 11.3. Programming
- 11.4. Entering Programming Mode
- 11.5. Programming Menus
- This operation erases all data stored in the datalog.
- Note: Once the datalog is cleared, the data cannot be recovered.
- Press [Y/+] to clear the datalog. The display asks, “Are you sure?”
- Press [Y/+] if you want to clear the datalog. When it has been cleared, the display shows “Datalog Cleared!”
- Press [MODE] if you do not want to clear the datalog.
- You are taken to the next submenu, Interval.
- When you have completed your selections, press [MODE] repeatedly until “OK” is highlighted.
- To save the new value, press [Y/+].
- To cancel the changes and keep the settings as they were, press [MODE] to highlight “Cancel.” Then press [Y/+].
- You are taken to the next submenu, Data Selection.
- Data Selection allows you to select which types of data are recorded and made available when you download your datalog to a computer via ProRAE Studio II software.
- You can choose any or all of four types of data (you must choose at least one):
- Minimum
- Average
- Maximum
- Real Time
- 1. Press [MODE] to step from one option to the next. The highlighter indicates your choice.
- 2. Press [Y/+] to toggle your selection on or off (the check box indicates “on” with an “X”).
- 3. When you have completed your selections, press [MODE] repeatedly until “Exit” is highlighted.
- 4. Press [Y/+] to save the changes and exit.
- The instrument has two datalog types:
- Auto Collects datalog information when the instrument is sampling until the datalog memory is full.
- Manual Datalogging occurs only when you manually initiate datalogging (see below for details).
- 1. Press [MODE] to step from one option to the next.
- 2. Press [Y/+] to make your selection (the dark circle in the “radio button” indicates that an option has been selected).
- 3. When you have completed your selection, press [MODE] until “Exit” is highlighted.
- 4. Press [Y/+] to save your selection and exit.
- When the instrument is set to Manual Datalog, you can turn datalogging on and off from the main measurement display in the Normal Mode by pressing the [MODE] key three times.
- When you reach the screen that says “Start Datalog?” press [Y/+] to start it. You see “Datalog Started,” confirming that datalogging is now on.
- When you reach the screen that says “Stop Datalog?” press [Y/+] to stop it. You see “Datalog Stopped,” confirming that datalogging is now off.
- There are seven Wireless parameters:
- Radio On/Off
- Roaming
- PAN ID
- Channel
- Join Network
- Interval
- Off Network Alarm
- Factory Reset
- Radio On/Off This turns the wireless modem on or off.
- Note: Turning the radio off does not change any of the settings. They are stored and ready for use the next time the wireless modem is turned on.
- Choose and enter a 3-digit PAN ID:
- Choose and enter a 2-digit Channel:
- Interval This sets the amount of time between data transmissions to the EchoView Host.
- To change the Interval:
- 1. Press [MODE] to step from one option to the other. The highlighted option changes each time you press [MODE].
- 2. Press [Y/+] to make your selection (the dark circle in the “radio button” indicates the option has been selected).
- 3. When you have completed your selection, press [MODE] repeatedly until “Exit” is highlighted.
- 4. Press [Y/+] to save your selection, exit the Interval menu, and advance to “Off Netwk Alarm.”
- Off Netwk Alarm When this is enabled, the unit goes into alarm whenever an active network connection is lost. This informs you that connectivity has been broken between the ToxiRAE Pro and the EchoView Host.
- Factory Reset Selecting this resets the wireless settings to their original factory configurations.
- CAUTION! A factory reset of the wireless settings deletes any customized settings and cannot be undone.
- 1. Press [Y/+] to select “Factory Reset.” You will see the message “Reset wireless settings?”
- 2. Press [Y/+] for “Yes” or [MODE] for “Exit.” If you select “Exit,” the ToxiRAE Pro exits without performing a factory reset.
- Choose and enter an 8-digit alphanumeric Site ID to uniquely identify the particular site where the instrument is to be used. This Site ID is included in the datalog report.
- Enter an 8-digit alphanumeric User ID to uniquely identify a user. This User ID is included in the datalog report.
- The ToxiRAE Pro PID has two user modes:
- Basic Basic users can only see and use a basic set of functions.
- Advanced Advanced users can see all screens and take advantage of all available functions.
- Note: The default value for User Mode is Basic.
- To change the User Mode:
- 1. Press [MODE] to step from one option to the other. The highlighting changes each time you press [MODE].
- 2. Press [Y/+] to make your selection (the dark circle in the “radio button” indicates the option has been selected).
- 3. When you have completed your selection, press [MODE] repeatedly until “Exit” is highlighted.
- 4. Press [Y/+] to register your selection, exit the User Mode submenu and advance to Date.
- The Date is expressed as Month/Day/Year, with two digits for each (MM/DD/YY).
- 4. Press [Y/+] to save your selection and advance to Time. Note: If you do not want to save the change, press [MODE] repeatedly until “Cancel” is highlighted. Press [Y/+] to exit to Time without saving the changes.
- The Time is expressed as Hours/Minutes/Seconds, with two digits for each. The time is in 24-hour (military) format of HH:MM:SS.
- The display unit of the internal temperature sensor can be switched between Fahrenheit and Celsius.
- To change the Temp. Unit:
- 1. Press [MODE] to step from one option to the other. The highlighted option changes each time you press [MODE].
- 2. Press [Y/+] to make your selection (the dark circle in the “radio button” indicates the option has been selected).
- 3. When you have completed your selection, press [MODE] repeatedly until “Exit” is highlighted.
- 4. Press [Y/+] to save your selection, exit the Temp. Unit menu, and advance to Language.
- English is the default language, but other languages can also be selected for the instrument.
- 1. Press [MODE] to step from one option to the next. The highlighted option changes each time you press [MODE].
- 2. Press [Y/+] to make your selection (the dark circle in the “radio button” indicates this option has been selected).
- 3. When you have completed your selection, press [MODE] repeatedly until “Exit” is highlighted.
- 4. Press [Y/+] to save your selection, exit the Language submenu, and advance to Zero At Start.
- When Zero At Start is turned on, the instrument starts with a zero calibration every time it is turned on.
- 1. Press [MODE] to choose between “Off” and “On.”
- 2. Press [Y/+] to make your selection (the dark circle in the “radio button” indicates your selection).
- 3. When you have completed your selection, press [MODE] repeatedly until “Exit” is highlighted.
- 4. Press [Y/+] to save your selection, exit the Zero At Start submenu, and advance to LCD Contrast.
- The display’s contrast can be increased or decreased from its default setting. You may not need to ever change the default setting, but sometimes you can optimize the display to suit extreme temperature and ambient brightness/darkness conditions.
- 1. Press and hold [Y/+] to select a desired level of contrast. The range is 1 to 100. Once 100 is reached, pressing [Y/+] again "wraps" around back to 1.
- 2. When you have completed your selection, press [MODE] repeatedly until “OK” is highlighted.
- 3. Press [Y/+] to save your selection, and exit the LCD Contrast. Note: If you do not want to save the change, press [MODE] repeatedly until “Cancel” is highlighted. Press [Y/+] to exit without saving the changes.
- 11.6. Exit (Exit Programming Mode)
- 12. Policy Enforcement
- 13. Bump Testing & Calibrating The ToxiRAE Pro PID
- 13.1. Bump Testing & Calibrating With An AutoRAE 2™
- 13.2. Calibration Adapter
- 13.3. Zero Calibration
- This operation sets the zero point of the sensor calibration curve for clean air. Expose the ToxiRAE Pro PID to a clean air source with 20.9% oxygen and without any organic, toxic, or combustible gas impurities. This “Zero Air” can come from a cylinde...
- Note: If you use a zero air cylinder, you must use the ToxiRAE Pro PID Calibration Adapter. Using a calibration adapter is not necessary for calibration in fresh air.
- Important! If you used the Calibration Adapter and a zero air cylinder, you must remove the Calibration Adapter from the ToxiRAE Pro PID. If the Calibration Adapter is attached during normal operation, inconsistent and lower-than-normal readings will ...
- 13.4. Span Calibration
- This procedure determines the second point of the sensor calibration curve for the sensor.
- To begin calibration, connect the calibration gas cylinder, flow regulator, and calibration adapter to the ToxiRAE Pro PID.
- Upon completion, the screen “Span is done!” appears along with the reading (it should be within 10% of the span gas concentration).
- Important! After calibration is complete, you must remove the Calibration Adapter from the ToxiRAE Pro PID. If the Calibration Adapter is attached during normal operation, inconsistent and lower-than-normal readings will occur because of decreased con...
- 13.4.1. Changing Span Gas Concentration
- If you selected “Change” for span gas concentration, the following screen appears:
- 1. Press [Y/+] repeatedly to select a desired number. Numbers increase from 0 to 9. Once 9 is reached, pressing [Y/+] again “wraps” around back to 0.
- 2. Step from one digit to the next by pressing [MODE].
- 3. When you are done, press [MODE] until either “OK” or “Cancel” is selected. Press [Y/+] to register your selection (if “OK” is highlighted) or to exit without registering it (if “Cancel” is selected).
- 14. Diagnostic Mode
- 15. Alarm Signal Summary
- 16. Downloading Datalogs And Performing PC-Based Instrument Configuration and Firmware Upgrades
- 17. Maintenance
- 18. Troubleshooting
- 19. Technical Support
- 20. RAE Systems Contacts
- 21. Appendix A: Regulatory Information

ToxiRAE Pro PID User’s Guide
39
12. Policy Enforcement
The ToxiRAE Pro PID can be configured to enforce a facility/company’s requirements
that calibration and/or bump testing be performed at specified intervals, and to warn the
user that calibration/bump testing is required. In addition, it can require calibration or
bump testing and not allow normal operation of the instrument unless calibration or bump
testing is performed.
If Policy Enforcement is enabled and if the instrument has been bump tested and
calibrated in compliance with the policy settings, a check-mark icon is included along the
top of the ToxiRAE Pro PID screen:
If Policy Enforcement is enabled, then after startup the ToxiRAE Pro PID displays a
screen that informs the user that the instrument requires either a bump test or a
calibration. If both are required, then they are shown in sequence.
12.1. Setting Policy Enforcement
You must use ProRAE Studio II to make changes to Policy Enforcement settings. The
procedure differs, depending on whether you are using an AutoRAE 2 Cradle, a
ToxiRAE Pro PID Travel Charger, or a ToxiRAE Pro PID Desktop Cradle.
12.1.1. AutoRAE 2 Cradle
Note: This procedure only works with a single AutoRAE 2 Cradle. It will not work with
an AutoRAE 2 Controller.
To program a ToxiRAE Pro PID via an AutoRAE 2 Cradle, you need ProRAE Studio II
Instrument Configuration and Data Management Software, the AutoRAE 2 Cradle
connected to a power source, and a USB PC communications cable.
1. Connect a USB cable between a PC with ProRAE Studio II and the AutoRAE 2
Cradle.
2. Apply power to the AutoRAE 2 Cradle.
3. Turn off the ToxiRAE Pro PID (or put the ToxiRAE Pro PID into PC
Communications Mode) and set it in the cradle.
4. Start ProRAE Studio II software on the PC.
5. Select “Administrator” and input the password (the default is “rae”).
6. Click “Detect the instruments automatically” (the magnifying glass icon with the
letter “A” in it). After a few seconds, the AutoRAE 2 Cradle is found and it is shown,
along with its serial number: