
User's Manual Part 1
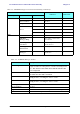
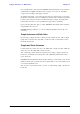
Table Of Contents
- Table of Contents
- List of Figures
- List of Tables
- Chapter 1
- Chapter 2
- Chapter 3
- Chapter 4
- Link Installation: The RADWIN Manager
- Installing theRADWIN Manager Application
- Starting the RADWIN Manager
- Login Errors
- Continuing without an IP Address
- Installing the Link: First steps
- Installing the Link: Overview
- Installing the Link: Step 1, Start the Wizard
- Installing the Link: Step 2, System Parameters
- Installing the Link: Step 3, Channel Settings
- Installing the Link: Step 4, Tx Power and Antenna Settings
- Installing the Link: Step 5, Services
- Installing the Link: Step 6, Installation Summary and Exit
- Link Installation: The RADWIN Manager
- Chapter 5
- Configuring the Link
- Link Configuration: Getting Started
- Configuring the Link: Overview
- Configuring the Link: Step 1, Start the Wizard
- Configuring the Link: Step 2, System Parameters
- Configuring the Link: Step 3, Channel Settings
- Configuring the Link: Step 4, Tx Power and Antenna Settings
- Configuring the Link: Step 5, Services
- Configuring the Link: Step 6, Configuration Summary and Exit
- Configuring the Link

Installing the Link: Step 4, Tx Power and Antenna Settings Chapter 4
RADWIN 1000/2000/5000 User ManualVersion 2.6.50p1 4-19
Figure 4-14: Channel Settings - Showing available installation rates
2. Click the check box if Automatic Channel Selection is required.
3. The Available Channels List contains all of the allowable channels for the
link. Check the channels that can be automatically selected.
Selecting a new channel causes the system quality to change. The Qual-
ity bar provides an indication of the link quality from poor (red) to good
(green) as shown in the bottom of figure 4-13 above.
4. Click Next.
Installing the Link: Step 4, Tx Power and Antenna Settings
The Tx Power and Antenna Parameters dialog appears.
Note
For version 2.1, channel bandwidth is set to 20 MHz and cannot be changed.