
User's Manual Part 1

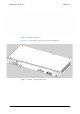
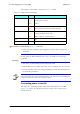
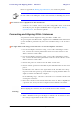
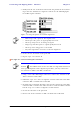
Table Of Contents
- Table of Contents
- List of Figures
- List of Tables
- Chapter 1
- Chapter 2
- Chapter 3
- Chapter 4
- Link Installation: The RADWIN Manager
- Installing theRADWIN Manager Application
- Starting the RADWIN Manager
- Login Errors
- Continuing without an IP Address
- Installing the Link: First steps
- Installing the Link: Overview
- Installing the Link: Step 1, Start the Wizard
- Installing the Link: Step 2, System Parameters
- Installing the Link: Step 3, Channel Settings
- Installing the Link: Step 4, Tx Power and Antenna Settings
- Installing the Link: Step 5, Services
- Installing the Link: Step 6, Installation Summary and Exit
- Link Installation: The RADWIN Manager
- Chapter 5
- Configuring the Link
- Link Configuration: Getting Started
- Configuring the Link: Overview
- Configuring the Link: Step 1, Start the Wizard
- Configuring the Link: Step 2, System Parameters
- Configuring the Link: Step 3, Channel Settings
- Configuring the Link: Step 4, Tx Power and Antenna Settings
- Configuring the Link: Step 5, Services
- Configuring the Link: Step 6, Configuration Summary and Exit
- Configuring the Link

Outdoor installation Chapter 3
RADWIN 1000/2000/5000 User ManualVersion 2.6.50p1 3-6
Figure 3-6: Typical Installation Diagram (with external antenna)
The installation steps are detailed in the following sections.
Outdoor installation
Mounting the ODU
The ODU can be mounted on a pole or a wall. In both installations, the sup-
plied mounting kit is used to secure the ODU.
A RADWIN 1000/2000/5000 link operates in pairs of two ODUs with the
same configuration. Both ODUs must be installed, and the antennas aligned
for maximum throughput.
Note
A mast-sited ODU typically uses a pole attached to the mast.