
User's Manual Part 1

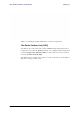
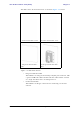
Table Of Contents
- Table of Contents
- List of Figures
- List of Tables
- Chapter 1
- Chapter 2
- Chapter 3
- Chapter 4
- Link Installation: The RADWIN Manager
- Installing theRADWIN Manager Application
- Starting the RADWIN Manager
- Login Errors
- Continuing without an IP Address
- Installing the Link: First steps
- Installing the Link: Overview
- Installing the Link: Step 1, Start the Wizard
- Installing the Link: Step 2, System Parameters
- Installing the Link: Step 3, Channel Settings
- Installing the Link: Step 4, Tx Power and Antenna Settings
- Installing the Link: Step 5, Services
- Installing the Link: Step 6, Installation Summary and Exit
- Link Installation: The RADWIN Manager
- Chapter 5
- Configuring the Link
- Link Configuration: Getting Started
- Configuring the Link: Overview
- Configuring the Link: Step 1, Start the Wizard
- Configuring the Link: Step 2, System Parameters
- Configuring the Link: Step 3, Channel Settings
- Configuring the Link: Step 4, Tx Power and Antenna Settings
- Configuring the Link: Step 5, Services
- Configuring the Link: Step 6, Configuration Summary and Exit
- Configuring the Link

The Radio Outdoor Unit (ODU) Chapter 1
RADWIN 1000/2000/5000 User ManualVersion 2.6.50p1 1-7
The ODU comes in two form factors as shown in figure 1-5 below:
Figure 1-5: ODU Form Factors
• Integrated Antenna ODU
This ODU has an integrated 370mm (1.2ft) flat panel antenna, with
a gain of 23dBi. The ODU contains both the radio and the antenna
as a single unit housed in a weatherproof case.
•Connectorized ODU
This ODU has 2x N-type connectors for connecting an external
antenna.
a. Connectorized ODU - Front b. Connectorized ODU - Rear
c. Integrated Antenna ODU -
Front
d. Integrated Antenna ODU -
Rear