
User Manual


AirMux-200 Installation and Operation Manual Chapter 2 Installation and Setup
Installation and Setup 2-7
ä
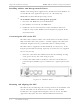
To align the ODUs using the AirMux Manager:
1. Connect power to the IDUs.
Do not stand in front of a live radio terminal.
2. Turn the local ODU in the direction of the remote ODU.
3. At the remote site, turn the ODU to face the local ODU. (Align
visually or by using a map and a compass).
4. Repeat step 3 for the local ODU to complete the installation
procedure.
5. Make sure that the management station is properly connected to
the same LAN as the IDU, and the AirMux Manager application is
running.
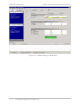
6. In the Main menu, click Monitor.
Once the wireless link is established between the local and
remote units, the Link Status indication bar in the middle of the
Main menu turns green. In addition, Radio Link - Sync message
appears in the logger at the bottom of the Main menu.
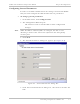
7. Check the radio signal strength (RSS) and sound-to-noise ratio
(SNR) in the Main menu. Rotate the local ODU until the best RSS is
found (better than -88 dBm). The SNR should be at least 9 dB.
Monitor these parameters for about 15 minutes to verify stability.
Try to achieve the best possible RSS and SNR values.
8. After achieving the best RSS and SNR levels, permanently attach the
ODU to the mast. Refer to Appendix B for the ODU mounting
instructions.
Connecting the User Equipment
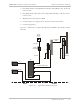
The IDU is a standalone desktop, wall-mounted or rack-installed unit.
Figure 2-2 illustrates a typical rear panel of the IDU.
ä
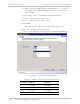
To connect user equipment to the IDU:
1. Connect a user mux or PBX to the IDU rear panel RJ-45 port
designated Trunk. Refer to Appendix A for the connector pinout.
Note
Warning