
Installation Guide
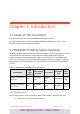
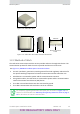
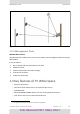
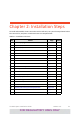
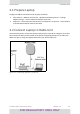
Table Of Contents
- Installation Guide
- Table of Contents
- Chapter 1: Introduction
- Chapter 2: Installation Steps
- 2.1 Prepare Laptop
- 2.2 Connect Laptop to Radio Unit
- 2.3 Update Connectivity Parameters of Radio Unit
- 2.4 Check items to be installed
- 2.5 Prepare Tools
- 2.6 Mount the HBS
- 2.7 Connect HBS antenna
- 2.8 Install SU Mounting Kit
- 2.9 Mounting the SU
- 2.10 Ground Radio Unit
- 2.11 Mounting the Lightning Protection Units
- 2.12 Waterproofing
- 2.13 Connect Radio (External Connections)
- 2.14 Check Connectivity to Radio
- 2.15 Request (and receive) permitted frequencies
- 2.16 Activate HBS
- 2.17 Align SU Unit
- Chapter 3: Safety Practices and Provisions
- Appendix A: Wiring Specifications
- Appendix B: About Antennas
- Appendix C: Terminology
- Appendix D: Certified Antennas
- RADWIN Worldwide Offices

TVWhiteSpaceInstallationGuide Release1.0 2‐1
Chapter2:InstallationSteps
Toinstallandestablishabasicconnectionwitharadiounit,carryoutthestepsshownbelow.
Printoutthislist,andplaceacheckmarknexttoacompletedtask.
Table2‐1:InstallationCheck‐List
Step Action Page Done?
Beforedeployingatinstallationsite
1.
PrepareLaptop page 2‐2
2.
ConnectLaptoptoRadioUnit page 2‐2
3.
UpdateConnectivityParametersofRadioUnit page 2‐4
4.
Checkitemstobeinstalled page 2‐5
5.
PrepareTools page 2‐6
Installation
6.
MounttheHBS page 2‐6
7.
ConnectHBSantenna page 2‐7
8.
InstallSUMountingKit page 2‐9
9.
MountingtheSU page 2‐13
10.
GroundRadioUnit page 2‐13
11.
MountingtheLightningProtectionUnits page 2‐14
12.
Waterproofing page 2‐17
Commissioning
13.
ConnectRadio(ExternalConnections) page 2‐18
14.
CheckConnectivitytoRadio page 2‐19
15.
Request(andreceive)permittedfrequencies page 2‐20
16.
ActivateHBS page 2‐20
17.
AlignSUUnit page 2‐21
FOR REGULATORY USES ONLY