
Installation guide

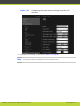
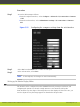
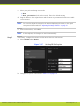
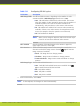
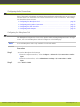
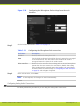

Table 5-8 Configuring general camera settings
Field Name Description
Default camera Specifies to which input of the XT Codec Unit the main camera
is connected. Typically it is HD CAM 1. The default camera is
automatically activated when the system powers up.
Driver Sets the camera driver for the connected camera.
Automatic allows automatic identification of the correct
driver at system start up. Automatic detection is available
only if the camera is connected using a VISCA Cross cable.
Camera control by far site Enables/disable control of my camera(s) by the remote
endpoint.
Bring back to place If enabled, the system stores camera positions when the
camera is switched off, and retrieves this position the next
time the camera is switched on.
Always power on camera Ensures the camera does not automatically power off,
enabling the system to be switched on via remote control, if
the camera has an infra-red receiver.
Camera privacy mode Places the camera in a sleep position, with the lens facing
down and to the left, when the system is in screen saver or
privacy mode (this is the default setting).
Digital zoom Enables digital zoom for cameras equipped with this feature.
Step 3
In the web interface, select Save.
Note
In the endpoint, the changes are saved automatically.
Step 4
To configure the main camera connection: configure settings on the HD1 page as described in
Table 5-9 on page 68.
a. Select HD1 under Cameras.
RADVISION | Installation Guide for SCOPIA XT5000 Series Version 3.1 Initial Configuration | 66