
Installation guide


Setting the Time Zone
You can set the time zone from your endpoint or the SCOPIA XT Series web interface.
Procedure
Step 1
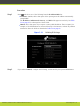
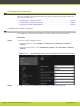
Access the time zone settings as follows:
•
From the web interface, select Administrator Settings > System > Date & Time > Time
Zone.
•
From the endpoint, select Configure > Advanced > System > Date & Time > Time Zone.
You need to enter the PIN required to access the Advanced settings. The default PIN is
1234.
Step 2
Configure settings as described in Table 5-6 on page 62.
Table 5-6 Configuring time zone related settings
Field Name Description
Select the time zone to which the system belongs.
Enable daylight time Set the daylight or summer time field to Yes or No
according to the current daylight-saving status of your
time zone.
Start (dd/mm) Set the day and month to indicate when daylight
saving times start.
Stop (dd/mm) Set the day and month to indicate when daylight
saving times end.
Step 3
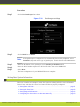
In the web interface, select Save.
Note
In the endpoint, the changes are saved automatically.
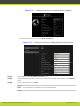
Setting Regional Information
You must configure the region-related settings: the country and language. You also need to
configure audio coding and video frequency, because your video network depends on the local
infrastructure. The system suggests the optimal values for audio coding and video frequency
when you enter the country value.
You may have set some of these fields in the Quick Setup screens as they belong to the
minimal setting requirements (for details, see “Performing Basic Configuration” on page 53).
You can modify these settings at any time from the endpoint or the web interface.
Procedure
Step 1
Access the SCOPIA XT Series web interface.
RADVISION | Installation Guide for SCOPIA XT5000 Series Version 3.1 Initial Configuration | 62