
Installation guide

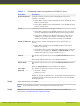
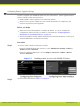
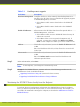
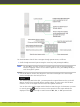

Table 5-1 Configuring remote management on SCOPIA XT Series
Field Name Description
Web management Configure whether to allow remote management via the web
interface, as follows:
•
Select Yes to enable remote management of the SCOPIA XT Series
from its web interface.
•
Select No to disable remote management of the SCOPIA XT Series
from its web interface.
HTTPS Configure your web security settings, as follows:
•
Select Yes to enable secure HTTPS connection to the web when
remotely managing the SCOPIA XT Series from its web interface.
•
Select No to disable secure HTTPS connection to the web. For
example, if you remotely configure your endpoint only from
within your network, it may not be necessary to use HTTPS.
Enable all addresses Allow access to remote management for all or specific PCs, as
follows:
•
Select Yes to enable access to SCOPIA XT Series from any IP
address in a network.
•
Select No to allow access to specified computers only. If selected,
you must also configure the Address and SubNet mask of each
computer for which you want to enable access.
Address This field is only relevant if you set the Enable all addresses field as
No.
Enter the IP address allowed to access SCOPIA XT Series.
Subnet mask This field is only relevant if you set the Enable all addresses field as
No.
Enter the Subnet mask associated with the IP address.
User name The default credentials for remote access are displayed:
•
username - Admin
•
password - 1234
Modify the default credentials here. We strongly recommend that you
change the default credentials the first time you access the SCOPIA
XT Series remotely.
Password
Step 3
In the web interface, select Save.
Note
In the endpoint interface, your changes are automatically saved.
Step 4
If you want to perform remote upgrades, you must first enable remote downloads, as
described in “Configuring Remote Upgrade Settings”.
RADVISION | Installation Guide for SCOPIA XT5000 Series Version 3.1 Initial Configuration | 39