
Installation guide

Procedure
Step 1
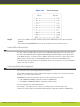
Verify you have a shielded stereo audio cable with an 1/8” stereo audio plug.
Step 2
Insert the green plug into the green analog connector.
Step 3
Insert the white plug into the left audio device connector.
Step 4
Insert the red plug into the right audio device connector.
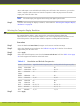
Connecting the Video Equipment
These sections describe how to connect the video devices to the XT Codec Unit.
•
Connecting the Primary XT Premium Camera.......................................... page 30
•
Connecting the Optional XT Premium Camera .......................................... page 31
•
Connecting Cameras for Controlling the Optional XT Premium Camera with the XT
Remote Control Unit ....................................................................... page 33
•
Using a DVD or Blu-ray Player............................................................. page 34
•
Connecting Analog Video Equipment..................................................... page 34
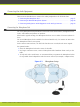
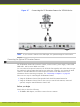
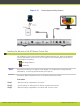
Connecting the Primary XT Premium Camera
Place the camera in a position to ensure eye contact between local and remote participants.
Recommended position is either directly below or directly above the monitors, in central
position, at a distance which enables capture of the entire table.
Caution
Do not place the camera on top of the XT Codec Unit. It can cause the system to overheat.
Procedure
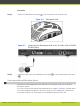
Step 1
Remove the camera stabilizing cartons.
Caution
A failure to remove the camera stabilizing cartons before connecting the
camera can cause damage to the system.
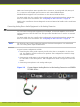
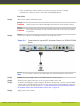
Step 2
Connect the XT Premium Camera to these ports on the XT Codec Unit using the camera
cable:
•
HD CAM port
•
Power and control port
RADVISION | Installation Guide for SCOPIA XT5000 Series Version 3.1 Setting up the SCOPIA XT Series | 30