
Installation guide
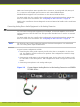
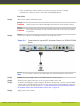
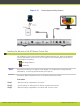

Since audio input is not included in the DVI-I port to XT Codec Unit connection, you need to
make a separate audio connection from the computer’s audio output port into the audio
input port of the XT Codec Unit.
Note
The audio input port supports both analog and digital optical audio.
Step 3
Continue with setting the display resolution, as described in “Selecting the Computer Display
Resolution” on page 26.
Selecting the Computer Display Resolution
For optimal display quality, and to prevent the screen from flickering during the
videoconference, set the computer display to one of the supported picture resolutions and
refresh frequencies. This procedure assumes computers running Microsoft Windows.
Procedure
Step 1
From the Windows Control Panel, navigate to the screen resolution settings.
Step 2
Select the desired screen resolution. See Table 4-2 on page 26 for the list of resolutions
supported by the XT Codec Unit.
Step 3
Select Apply.
Step 4
Select the refresh frequency rate from the Screen refresh rate field. See Table 4-2 on page
26 for the supported resolution and refresh rates.
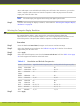
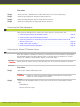
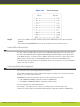
Table 4-2 Resolution and Refresh Frequencies
Name Resolution Digital Refresh Frequency (Hz) Analog Refresh Frequency (Hz)
1080p 1920x1080 60 60
SXGA 1280x1024 60,75 60, 75
HD+
(900p)
1600x900 60 N/A
WSGA 1440x900 60 60
UVGA 1280x960 60, 85 60, 85
WXGA 1280x768 60 N/A
720p 1280x720 60 60
XGA 1024x768 60, 70, 75 60, 70, 75
SVGA 800x600 60, 72, 75 60, 72, 75
VGA 640x480 72, 75 72, 75
Step 5
Select Apply.
RADVISION | Installation Guide for SCOPIA XT5000 Series Version 3.1 Setting up the SCOPIA XT Series | 26