
Installation guide

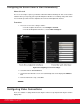

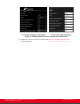
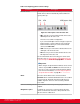
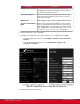
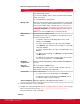

Table Of Contents
- Installation Guide for Scopia XT5000 Endpoint with Embedded Server for IP Office Version 3.2
- Table of Contents
- Chapter 1: About the Scopia XT Endpoint for IP Office
- Chapter 2: Installation Workflow for Scopia XT Endpoint for IP Office
- Chapter 3: Planning the Topology of the Scopia XT Endpoint for IP Office Deployment
- About the Scopia XT Endpoint for IP Office Embedded MCU
- Planning the Topology of Scopia XT Endpoint for IP Office with Scopia XT Desktop
- Planning NAT and Firewall Traversal with Scopia XT Endpoint for IP Office
- Supporting ISDN Connectivity
- Implementing External API Control
- Implementing Port Security for the Scopia XT Endpoint for IP Office
- Chapter 4: Prerequisites for Setting up the System
- Chapter 5: Setting up the Scopia XT Endpoint for IP Office
- Mounting the XT Codec Unit
- Connecting Scopia XT Endpoint for IP Office to Your Network
- Connecting a Computer to the Scopia XT Endpoint for IP Office
- Selecting the Computer Display Resolution
- Connecting Audio Equipment to the Scopia XT Endpoint for IP Office
- Connecting the Video Equipment to the Scopia XT Endpoint for IP Office
- Connecting the Primary XT Premium Camera
- Connecting the Optional USB Camera
- Connecting the Optional XT Premium Camera
- Connecting Cameras for Controlling the Optional XT Premium Camera with the XT Remote Control Unit
- Connecting the Optional Scopia XT Camera Switch
- Connecting a DVD or Blu-ray Player
- Connecting Analog Video Equipment
- Installing the Batteries of the XT Remote Control Unit
- Chapter 6: Initial Configuration
- How to Control the XT Endpoint
- Registering and Enabling your Scopia XT Endpoint for IP Office license
- Performing Basic Configuration
- Registering the XT Endpoint to IP Office
- Setting Basic System Information
- Configuring Video Connections
- Configuring Audio Connections
- Configuring Network Settings
- Chapter 7: Securing your Scopia XT Endpoint for IP Office
- Chapter 8: Troubleshooting the Scopia XT Endpoint for IP Office

Table 20: Configuring advanced camera settings
Field Name Description
Enable Select Yes to enable this camera. Otherwise, you cannot use the
video input from this camera.
If you connected multiple cameras via the Scopia XT Camera Switch,
enable each camera.
You cannot disable the default camera.
Moving (PTZ) Enable the camera pan, tilt and zoom functionality if it is supported by
your camera, such as the XT Premium Camera. The camera must be
connected via a VISCA cable, as described in Connecting Cameras
for Controlling the Optional XT Premium Camera with the XT Remote
Control Unit on page 44.
Disable if you connected DVD devices or non-PTZ cameras.
White balance
mode
This is not relevant for USB cameras.
If the lighting in the room is not standard, you can adjust the colors of
the image sent by the camera:
•
To allow the camera to automatically adjust colors to room
lighting, set to Automatic.
•
To set the camera to adjust colors based on natural sunlight,
select Outdoor. This could be used, for example, in a room with
many large windows.
•
To set the camera to adjust colors based on artificial light, select
Indoor.
•
To calibrate colors manually, set to Manual, and adjust the Red
and Blue sliders.
•
To calibrate color temperature so that the image does not have
blue or red color undertones, set to Customize.
Backlight
compensation
Select to counteract silhouetting of subjects when the backlighting is
excessive.
Exposure
compensation
This is not relevant for USB cameras.
If the lighting in the room is excessive, enable and define exposure
compensation to manually reduce light intake.
Focus mode Set the camera focus:
•
To set the camera focus automatically, select Automatic.
•
To adjust the camera focus manually, select Manual, and set
the distance from the camera to the table.
Camera sharpness Adjust the sharpness of the image from your camera.
6. From the web interface only, select Save.
7. Configure the settings described in Table 20: Configuring advanced camera settings on page
99 for each camera you are using.
From the web interface only, select Save.
Installation Guide for Scopia XT5000 Endpoint with Embedded
Server for IP Office Version 3.2
Initial Configuration | 99