
Installation guide


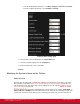


Table Of Contents
- Installation Guide for Scopia XT5000 Endpoint with Embedded Server for IP Office Version 3.2
- Table of Contents
- Chapter 1: About the Scopia XT Endpoint for IP Office
- Chapter 2: Installation Workflow for Scopia XT Endpoint for IP Office
- Chapter 3: Planning the Topology of the Scopia XT Endpoint for IP Office Deployment
- About the Scopia XT Endpoint for IP Office Embedded MCU
- Planning the Topology of Scopia XT Endpoint for IP Office with Scopia XT Desktop
- Planning NAT and Firewall Traversal with Scopia XT Endpoint for IP Office
- Supporting ISDN Connectivity
- Implementing External API Control
- Implementing Port Security for the Scopia XT Endpoint for IP Office
- Chapter 4: Prerequisites for Setting up the System
- Chapter 5: Setting up the Scopia XT Endpoint for IP Office
- Mounting the XT Codec Unit
- Connecting Scopia XT Endpoint for IP Office to Your Network
- Connecting a Computer to the Scopia XT Endpoint for IP Office
- Selecting the Computer Display Resolution
- Connecting Audio Equipment to the Scopia XT Endpoint for IP Office
- Connecting the Video Equipment to the Scopia XT Endpoint for IP Office
- Connecting the Primary XT Premium Camera
- Connecting the Optional USB Camera
- Connecting the Optional XT Premium Camera
- Connecting Cameras for Controlling the Optional XT Premium Camera with the XT Remote Control Unit
- Connecting the Optional Scopia XT Camera Switch
- Connecting a DVD or Blu-ray Player
- Connecting Analog Video Equipment
- Installing the Batteries of the XT Remote Control Unit
- Chapter 6: Initial Configuration
- How to Control the XT Endpoint
- Registering and Enabling your Scopia XT Endpoint for IP Office license
- Performing Basic Configuration
- Registering the XT Endpoint to IP Office
- Setting Basic System Information
- Configuring Video Connections
- Configuring Audio Connections
- Configuring Network Settings
- Chapter 7: Securing your Scopia XT Endpoint for IP Office
- Chapter 8: Troubleshooting the Scopia XT Endpoint for IP Office
Setting the Administrator PIN Code for the XT Endpoint
About this task
You can modify the administrator PIN code required to access and modify advanced settings, such as
defining camera or network settings. You can do this procedure from the endpoint itself or from the XT
Endpoint web interface.
The default PIN is 1234. We recommend that you change the administrator PIN when starting the
system configuration to prevent users from changing settings by mistake.
You can also set a user PIN code to access basic settings, such as the language displayed on the
interface, as described in Administrator Guide for Scopia XT Endpoint for IP Office. To modify the web
username and password for the XT Endpoint, see Administrator Guide for Scopia XT Endpoint for IP
Office.
Before you begin
If configuring from the endpoint, you must first enable advanced configuration, as described in
Maintaining the XT Endpoint Locally from the Endpoint on page 66.
To modify the PIN, you must be connected via HTTPS (see Enabling Remote Management on the
Scopia XT Endpoint for IP Office on page 56).
Procedure
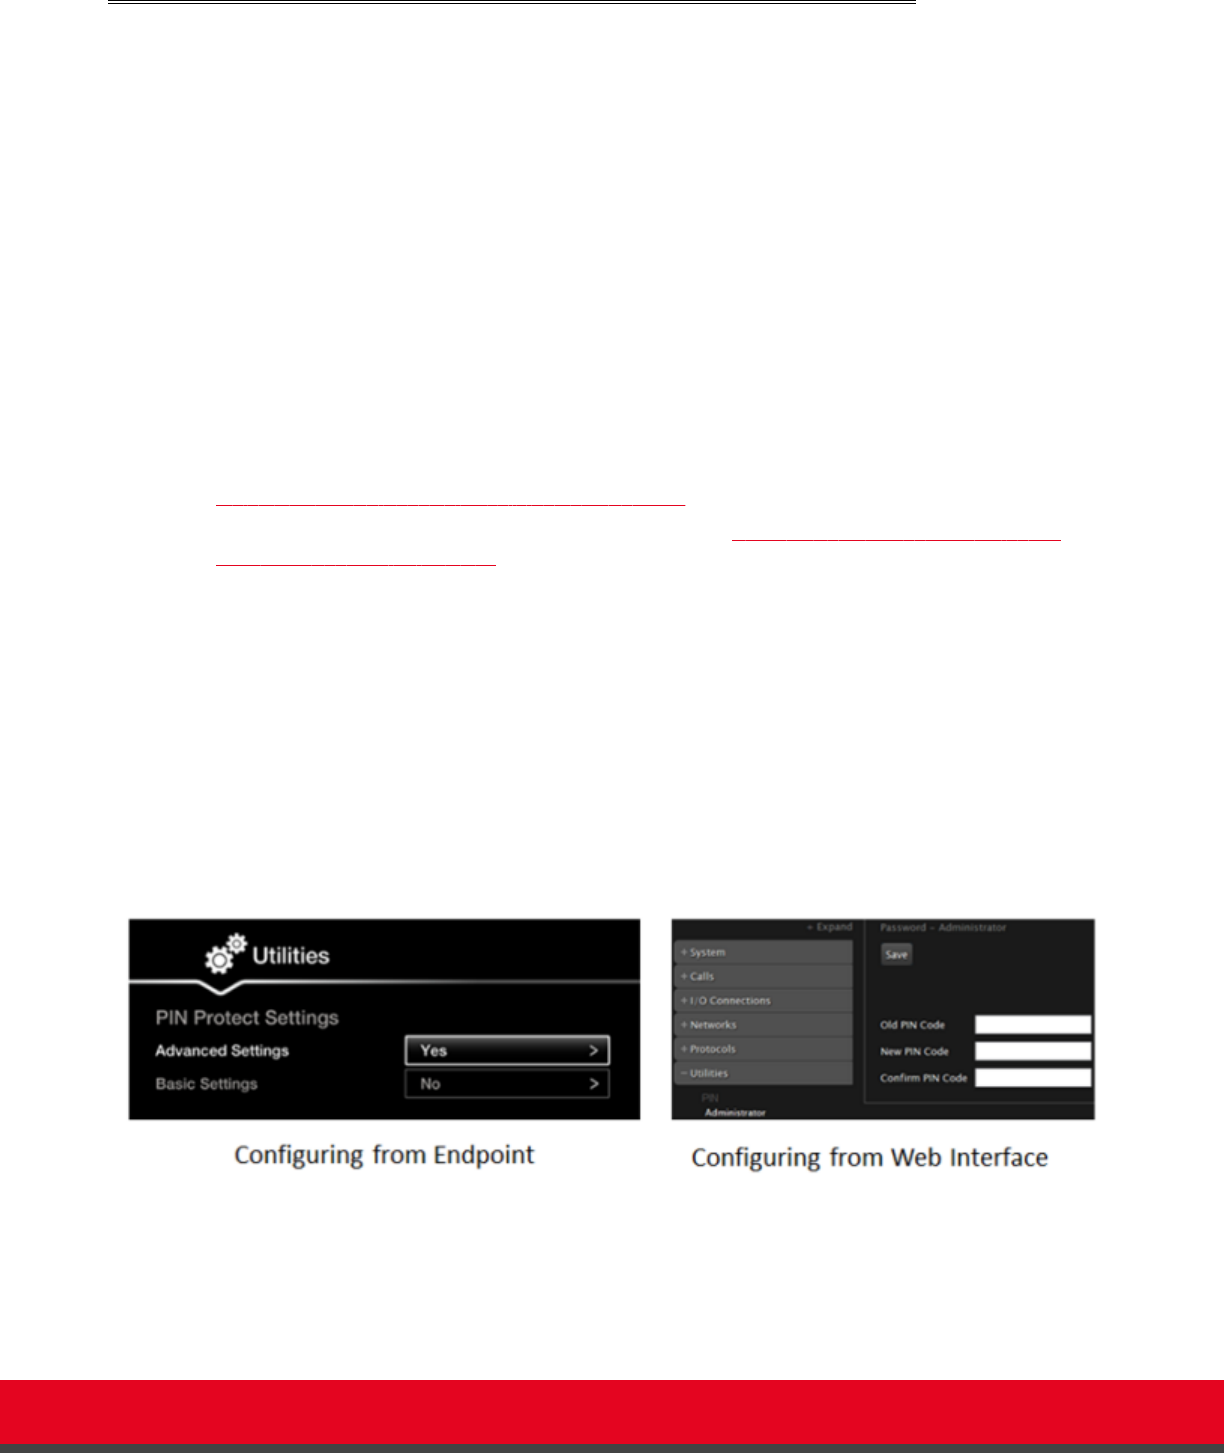
1. Access the PIN settings, as follows:
•
From the endpoint's main menu, select Configure > Advanced > Utilities > PIN
Protect Settings > Advanced Settings > Choose a new PIN Code.
You need to enter the PIN required to access the Advanced settings. The default PIN
is 1234.
•
From the XT Endpoint web interface, select Administrator Settings > Utilities > PIN
Protect Settings > Administrator.
Figure 53: Modifying the administrator PIN
2. Enter the current PIN code required to access the Advanced settings in the Old PIN Code
field. The default PIN is 1234.
3. Enter your new 4 digit PIN code.
Installation Guide for Scopia XT5000 Endpoint with Embedded
Server for IP Office Version 3.2
Initial Configuration | 89