
Installation guide
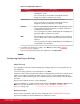


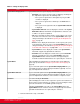

Table Of Contents
- Installation Guide for Scopia XT5000 Endpoint with Embedded Server for IP Office Version 3.2
- Table of Contents
- Chapter 1: About the Scopia XT Endpoint for IP Office
- Chapter 2: Installation Workflow for Scopia XT Endpoint for IP Office
- Chapter 3: Planning the Topology of the Scopia XT Endpoint for IP Office Deployment
- About the Scopia XT Endpoint for IP Office Embedded MCU
- Planning the Topology of Scopia XT Endpoint for IP Office with Scopia XT Desktop
- Planning NAT and Firewall Traversal with Scopia XT Endpoint for IP Office
- Supporting ISDN Connectivity
- Implementing External API Control
- Implementing Port Security for the Scopia XT Endpoint for IP Office
- Chapter 4: Prerequisites for Setting up the System
- Chapter 5: Setting up the Scopia XT Endpoint for IP Office
- Mounting the XT Codec Unit
- Connecting Scopia XT Endpoint for IP Office to Your Network
- Connecting a Computer to the Scopia XT Endpoint for IP Office
- Selecting the Computer Display Resolution
- Connecting Audio Equipment to the Scopia XT Endpoint for IP Office
- Connecting the Video Equipment to the Scopia XT Endpoint for IP Office
- Connecting the Primary XT Premium Camera
- Connecting the Optional USB Camera
- Connecting the Optional XT Premium Camera
- Connecting Cameras for Controlling the Optional XT Premium Camera with the XT Remote Control Unit
- Connecting the Optional Scopia XT Camera Switch
- Connecting a DVD or Blu-ray Player
- Connecting Analog Video Equipment
- Installing the Batteries of the XT Remote Control Unit
- Chapter 6: Initial Configuration
- How to Control the XT Endpoint
- Registering and Enabling your Scopia XT Endpoint for IP Office license
- Performing Basic Configuration
- Registering the XT Endpoint to IP Office
- Setting Basic System Information
- Configuring Video Connections
- Configuring Audio Connections
- Configuring Network Settings
- Chapter 7: Securing your Scopia XT Endpoint for IP Office
- Chapter 8: Troubleshooting the Scopia XT Endpoint for IP Office

Table 15: Setting the display name
Field Description
System Name Display Mode Select which name the system displays on the titlebar:
•
Automatic: The system selects the name to display by checking how
the endpoint was registered, in the following order:
–
If the system is registered to a SIP registrar or proxy, the SIP
username is displayed.
–
If the system is registered to a Gatekeeper, the H.323 name is
displayed.
–
If the system is not registered at all, the System Name Unicode
is displayed.
•
System Name Unicode: Select to display the contents of the System
Name Unicode field, which allows non-alphanumeric characters such
as Chinese or Japanese alphabets.
•
SIP: Select to display the SIP username, used to register your system
to the SIP server. This is the same as the System Name, unless you
change it manually as described in Registering the XT Endpoint to IP
Office on page 82.
•
H.323: Select to display the H.323 name, used to register your system
to the gatekeeper. This is the same as the System Name, unless you
change it manually as described in Registering the Scopia XT Endpoint
for IP Office with a Gatekeeper on page 120.
•
System Name: Select to display the contents of the System Name
field, which supports only alphanumeric characters.
•
Hostname: Select to display the contents of the system's Hostname
field. This is typically the same as the System Name, unless the
System Name includes characters that are not supported by the
hostname standard. Invalid characters are replaced by the - character.
System Name This field displays the initial name you entered for the system during the
quick setup (as described in Setting the System Name and Language on
page 76).
If you selected this option from the System Name Display Mode list, you
can modify the name you want to display in the titlebar (optional). You can
only enter alphanumeric characters.
System Name Unicode If you selected this option from the System Name Display Mode list, you
can modify the name you want to display in the titlebar (optional). You can
enter non-alphanumeric characters, such as Chinese or Japanese letters.
Hostname You cannot modify the Hostname.
This field displays the name used to register the system to the network. You
may need the system's hostname, for example, if you are locating the device
from a list of hostnames on an SNMP agent discovery tool.
Typically, the Hostname is the same as the System Name, unless the
System Name includes characters that are not supported by the hostname
standard. Invalid characters are replaced by the - character.
3. From the web interface only, select Save.
Installation Guide for Scopia XT5000 Endpoint with Embedded
Server for IP Office Version 3.2
Initial Configuration | 88