
Installation guide


Table Of Contents
- Installation Guide for Scopia XT5000 Endpoint with Embedded Server for IP Office Version 3.2
- Table of Contents
- Chapter 1: About the Scopia XT Endpoint for IP Office
- Chapter 2: Installation Workflow for Scopia XT Endpoint for IP Office
- Chapter 3: Planning the Topology of the Scopia XT Endpoint for IP Office Deployment
- About the Scopia XT Endpoint for IP Office Embedded MCU
- Planning the Topology of Scopia XT Endpoint for IP Office with Scopia XT Desktop
- Planning NAT and Firewall Traversal with Scopia XT Endpoint for IP Office
- Supporting ISDN Connectivity
- Implementing External API Control
- Implementing Port Security for the Scopia XT Endpoint for IP Office
- Chapter 4: Prerequisites for Setting up the System
- Chapter 5: Setting up the Scopia XT Endpoint for IP Office
- Mounting the XT Codec Unit
- Connecting Scopia XT Endpoint for IP Office to Your Network
- Connecting a Computer to the Scopia XT Endpoint for IP Office
- Selecting the Computer Display Resolution
- Connecting Audio Equipment to the Scopia XT Endpoint for IP Office
- Connecting the Video Equipment to the Scopia XT Endpoint for IP Office
- Connecting the Primary XT Premium Camera
- Connecting the Optional USB Camera
- Connecting the Optional XT Premium Camera
- Connecting Cameras for Controlling the Optional XT Premium Camera with the XT Remote Control Unit
- Connecting the Optional Scopia XT Camera Switch
- Connecting a DVD or Blu-ray Player
- Connecting Analog Video Equipment
- Installing the Batteries of the XT Remote Control Unit
- Chapter 6: Initial Configuration
- How to Control the XT Endpoint
- Registering and Enabling your Scopia XT Endpoint for IP Office license
- Performing Basic Configuration
- Registering the XT Endpoint to IP Office
- Setting Basic System Information
- Configuring Video Connections
- Configuring Audio Connections
- Configuring Network Settings
- Chapter 7: Securing your Scopia XT Endpoint for IP Office
- Chapter 8: Troubleshooting the Scopia XT Endpoint for IP Office
9. Connect one end of the power supply cable to the DC IN 12V connector on the camera, and
the other end into one of the power sockets on the wall.
10. Configure the cameras' settings as explained in Configuring the Camera Connection on page
95.
If required, connect the DVD or Blu-ray player to a socket on the Scopia XT Camera Switch
using an HDMI cable.
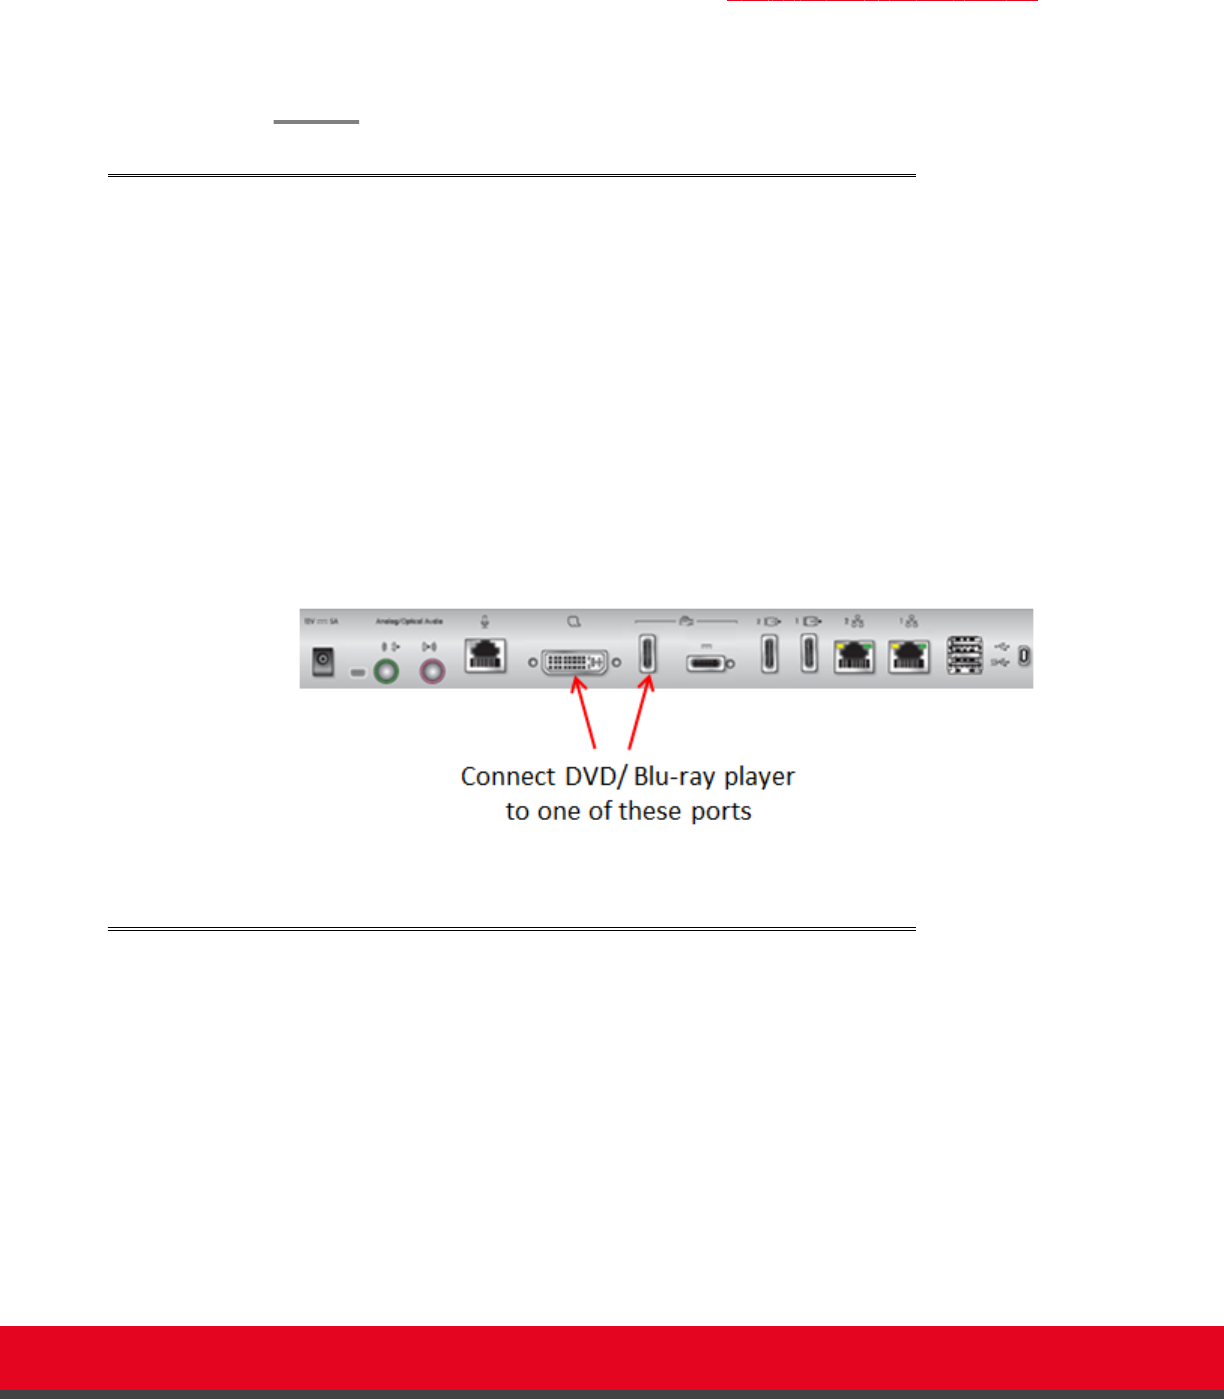
Connecting a DVD or Blu-ray Player
About this task
You can connect a DVD or Blu-ray player to the Scopia XT Endpoint for IP Office to share its content
during a videoconference. XT Endpoint supports High-bandwidth Digital Content Protection (HDCP):
•
You can only view digitally protected content on a device that supports HDCP.
•
You cannot view digitally protected content on a device that copies HDCP content.
•
You cannot send digitally protected content to non-HDCP devices.
•
If the XT Codec Unit detects that non-compliant devices are attached to one of the HD CAM inputs,
the video is locked.
Connect a DVD or Blu-ray player to the HD CAM or DVI inputs of the XT Codec Unit:
Figure 30: Connecting a DVD or Blu-ray Player
Connecting Analog Video Equipment
About this task
As an alternative to the XT Premium Camera, you can connect an analog video device, such as an
analog camera.
Before you begin
The XT Codec Unit features digital inputs and outputs. To connect an analog video device, you need an
external analog-to-digital (or vice-versa) video converter.
Installation Guide for Scopia XT5000 Endpoint with Embedded
Server for IP Office Version 3.2
Setting up the Scopia XT Endpoint for IP Office | 51