
Installation guide

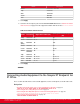

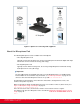


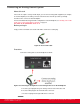

Table Of Contents
- Installation Guide for Scopia XT5000 Endpoint with Embedded Server for IP Office Version 3.2
- Table of Contents
- Chapter 1: About the Scopia XT Endpoint for IP Office
- Chapter 2: Installation Workflow for Scopia XT Endpoint for IP Office
- Chapter 3: Planning the Topology of the Scopia XT Endpoint for IP Office Deployment
- About the Scopia XT Endpoint for IP Office Embedded MCU
- Planning the Topology of Scopia XT Endpoint for IP Office with Scopia XT Desktop
- Planning NAT and Firewall Traversal with Scopia XT Endpoint for IP Office
- Supporting ISDN Connectivity
- Implementing External API Control
- Implementing Port Security for the Scopia XT Endpoint for IP Office
- Chapter 4: Prerequisites for Setting up the System
- Chapter 5: Setting up the Scopia XT Endpoint for IP Office
- Mounting the XT Codec Unit
- Connecting Scopia XT Endpoint for IP Office to Your Network
- Connecting a Computer to the Scopia XT Endpoint for IP Office
- Selecting the Computer Display Resolution
- Connecting Audio Equipment to the Scopia XT Endpoint for IP Office
- Connecting the Video Equipment to the Scopia XT Endpoint for IP Office
- Connecting the Primary XT Premium Camera
- Connecting the Optional USB Camera
- Connecting the Optional XT Premium Camera
- Connecting Cameras for Controlling the Optional XT Premium Camera with the XT Remote Control Unit
- Connecting the Optional Scopia XT Camera Switch
- Connecting a DVD or Blu-ray Player
- Connecting Analog Video Equipment
- Installing the Batteries of the XT Remote Control Unit
- Chapter 6: Initial Configuration
- How to Control the XT Endpoint
- Registering and Enabling your Scopia XT Endpoint for IP Office license
- Performing Basic Configuration
- Registering the XT Endpoint to IP Office
- Setting Basic System Information
- Configuring Video Connections
- Configuring Audio Connections
- Configuring Network Settings
- Chapter 7: Securing your Scopia XT Endpoint for IP Office
- Chapter 8: Troubleshooting the Scopia XT Endpoint for IP Office

Connecting the Video Equipment to the Scopia XT
Endpoint for IP Office
These sections describe how to connect the video devices to the XT Codec Unit.
Navigation
•
Connecting the Primary XT Premium Camera on page 40
•
Connecting the Optional USB Camera on page 42
•
Connecting the Optional XT Premium Camera on page 43
•
Connecting Cameras for Controlling the Optional XT Premium Camera with the XT Remote
Control Unit on page 44
•
Connecting the Optional Scopia XT Camera Switch on page 46
•
Connecting a DVD or Blu-ray Player on page 51
•
Connecting Analog Video Equipment on page 51
Connecting the Primary XT Premium Camera
About this task
This procedure describes how to connect the primary XT Premium Camera to the XT Endpoint.
You can control and include more than one HDMI camera in your video by connecting them to the
Scopia XT Camera Switch (purchased separately). Multiple cameras are typically used for larger
meeting rooms or auditoriums. For example, you may want to zoom one camera to focus on the
speaker, and use another camera for the audience. Connecting the Scopia XT Camera Switch also
allows you use multiple cameras while still keeping the DVI port open to connect a computer and share
content. For more information about connecting the Scopia XT Camera Switch, see Connecting the
Optional Scopia XT Camera Switch on page 46.
For details about the camera's capabilities, see Technical Specifications on page 8.
Procedure
1. Place the camera in a position to ensure eye contact between local and remote participants.
We recommend positioning the camera either directly below or directly above the monitors, in
central position, at a distance which enables capture of the entire table. For the USB camera,
we recommend placing the camera and adjusting the zoom so that the frame is filled with the
head and upper body of the user.
For more information about the room setup, see Planning the Optimal Conference Room
Setup on page 25.
Caution:
Do not place the camera on top of the XT Codec Unit. It can cause the system to overheat.
2. Remove the camera stabilizing cartons.
Installation Guide for Scopia XT5000 Endpoint with Embedded
Server for IP Office Version 3.2
Setting up the Scopia XT Endpoint for IP Office | 40