
Installation guide


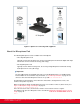


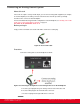

Table Of Contents
- Installation Guide for Scopia XT5000 Endpoint with Embedded Server for IP Office Version 3.2
- Table of Contents
- Chapter 1: About the Scopia XT Endpoint for IP Office
- Chapter 2: Installation Workflow for Scopia XT Endpoint for IP Office
- Chapter 3: Planning the Topology of the Scopia XT Endpoint for IP Office Deployment
- About the Scopia XT Endpoint for IP Office Embedded MCU
- Planning the Topology of Scopia XT Endpoint for IP Office with Scopia XT Desktop
- Planning NAT and Firewall Traversal with Scopia XT Endpoint for IP Office
- Supporting ISDN Connectivity
- Implementing External API Control
- Implementing Port Security for the Scopia XT Endpoint for IP Office
- Chapter 4: Prerequisites for Setting up the System
- Chapter 5: Setting up the Scopia XT Endpoint for IP Office
- Mounting the XT Codec Unit
- Connecting Scopia XT Endpoint for IP Office to Your Network
- Connecting a Computer to the Scopia XT Endpoint for IP Office
- Selecting the Computer Display Resolution
- Connecting Audio Equipment to the Scopia XT Endpoint for IP Office
- Connecting the Video Equipment to the Scopia XT Endpoint for IP Office
- Connecting the Primary XT Premium Camera
- Connecting the Optional USB Camera
- Connecting the Optional XT Premium Camera
- Connecting Cameras for Controlling the Optional XT Premium Camera with the XT Remote Control Unit
- Connecting the Optional Scopia XT Camera Switch
- Connecting a DVD or Blu-ray Player
- Connecting Analog Video Equipment
- Installing the Batteries of the XT Remote Control Unit
- Chapter 6: Initial Configuration
- How to Control the XT Endpoint
- Registering and Enabling your Scopia XT Endpoint for IP Office license
- Performing Basic Configuration
- Registering the XT Endpoint to IP Office
- Setting Basic System Information
- Configuring Video Connections
- Configuring Audio Connections
- Configuring Network Settings
- Chapter 7: Securing your Scopia XT Endpoint for IP Office
- Chapter 8: Troubleshooting the Scopia XT Endpoint for IP Office

Connecting the One-Way Microphone Pod and other Analog
Microphones
About this task
You can connect the one-way Microphone Pod. For details about the Microphone Pod, see
About the
Microphone Pod on page 34.
When the Microphone Pod is not sufficient for covering the room, you can use an external analog/optical
microphone. This is typically only done for large-room configurations.
When connecting either the one-way Microphone Pod or another analog/optical microphone, you cannot
share audio content from your PC with remote participants, since the port used to connect your PC's
audio output is also used to connect an external microphone. To hear both the audio from your computer
and the Microphone Pod, either connect the three-way Microphone Pod and your computer output, or
use an external mixer device.
Important:
The XT Codec Unit’s analog audio input supports either a balanced or unbalanced line microphone. A
balanced line microphone reduces audio disruptions from other devices such as cellular phones.
For more information about typical audio configurations for the XT Endpoint, see Deciding on the Audio
Setup for the Scopia XT Endpoint for IP Office on page 33. To connect the three-way Microphone Pod,
see Connecting the Three-Way Microphone Pod on page 35.
Before you begin
•
For optimal results, place the Microphone Pod as described in Planning the Optimal Conference
Room Setup on page 25.
•
For very large conference rooms using multiple microphones, or to share both audio output from
the computer and audio from the microphone during a call, you need to acquire audio mixers from
third-parties. An audio mixer can connect multiple microphones, mix them, cancel the echo and
generate a single audio stream that feeds into the audio inputs of your XT Codec Unit.
You can use, for example, Clear One audio mixers, which have been tested with the XT Endpoint:
http://www.clearone.com/professional_conference_system.html
Make sure the microphone mixer provides these connectors: an analog audio I/O (mini jack 3.5”)
connector and a digital optical connector with a mini-TOSlink adapter.
Procedure
1. Connect the one-way Microphone Pod to the analog audio input (Figure 15: Connecting the
one-way Microphone Pod on page 38).
Installation Guide for Scopia XT5000 Endpoint with Embedded
Server for IP Office Version 3.2
Setting up the Scopia XT Endpoint for IP Office | 37