
Installation guide


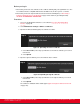
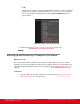
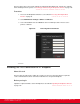
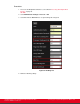
Table Of Contents
- Installation Guide for Scopia XT5000 Endpoint with Embedded Server for IP Office Version 3.2
- Table of Contents
- Chapter 1: About the Scopia XT Endpoint for IP Office
- Chapter 2: Installation Workflow for Scopia XT Endpoint for IP Office
- Chapter 3: Planning the Topology of the Scopia XT Endpoint for IP Office Deployment
- About the Scopia XT Endpoint for IP Office Embedded MCU
- Planning the Topology of Scopia XT Endpoint for IP Office with Scopia XT Desktop
- Planning NAT and Firewall Traversal with Scopia XT Endpoint for IP Office
- Supporting ISDN Connectivity
- Implementing External API Control
- Implementing Port Security for the Scopia XT Endpoint for IP Office
- Chapter 4: Prerequisites for Setting up the System
- Chapter 5: Setting up the Scopia XT Endpoint for IP Office
- Mounting the XT Codec Unit
- Connecting Scopia XT Endpoint for IP Office to Your Network
- Connecting a Computer to the Scopia XT Endpoint for IP Office
- Selecting the Computer Display Resolution
- Connecting Audio Equipment to the Scopia XT Endpoint for IP Office
- Connecting the Video Equipment to the Scopia XT Endpoint for IP Office
- Connecting the Primary XT Premium Camera
- Connecting the Optional USB Camera
- Connecting the Optional XT Premium Camera
- Connecting Cameras for Controlling the Optional XT Premium Camera with the XT Remote Control Unit
- Connecting the Optional Scopia XT Camera Switch
- Connecting a DVD or Blu-ray Player
- Connecting Analog Video Equipment
- Installing the Batteries of the XT Remote Control Unit
- Chapter 6: Initial Configuration
- How to Control the XT Endpoint
- Registering and Enabling your Scopia XT Endpoint for IP Office license
- Performing Basic Configuration
- Registering the XT Endpoint to IP Office
- Setting Basic System Information
- Configuring Video Connections
- Configuring Audio Connections
- Configuring Network Settings
- Chapter 7: Securing your Scopia XT Endpoint for IP Office
- Chapter 8: Troubleshooting the Scopia XT Endpoint for IP Office

3. Perform Uploading XT Endpoint Certificates on page 134.
4. Perform Enabling the TLS Connection in XT Endpoint on page 138 .
5. To encrypt the media (audio, video, presentation) of videoconferences using the SRTP protocol,
perform Enabling Encryption for Videoconferences on page 140.
Generating a Certificate Signing Request for XT Endpoint
About this task
This section details how to generate a certificate signing request (CSR) for the XT Endpoint, which must
be signed by a certificate authority (CA). This is done from the web interface only.
Once properly signed, the certificate would confirm the identity of the XT Endpoint to other components
in the network, and can also facilitate encrypted communications with those components.
Important:
If you modify the XT Endpoint's IP address, you must generate a new CSR.
To restore previously uploaded certificates, see
Backing Up and Restoring XT Endpoint Certificates on
page 136. To delete the certificates, see Deleting XT Endpoint Certificates on page 137.
Important:
Using encryption is subject to local regulation. In some countries it is restricted or limited for usage.
For more information, consult your local reseller.
Before you begin
To secure SIP connections using TLS certificates, your system must have a static IP address, since the
system generates the certificate request using its IP address as the Common Name (CN). For more
information, see
Configuring IP Addresses on page 113.
Procedure
1. Access the XT Endpoint web interface, as described in Accessing XT Endpoint Web
Interface on page 55.
2. Select Administrator Settings > Utilities > Certificates.
3. Enter your organization's details and your email.
Installation Guide for Scopia XT5000 Endpoint with Embedded
Server for IP Office Version 3.2
Securing your Scopia XT Endpoint for IP Office | 132