
Installation guide
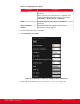


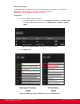
Table Of Contents
- Installation Guide for Scopia XT5000 Endpoint with Embedded Server for IP Office Version 3.2
- Table of Contents
- Chapter 1: About the Scopia XT Endpoint for IP Office
- Chapter 2: Installation Workflow for Scopia XT Endpoint for IP Office
- Chapter 3: Planning the Topology of the Scopia XT Endpoint for IP Office Deployment
- About the Scopia XT Endpoint for IP Office Embedded MCU
- Planning the Topology of Scopia XT Endpoint for IP Office with Scopia XT Desktop
- Planning NAT and Firewall Traversal with Scopia XT Endpoint for IP Office
- Supporting ISDN Connectivity
- Implementing External API Control
- Implementing Port Security for the Scopia XT Endpoint for IP Office
- Chapter 4: Prerequisites for Setting up the System
- Chapter 5: Setting up the Scopia XT Endpoint for IP Office
- Mounting the XT Codec Unit
- Connecting Scopia XT Endpoint for IP Office to Your Network
- Connecting a Computer to the Scopia XT Endpoint for IP Office
- Selecting the Computer Display Resolution
- Connecting Audio Equipment to the Scopia XT Endpoint for IP Office
- Connecting the Video Equipment to the Scopia XT Endpoint for IP Office
- Connecting the Primary XT Premium Camera
- Connecting the Optional USB Camera
- Connecting the Optional XT Premium Camera
- Connecting Cameras for Controlling the Optional XT Premium Camera with the XT Remote Control Unit
- Connecting the Optional Scopia XT Camera Switch
- Connecting a DVD or Blu-ray Player
- Connecting Analog Video Equipment
- Installing the Batteries of the XT Remote Control Unit
- Chapter 6: Initial Configuration
- How to Control the XT Endpoint
- Registering and Enabling your Scopia XT Endpoint for IP Office license
- Performing Basic Configuration
- Registering the XT Endpoint to IP Office
- Setting Basic System Information
- Configuring Video Connections
- Configuring Audio Connections
- Configuring Network Settings
- Chapter 7: Securing your Scopia XT Endpoint for IP Office
- Chapter 8: Troubleshooting the Scopia XT Endpoint for IP Office
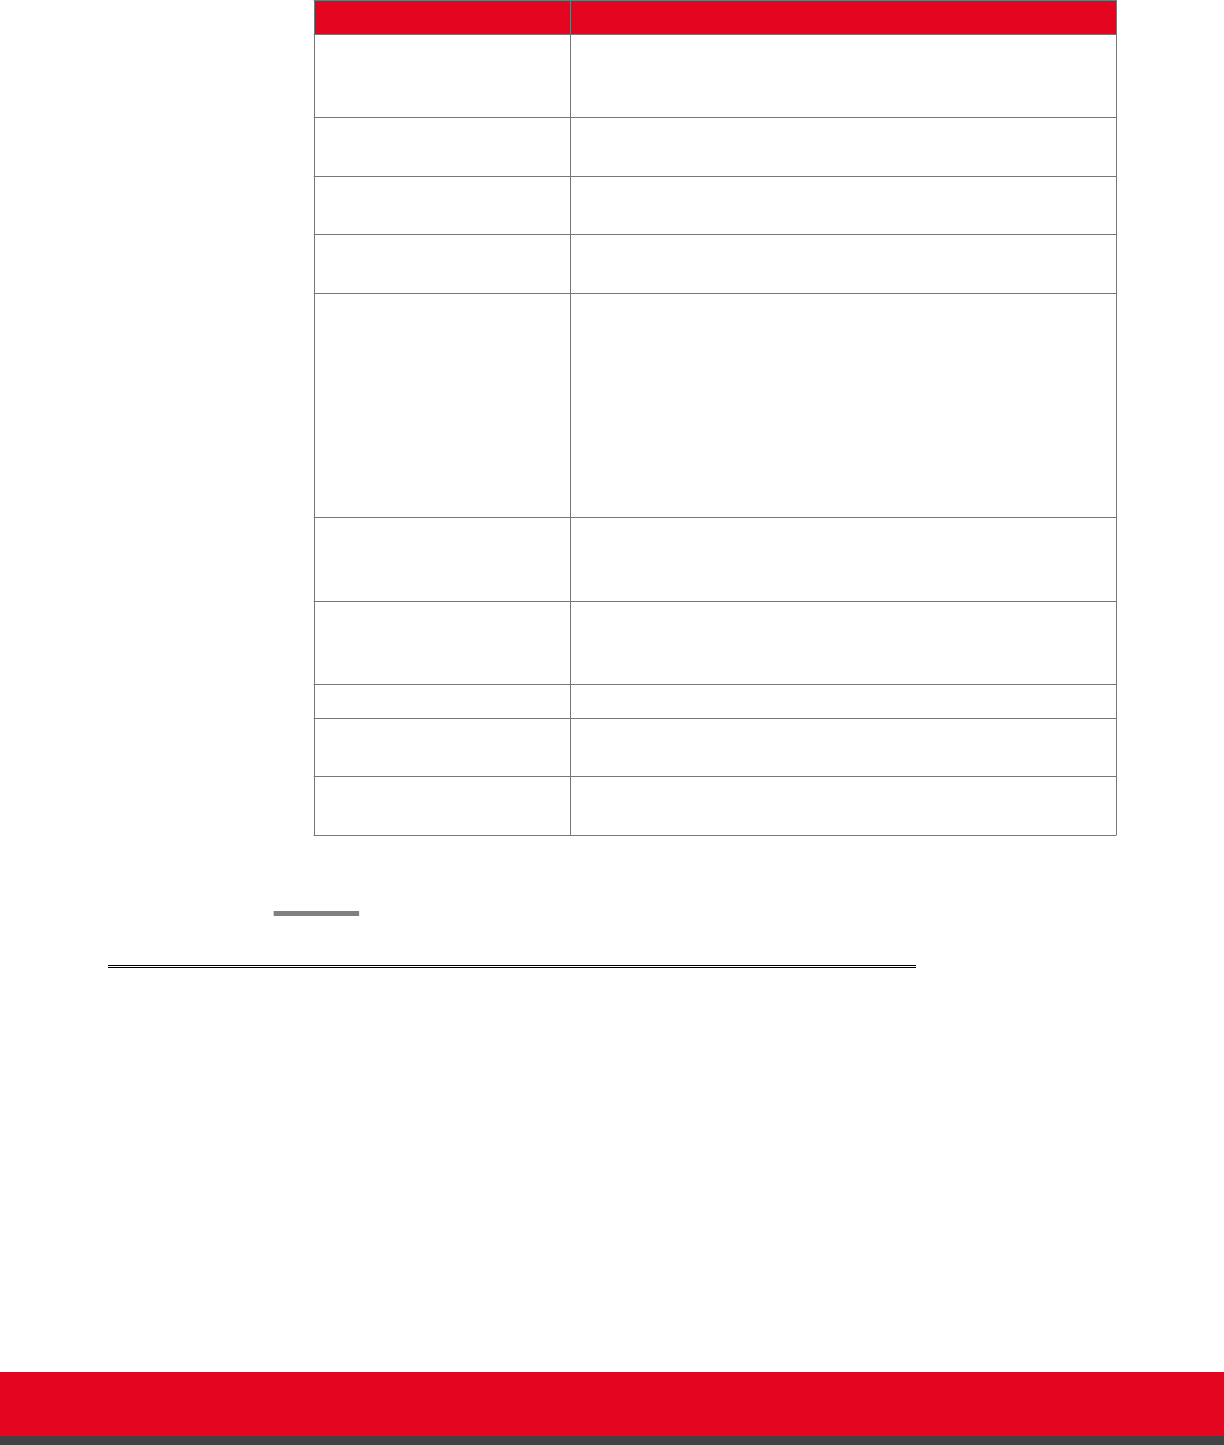
Table 32: Configuring the gatekeeper
Field Name Description
Use gatekeeper Enables/disables the use of a gatekeeper. If No is selected, all
the other fields are greyed. If Yes is selected, the XT Codec
Unit can use the gatekeeper’s services.
Automatic IP address Automatic gatekeeper discovery. The XT Codec Unit
searches for an available gatekeeper.
IP address Enter the IP address of the gatekeeper, if you do not use
Automatic IP address.
Use H.460 If set to Yes, the system uses H.460 firewall traversal
features.
Re-registration interval
time
This option is normally off and must be enabled only if the XT
Codec Unit administrator is sure that the gatekeeper sends
the IRQ messages (see the Gatekeeper's documentation for
more information).
Enter the time (in seconds) after which the system should re-
register to the gatekeeper because the registration state was
lost. This field is useful if you do not want to use the normal
RAS lightweight registration procedure.
Authentication If Authentication is enabled, the related fields must be
defined. If it is not enabled, the four text fields (Mode, Gatek.
ID, User name, Password) are greyed.
Mode Automatic, MD5, H.235 annex D - If set to Automatic, the
XT Codec Unit selects the best mode according to the
gatekeeper.
Gatek. ID Gatekeeper H.323 identifier. Ask the network administrator.
User name The network administrator must pre-configure the User name
in the gatekeeper.
Password The network administrator must pre-configure the Password
in the gatekeeper.
6. From the web interface only, select Save.
Configuring Call Settings
About this task
To allow incoming and outgoing calls, configure the following system settings according to your network
requirements, as described in this procedure:
•
Network's preferred GLAN
•
Call settings, such as defining calls as audio-only, or specifying the call rate
•
IP settings, such as determining whether the XT Codec Unit checks the source of audio and video
data packets
Installation Guide for Scopia XT5000 Endpoint with Embedded
Server for IP Office Version 3.2
Initial Configuration | 123