
Installation guide


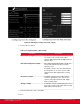
Table Of Contents
- Installation Guide for Scopia XT5000 Endpoint with Embedded Server for IP Office Version 3.2
- Table of Contents
- Chapter 1: About the Scopia XT Endpoint for IP Office
- Chapter 2: Installation Workflow for Scopia XT Endpoint for IP Office
- Chapter 3: Planning the Topology of the Scopia XT Endpoint for IP Office Deployment
- About the Scopia XT Endpoint for IP Office Embedded MCU
- Planning the Topology of Scopia XT Endpoint for IP Office with Scopia XT Desktop
- Planning NAT and Firewall Traversal with Scopia XT Endpoint for IP Office
- Supporting ISDN Connectivity
- Implementing External API Control
- Implementing Port Security for the Scopia XT Endpoint for IP Office
- Chapter 4: Prerequisites for Setting up the System
- Chapter 5: Setting up the Scopia XT Endpoint for IP Office
- Mounting the XT Codec Unit
- Connecting Scopia XT Endpoint for IP Office to Your Network
- Connecting a Computer to the Scopia XT Endpoint for IP Office
- Selecting the Computer Display Resolution
- Connecting Audio Equipment to the Scopia XT Endpoint for IP Office
- Connecting the Video Equipment to the Scopia XT Endpoint for IP Office
- Connecting the Primary XT Premium Camera
- Connecting the Optional USB Camera
- Connecting the Optional XT Premium Camera
- Connecting Cameras for Controlling the Optional XT Premium Camera with the XT Remote Control Unit
- Connecting the Optional Scopia XT Camera Switch
- Connecting a DVD or Blu-ray Player
- Connecting Analog Video Equipment
- Installing the Batteries of the XT Remote Control Unit
- Chapter 6: Initial Configuration
- How to Control the XT Endpoint
- Registering and Enabling your Scopia XT Endpoint for IP Office license
- Performing Basic Configuration
- Registering the XT Endpoint to IP Office
- Setting Basic System Information
- Configuring Video Connections
- Configuring Audio Connections
- Configuring Network Settings
- Chapter 7: Securing your Scopia XT Endpoint for IP Office
- Chapter 8: Troubleshooting the Scopia XT Endpoint for IP Office

and outputs forms a matrix, which is depicted in the Scopia XT Endpoint for IP Office system menus
(Figure 64: Defining the routing of the audio outputs on page 110).
Sources of audio input include the following:
•
XT Digital Microphone Array Pods
•
Analog audio input
•
Remote audio coming from other participants in the videoconference
Important:
The audio from the analog inputs and microphones can be mixed and echo-cancelled, and routed to
one or more of the following audio outputs:
•
Monitor speakers or other device connected to the HD1 port with an HDMI cable.
•
The analog output or the analog/optical port connected to a speaker or a device like a recorder.
A typical audio configuration, depicted in
Figure 64: Defining the routing of the audio outputs on page
110, would be:
•
Route the remote audio to the speakers of one of the monitors (HD1), so you can hear the other
conference participants.
•
Typically, you do not route the local microphone to a speaker, since you can hear your own voices
in the room. This will avoid feedback loops.
•
If you are showing a presentation on your computer and it includes sound, route the sound of the
computer to the analog input connector.
Before you begin
If configuring from the endpoint, you must first enable advanced configuration, as described in
Maintaining the XT Endpoint Locally from the Endpoint on page 66.
Procedure
1. Access the audio output settings as follows:
•
From the endpoint's main menu, select Configure > Advanced > I/O connections >
Audio - Outputs > General.
•
From the XT Endpoint web interface, select Administrator settings > I/O
connections > Audio - Outputs > General.
Installation Guide for Scopia XT5000 Endpoint with Embedded
Server for IP Office Version 3.2
Initial Configuration | 109