
Installation guide
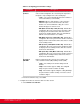

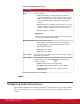


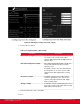
Table Of Contents
- Installation Guide for Scopia XT5000 Endpoint with Embedded Server for IP Office Version 3.2
- Table of Contents
- Chapter 1: About the Scopia XT Endpoint for IP Office
- Chapter 2: Installation Workflow for Scopia XT Endpoint for IP Office
- Chapter 3: Planning the Topology of the Scopia XT Endpoint for IP Office Deployment
- About the Scopia XT Endpoint for IP Office Embedded MCU
- Planning the Topology of Scopia XT Endpoint for IP Office with Scopia XT Desktop
- Planning NAT and Firewall Traversal with Scopia XT Endpoint for IP Office
- Supporting ISDN Connectivity
- Implementing External API Control
- Implementing Port Security for the Scopia XT Endpoint for IP Office
- Chapter 4: Prerequisites for Setting up the System
- Chapter 5: Setting up the Scopia XT Endpoint for IP Office
- Mounting the XT Codec Unit
- Connecting Scopia XT Endpoint for IP Office to Your Network
- Connecting a Computer to the Scopia XT Endpoint for IP Office
- Selecting the Computer Display Resolution
- Connecting Audio Equipment to the Scopia XT Endpoint for IP Office
- Connecting the Video Equipment to the Scopia XT Endpoint for IP Office
- Connecting the Primary XT Premium Camera
- Connecting the Optional USB Camera
- Connecting the Optional XT Premium Camera
- Connecting Cameras for Controlling the Optional XT Premium Camera with the XT Remote Control Unit
- Connecting the Optional Scopia XT Camera Switch
- Connecting a DVD or Blu-ray Player
- Connecting Analog Video Equipment
- Installing the Batteries of the XT Remote Control Unit
- Chapter 6: Initial Configuration
- How to Control the XT Endpoint
- Registering and Enabling your Scopia XT Endpoint for IP Office license
- Performing Basic Configuration
- Registering the XT Endpoint to IP Office
- Setting Basic System Information
- Configuring Video Connections
- Configuring Audio Connections
- Configuring Network Settings
- Chapter 7: Securing your Scopia XT Endpoint for IP Office
- Chapter 8: Troubleshooting the Scopia XT Endpoint for IP Office

Field Name Description
Type In a standalone microphone, power and audio can be supplied over
the same wires; power is drawn from an external source but without a
separate power supply. This is called phantom power.
A built-in microphone, such as in a computer or the Scopia XT
Executive, does not need phantom power since it gets power from
the device itself, using the computer as its external power source, for
example.
When configuring these settings, verify the audio equipment
connection method: a balanced line reduces external noise
interference and allows to use very long cables.
Choose one of these settings:
•
Line - Select this option for an analog audio input without
phantom power. Then set the Mode field to Stereo or Mono
input (see below).
•
Microphone - Select this option if the analog audio is coming
from an analog balanced microphone that is using phantom
power.
Mode You can configure this field if you selected the Line setting. Choose
one of these options:
•
Stereo - The input is an L/R stereo unbalanced line without
phantom power.
•
Mono - The input is a mono balanced line without phantom
power.
3. From the web interface only, select Save.
4. (Optional) If you selected Analog associated with DVI as the Audio selection (see Table
24: Configuring analog audio connections on page 107), verify the DVI video input is enabled
as described below.
The remote endpoint hears the computer's audio.
a. Access the DVI settings as follows:
•
From the endpoint's main menu, select Configure > Advanced > I/O
Connections > Cameras > DVI.
•
From the XT Endpoint web interface, select Administrator Settings > I/O
Connections > Cameras > DVI.
b. Verify that Enabled is set to Yes.
Configuring Audio Outputs
About this task
The Scopia XT Endpoint for IP Office allows you to combine audio from various inputs such as the XT
Digital Microphone Array Pod, and route it to available audio outputs. The possible combination of inputs
Installation Guide for Scopia XT5000 Endpoint with Embedded
Server for IP Office Version 3.2
Initial Configuration | 108