
Installation guide
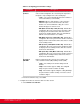

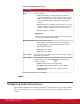


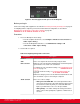
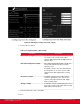
Table Of Contents
- Installation Guide for Scopia XT5000 Endpoint with Embedded Server for IP Office Version 3.2
- Table of Contents
- Chapter 1: About the Scopia XT Endpoint for IP Office
- Chapter 2: Installation Workflow for Scopia XT Endpoint for IP Office
- Chapter 3: Planning the Topology of the Scopia XT Endpoint for IP Office Deployment
- About the Scopia XT Endpoint for IP Office Embedded MCU
- Planning the Topology of Scopia XT Endpoint for IP Office with Scopia XT Desktop
- Planning NAT and Firewall Traversal with Scopia XT Endpoint for IP Office
- Supporting ISDN Connectivity
- Implementing External API Control
- Implementing Port Security for the Scopia XT Endpoint for IP Office
- Chapter 4: Prerequisites for Setting up the System
- Chapter 5: Setting up the Scopia XT Endpoint for IP Office
- Mounting the XT Codec Unit
- Connecting Scopia XT Endpoint for IP Office to Your Network
- Connecting a Computer to the Scopia XT Endpoint for IP Office
- Selecting the Computer Display Resolution
- Connecting Audio Equipment to the Scopia XT Endpoint for IP Office
- Connecting the Video Equipment to the Scopia XT Endpoint for IP Office
- Connecting the Primary XT Premium Camera
- Connecting the Optional USB Camera
- Connecting the Optional XT Premium Camera
- Connecting Cameras for Controlling the Optional XT Premium Camera with the XT Remote Control Unit
- Connecting the Optional Scopia XT Camera Switch
- Connecting a DVD or Blu-ray Player
- Connecting Analog Video Equipment
- Installing the Batteries of the XT Remote Control Unit
- Chapter 6: Initial Configuration
- How to Control the XT Endpoint
- Registering and Enabling your Scopia XT Endpoint for IP Office license
- Performing Basic Configuration
- Registering the XT Endpoint to IP Office
- Setting Basic System Information
- Configuring Video Connections
- Configuring Audio Connections
- Configuring Network Settings
- Chapter 7: Securing your Scopia XT Endpoint for IP Office
- Chapter 8: Troubleshooting the Scopia XT Endpoint for IP Office

Table 22: Configuring PIP-PaP option
Field Name Description
Multi Image
Mode
Sets PIP and PaP activation, depending on the number of video
streams available.
•
auto: PIP and PaP are enabled only when needed. This
occurs when the number of video streams is greater than the
number of available monitors. The order of the video streams
is set automatically, with precedence to the remote video
streams.
•
On: PIP and PaP are enabled if at least two video streams are
available. If there is one video stream, the image shows in full
screen (for example, when the system is not connected).
•
Off: PIP and PaP are disabled.
Important:
When you are using two monitors, PIP can be forced only if there
are at least three different video streams.
Multi Image Type Sets the PIP and PaP functions.
•
auto: Both PIP, PaP and PoP functions are enabled. Press
the Layout key to switch between PIP, PaP and PoP.
•
PIP: Only PIP is enabled.
•
PaP: Only PaP is enabled.
•
PoP: Only PoP is enabled.
PIP - Position Sets the position of the small image on the monitor: upper left, upper
right, lower left, lower right.
PIP - Rotation Enables/disables image rotation and controls the direction in which
the image rotates. Press the Layout key to activate image
rotation (if enabled).
•
Fixed: The image does not change position.
•
Clockwise: Image rotates clockwise to change position.
•
Counterclockwise: Image rotates counterclockwise to
change position.
c. From the web interface only, select Save.
Configuring Audio Connections
Part of the initial configuration is ensuring the microphones and speakers are set up correctly, and that
there is no noticeable echo across connections in a call or conference. The settings are detailed in these
sections:
Installation Guide for Scopia XT5000 Endpoint with Embedded
Server for IP Office Version 3.2
Initial Configuration | 104