
Installation guide

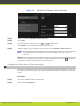
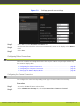
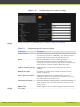
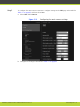
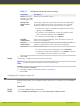
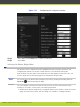

Table 5-7 Configuring advanced camera settings
Field Name Description
Enable (this field
appears on the HD2
and DVI pages only)
Enable for the optional camera.
Moving (PTZ) If necessary, enable the camera pan, tilt and zoom functionality.
White balance
mode
In case the lighting in the room is not sufficient, you can make
adjustments to the colors of the image sent by the camera.
•
To allow the camera to automatically adjusts colors to room
lighting, set to Automatic.
•
To calibrate color temperature so that the image is neither
blue nor red color prevails, set to Customize.
•
To calibrate colors manually, set to Manual.
Backlight
compensation
If there is excessive backlighting, select this option to filter out
some of the backlighting.
Exposure
compensation
In case the lighting in the room is excessive, enable and define
exposure compensation to filter out some of the lighting.
Focus mode Set the camera focus:
•
To set the camera focus automatically, select Automatic.
•
To adjust the camera focus manually, select Manual, and then
set the distance from the cameras to the table.
c. Select Save.
Step 6
If necessary, configure the optional camera connection:
Note
An optional camera is available for selected models only.
a. Select DVI under Cameras.
b. Configure settings as described in Table 5-7 on page 43.
c. Select Save.
Configuring the Computer Connection
Perform this procedure if you configure a device connected to a computer to your SCOPIA XT
Series.
Procedure
Step 1
Access the SCOPIA XT Series web interface.
Step 2
In the Administrator Settings tab, select I/O connections > Cameras > DVI.
RADVISION | Installation Guide for SCOPIA XT4000 Series Version 3.0 Initial Configuration | 43