
Installation guide

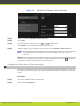
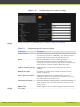
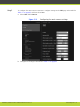
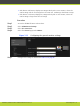

Figure 5-9 Settings general user settings
Step 3
Select Yes from the Automatic screensaver list.
Step 4
Set the time after which the screen saver automatically starts on the display in the Minutes
field.
Step 5
Select Save.
Configuring Video Connections
There are a number of settings which affect the way the camera accepts input and the way
the monitors display video.
•
Configuring the Camera Connection..................................................... page 40
•
Configuring the Computer Connection................................................... page 43
•
Setting up the Monitor Display Modes.................................................... page 44
Configuring the Camera Connection
You configure the connection depending on the type of camera and its functionality.
Procedure
Step 1
Access the SCOPIA XT Series web interface.
Step 2
In the Administrator Settings tab, select I/O connections > Cameras > General.
RADVISION | Installation Guide for SCOPIA XT4000 Series Version 3.0 Initial Configuration | 40