
Installation guide
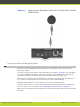
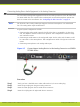
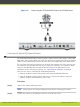
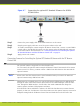
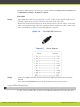
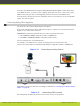
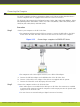


Figure 4-6 Connecting the XT Standard II Camera for XT5000 Series
Connecting the Optional XT Standard II Camera
The XT Standard II Camera kit contains a camera, remote control, power supply, 5-meter DVI-
HDVI cable, and 10-meter VISCA cross cable. The kit does not contain cables since the optional
camera location and distance from the XT Codec Unit varies significantly across installations.
You can connect the optional camera to the XT Codec Unit together with other devices to get
the number of video streams that best fit your conference. Typically, you connect the main
camera to the HD CAM connector and the optional camera to the DVI connector. For
information about connecting a computer, see “Connecting the Computer” on page 24.
There are two ways of controlling the XT Standard II Camera:
•
Using the XT Remote Control Unit provided with the XT Standard II Camera kit.
•
Using the XT Remote Control Unit. In that case you control both cameras, main and
optional, using the same XT Remote Control Unit.
Procedure
Step 1
Remove the camera stabilizing cartons.
Note
Always remove the camera stabilizing cartons before connecting the camera.
Step 2
Connect the camera to the DVI Input connector on the XT Codec Unit:
RADVISION | Installation Guide for SCOPIA XT4000 Series Version 3.0 Setting up the SCOPIA XT Series | 20